 As discussed yesterday, you may have this lesson as a finishing off lesson. Please ensure that all work from the skills development section is completed and uploaded, and that your website is suitably organized, ready to be marked at the start of next week. If you need any help with any of the previous tasks, you can access all lessons by clicking the lessons blog page at the top of this page, and scroll through all of the guidance you have had for each lesson for reference.  If you are totally finished, you may start to consider the first project which is called 'Journeys'.
Explore what photographers have done under this title previously, by creating a combined mindmap and collage on word/publisher/other and save it for reference later. I also recommend signing up to Pinterest and starting a board called 'Journeys', and pinning images that inspire you within the subject.
0 Comments

 
 Annotate your composition photos. Add a title: HOMEWORK: Composition photographs Insert a text box above your gallery. In the text box, write a paragraph to summarise the homework task and analyse the changes that occur as a result of different composition. Which composition do you prefer and why? What did you learn through this task? Sentence starters to help if you need them. You can copy and paste them, then fill in the gaps if you wish. For this homework task I had to... I took my photographs in.... (where?) Something I found tricky was... something I learnt by doing this task is... Next, upload your photos by clicking on the gallery and finding them on your area. When the photos have uploaded, click each photo and add a title of the composition type in each picture.  Basic photoshopOpen Adobe Photoshop. Open your best photo from the 6 you took for homework via file... open... Using the laminated guide sheet, explore the options for photo editing. Try: - Changing the colours - changing the brightness and contrast - cropping your picture - Desaturating - Altering the curves - Dodging and Burning  Learn the photoshop short cuts! They really do make editing faster. 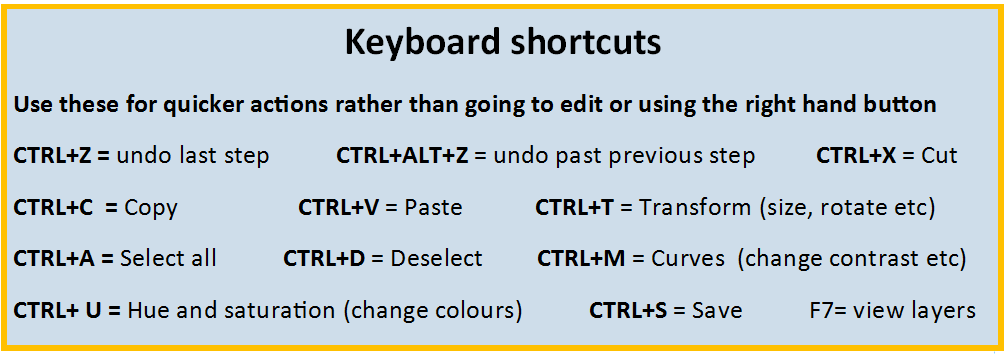  When you don't complete the photoshoot homeworks, you miss out on practical lessons.
Add a title block to the bottom of your skills development page - title '300 words on composition' Add a text box below, then write a 300 word mini essay to cover the following: - what is composition? - why is composition important? - when should you consider composition in photography? - What are the rules for successful composition?  Go to your lighting page. Add a gallery underneath your research. Upload ALL of the photos that you took as a contact sheet. Change the settings of your gallery so that you have 5/6 columns depending on the number of photos, making them quite small. School camera photos are in the student shared area/art/miss Wilson/ y12 photography  Edit your favourite photographs in photoshop - one to represent each of the lighting types that you tried – desaturate the colour to make them black and white, and alter brightness and contrast. Refer to your Photoshop guide to help you with this. Save each photograph separately, and change the file type to JPEG. Weebly will not recognize PSD files from photoshop. Upload these as separate images under your gallery, under the title ‘edited images’. Write a short explanation of each photo to discuss the lighting and the ways you might use each type in the future. For bonus points you could also discuss other formal elements in this explanation.  Complete a figure/portrait photoshoot to combine lighting and composition, due Friday.
Demonstrate your knowledge of: - soft lighting - natural lighting - spotlights - alternative lighting eg. coloured filters, torches Take a range of photos 20+ trying to show all types of composition. - symmetry - rule of thirds - balance - negative space - leading lines - viewpoints You may use the photo studio at any time during frees/lunch/after school, or do it at home if you prefer! After taking the photos, upload them to your website under the title 'Homework photoshoot' then edit TWO or more photos. Explain briefly how you have used different lighting and composition techniques to review your photos.  Read through the following on lighting in photography.  Through this task you are learning about the different types of lighting in photography. You need to be able to use lots of different types so that you can choose the right kind of lighting for your photoshoot. The lighting in your photo can make or break your image! 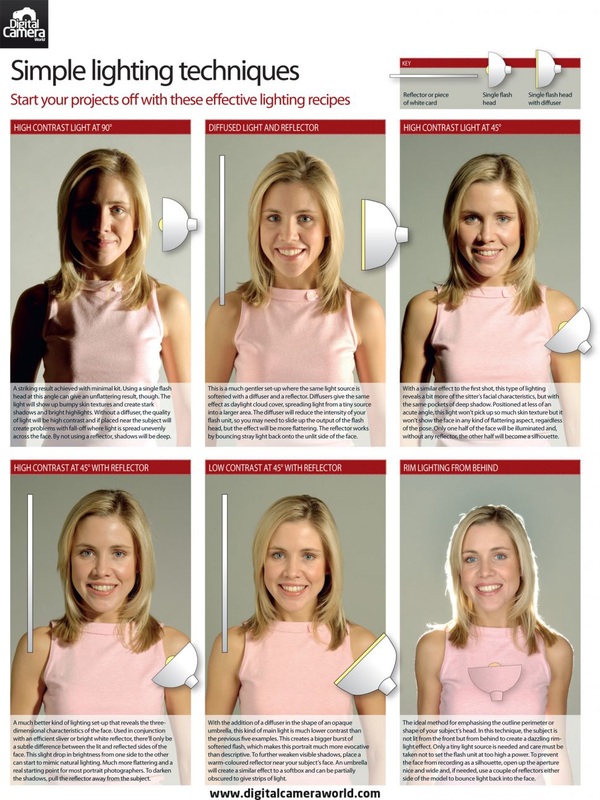  Put all of the following onto a powerpoint on different slides: TASK 1 - on the first slide: Carry out research into different types of lighting. Explore the following different types of lighting your subject in a photograph, the effect each one creates and when you might use it in your photography. Spotlight Side lighting Back Lighting Soft/diffused lighting Natural lighting Creative/unusual lighting For example: Window lighting - stand/place your subject near a window for natural lighting. This will produce highlights and some shadows, which will be softer rather harsh contrast. This will vary depending on the time of day and brightness of the room in contrast to outside. Bonus points: if you can find any 'tips for lighting' images, include these on your page to refer back to!
 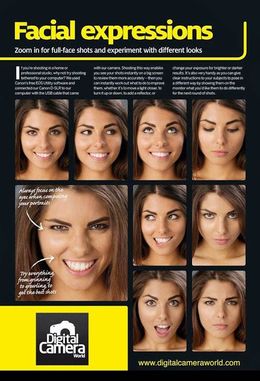 Preparing for your practical lesson When Mr Field is back in school. To apply what you have learnt through this task, you will take a range of portrait photographs using different lighting. To prepare for this, find some guides on portrait photographs eg. ideas for facial expressions, body language, poses, props etc. Copy and pastes your images under the title 'Ideas for Portait Photographs'.  For your homework, I'd like you to have a practice for the practical...
Please take 6 photographs of the same person, with each photograph using different lighting. Vary your distance from the person, their expressions, their poses etc. Save these to a new slide on your powerpoint.  Add a title 'Photoshop tools' to your skills development page. Write a subtitle: BEFORE - What I already know about photoshop Write a paragraph or bullet points about anything you know about photoshop already. It's fine if you don't know loads, but please write down what you do know. For example: - what can you do with it? - who uses photoshop? - how can you edit photographs? - what functions/tools etc are there to use?  Next, you are going on to learn the basic functions of photoshop through some experiments on the photos you took for the composition task.  You have just this lesson to do this, plus homework! Download the file below. Open any one of your photographs in Photoshop. Experiment with each of the tools/functions mentioned on the document below to work out what they do. Label/write explanations etc to complete the document for future reference. You might need to draw text boxes on the sheet to label things properly or draw arrows. This is the best way to learn rather than me just giving you the answers!! Try a tool, then flip back to publisher to add the description.
 Write the title: AFTER - What I have learnt about photoshop Write a paragraph or bullet points about what you have learnt through this task. Try to go into detail. For example: - what can you do with it? - who uses photoshop? - how can you edit photographs? - what functions/tools etc are there to use?  Go to your blog page. Click New Post. Title: Self assessment of Macro Photoshoot Answer the following question: What did you learn through the macro photo shoot last lesson? What went well and why? What problems did you face and how did you overcome them?  How to edit photos creatively.     This lesson you will learn what the different types of composition are in photography, and how to use them to create an effective photograph. You will create a PowerPoint with key information about the 6 main types of composition.  Composition is basically the lay out of your picture. Photographers make conscious decisions of how to arrange the objects in their picture in order to get the most visually pleasing results. These are the main composition techniques: 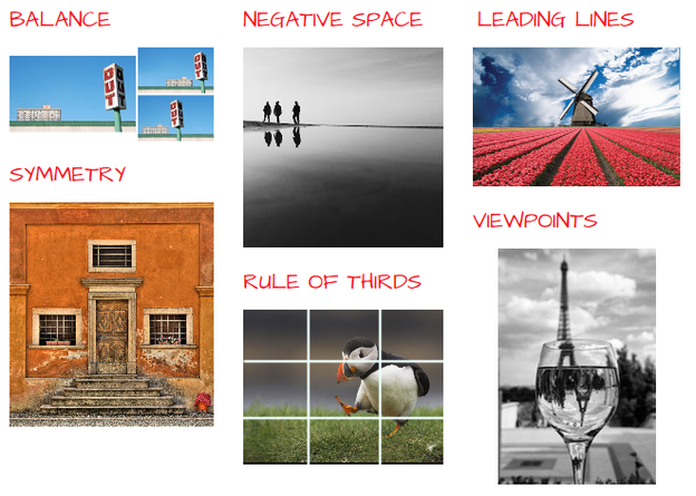  Research each type of composition and create a powerpoint, with a slide on each type of composition. (6 slides)
Tip: When searching on google, make sure you type 'photography' next to each composition type so you get the right things come up! On each PowerPoint slide, there should be: - the title (composition type) - 3 photo examples - an explanation of what it is and how to use it in your photography - Examples of when it is best to use that type of composition.  Many of you will want to (and should!) aim for the highest grades in Photography. One of the best ways to do this is to carry out research and to read about different areas of the subject so that your subject knowledge is stronger and more advanced, allowing you to produce work of a higher standard.
I have selected the following websites as being useful for the next task... read through them so you are ahead of the game! Click the buttons to be taken to the right page.   Complete your powerpoint from last lesson on the different types of composition. Click the button below to recap what you had to do... When you are finished, create a page on composition within skills development. Drag a document element onto the page then upload your powerpoint so it is on the page.  Read through the homework below... Create a plan for your photoshoot on a powerpoint - put all of this information on one slide. When you are finished, add this as another document underneath your composition powerpoint on the same page. Put a title above it 'Photoshoot Plan'. Include the following: - a brainstorm of ideas of things you could photograph - a brainstorm of places you could go to take your photos - select the one you are going to photograph and explain how you will take each photograph using a different composition. If you need help, have a look at these students work who have done the same task...  Firstly: Complete the PowerPoint on Composition if you haven't already. Upload it to weebly on the composition page before the lesson (see above)
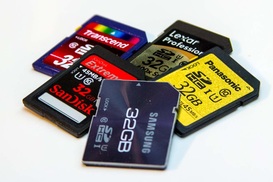
Secondly: Your main homework is to take 6 photographs of the same subject matter (eg. the same person or same object) - in the same location, at the same time etc. The challenge is to use a different composition method for each photograph, so you end up with 6 slightly different versions of the same photo. To be successful you will need to choose your subject and location carefully, to ensure that your examples of each of the composition can be effective. If you need help deciding on what to photograph, do some research before you get started! Upload your photos to a 2x3 gallery on the composition page in skills development before next lesson. IF you cant do this, bring in the memory card. DO NOT USE YOUR PHONE FOR THIS TASK unless you can upload your photos at home as you are NOT ALLOWED to use them in school. 
 Go to your formal elements page. At the bottom of the page, add a title 'first homework photoshoot' and a text box in which you should explain what you had to do for the task. Next add a gallery below this using the build tools. Upload your photos from the weekend (3 photos for each of the formal elements), and add them to your gallery. From here, click each photograph, and add a caption to answer the following question: Which formal element does the photograph represent and what makes it effective? Explore the options for your gallery so you are familiar with what you can do with it. |
AuthorThese lessons have been written by Miss Wilson. Archives
December 2018
Categories
All
|
|||||||||||||||


 RSS Feed
