
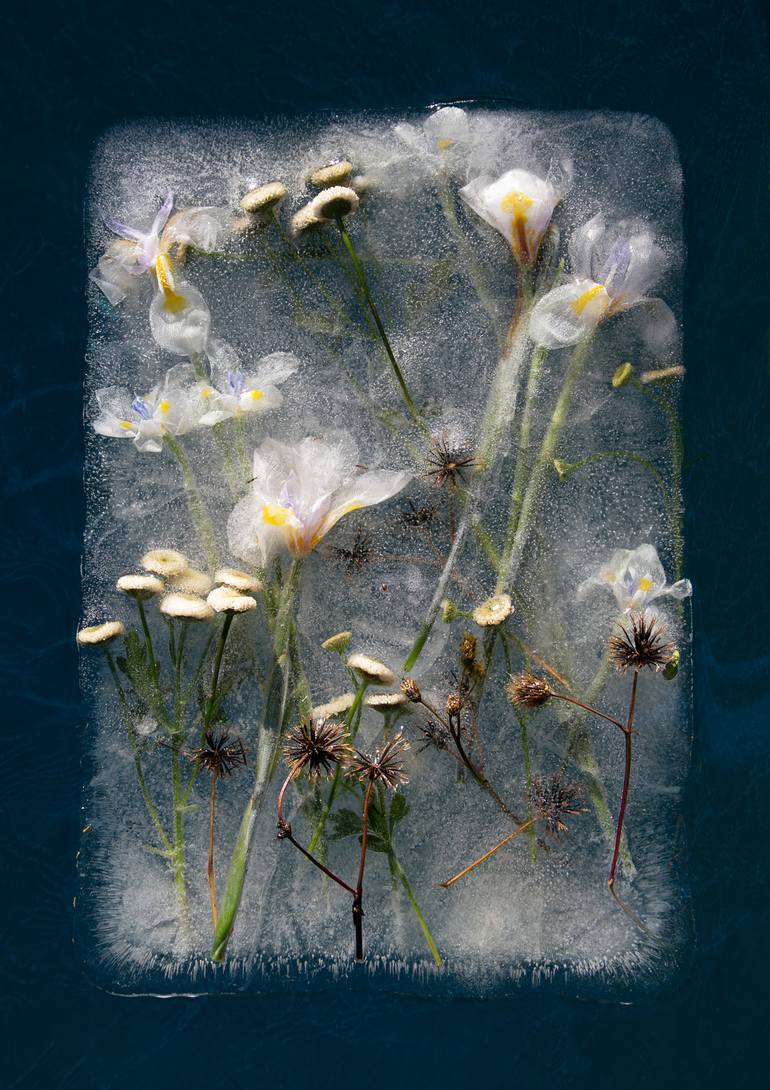
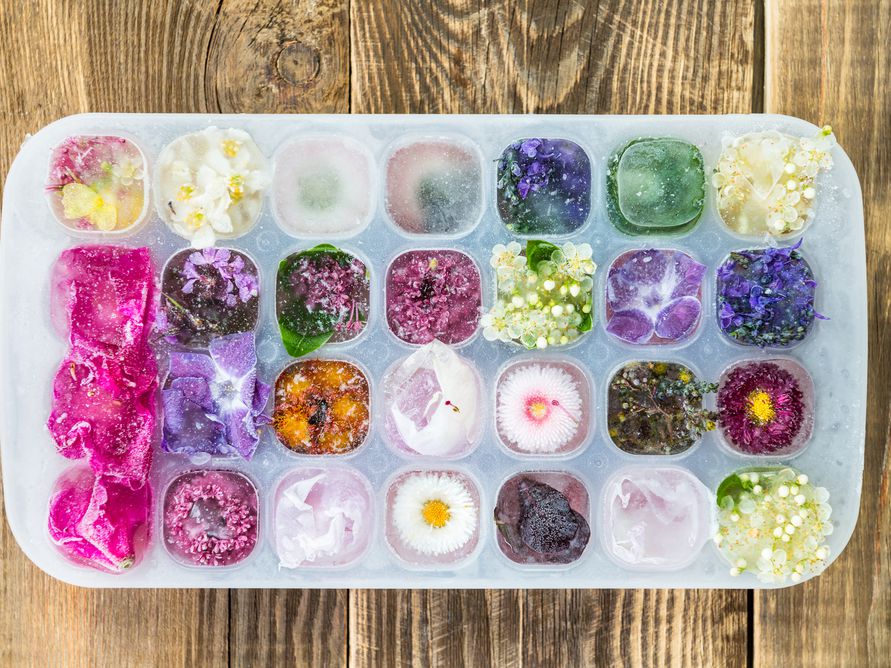
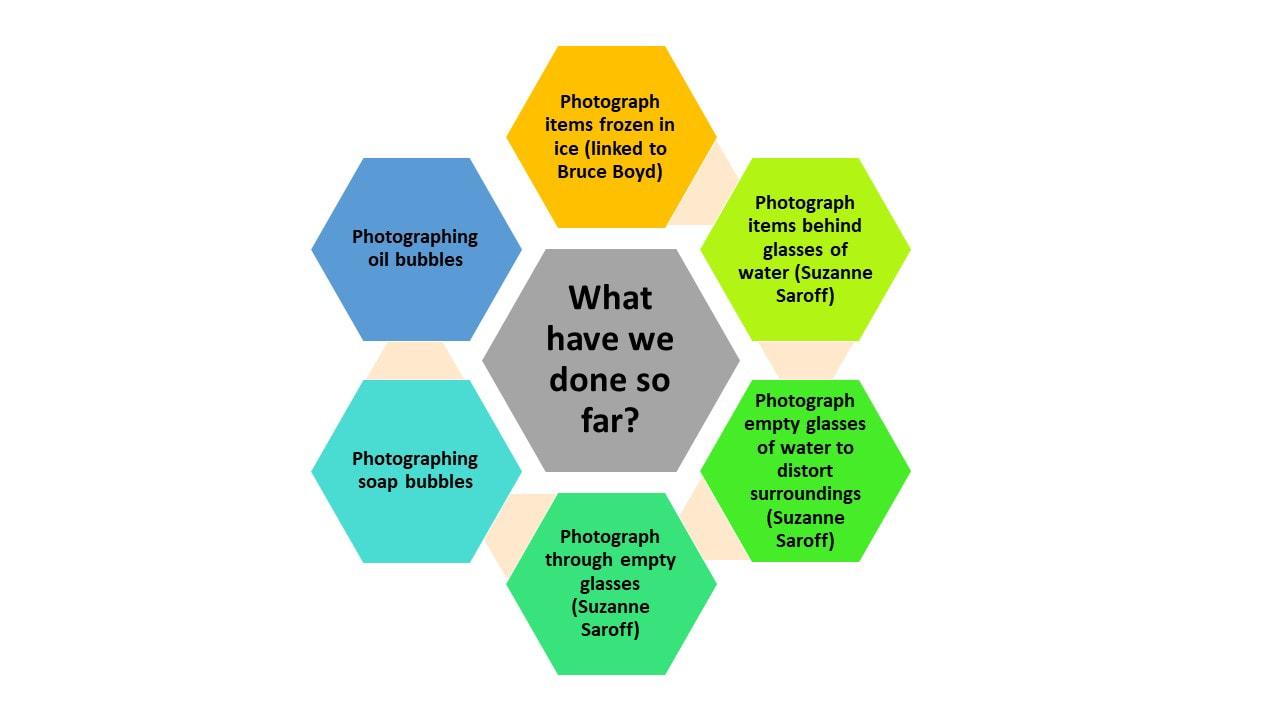
Photoshoot of ice... Research Bruce Boyd... Edit and upload.
|
|
All work from here needs to go on your Distortion powerpoint.
|
If you haven't already completed the research, copy and paste one of the images above into your Distortion powerpoint, then copy and paste these sentence starters for your research: Bruce Boyd takes photos of... He does this by... Something interesting about his photography is... I could work in his style by... To make the work more my own rather than just copying his work, I could also try... Key words to help you: Ice, frozen, flowers, arrangement, cracks, bubbles, contrast, dark background, distorted, preserved. |
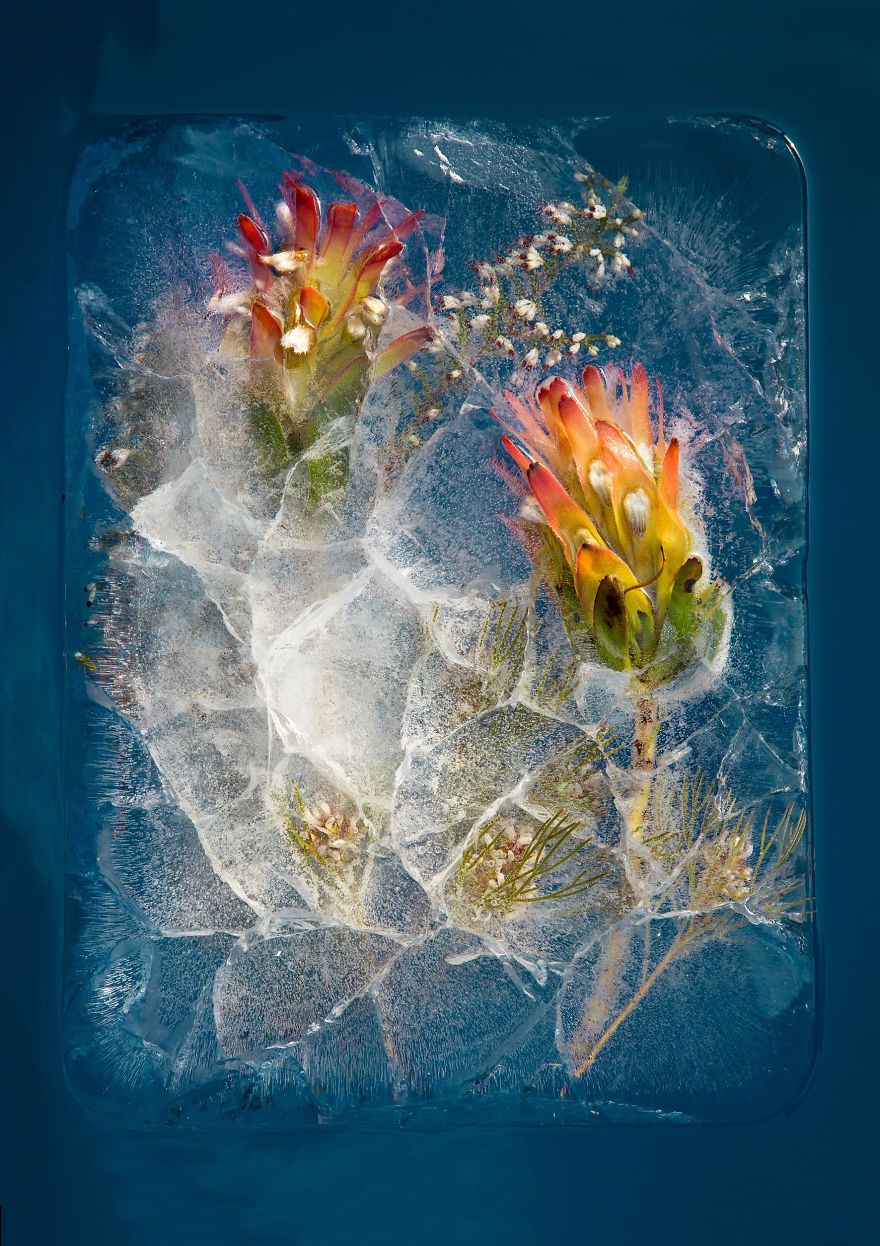
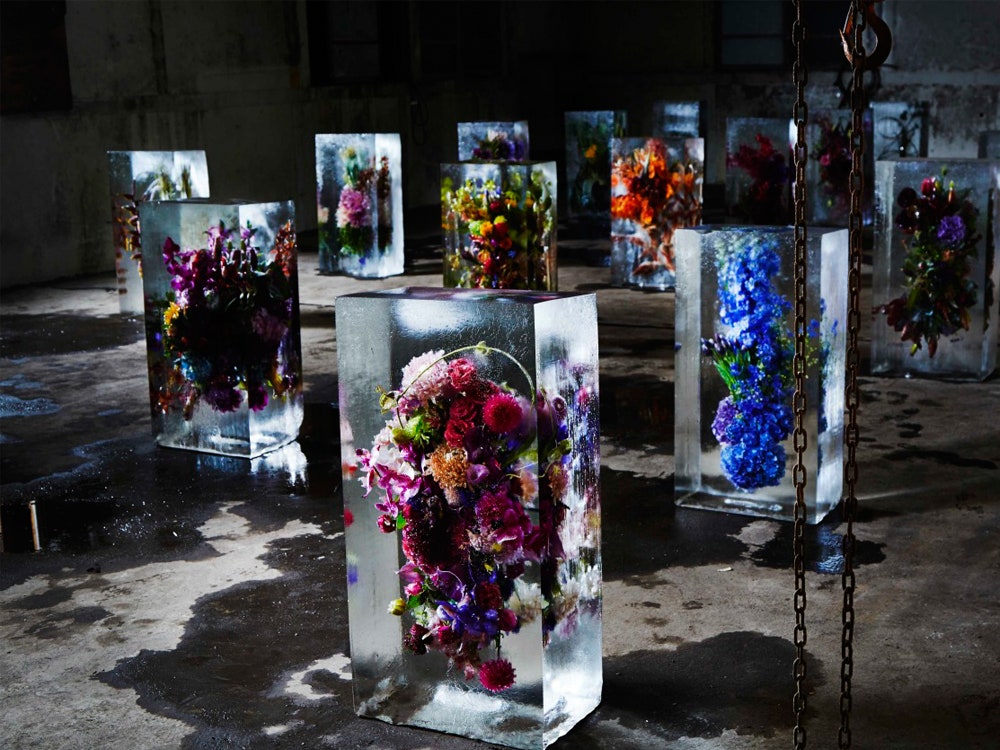
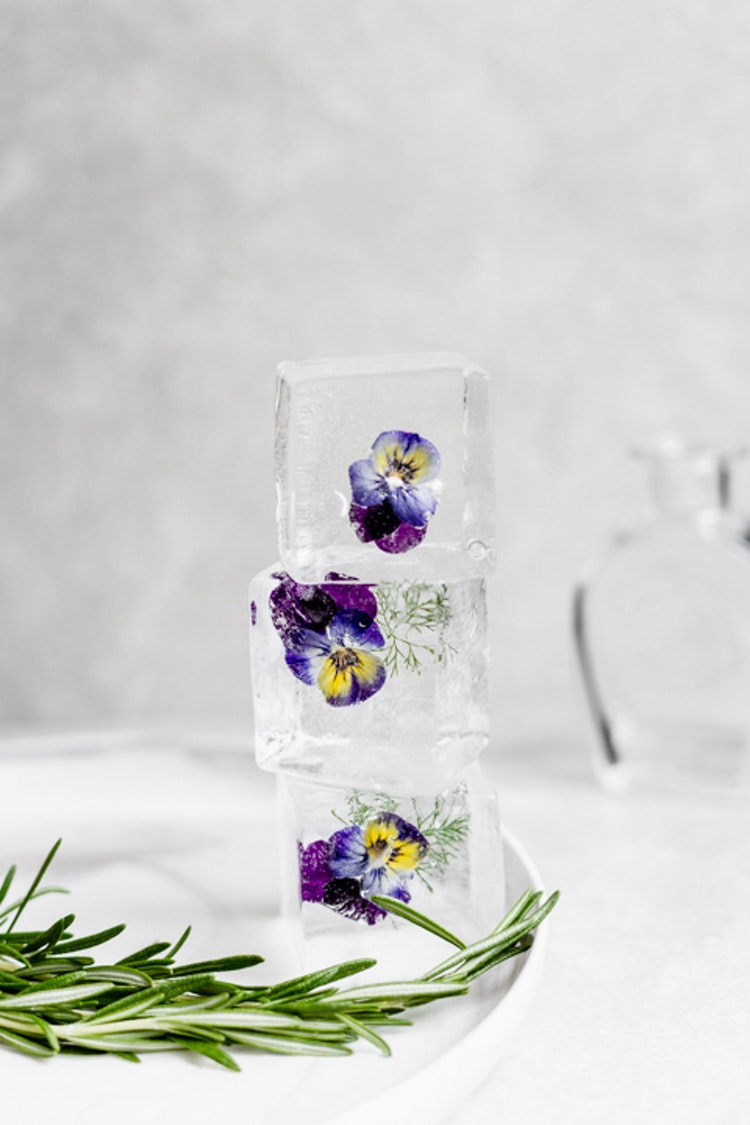
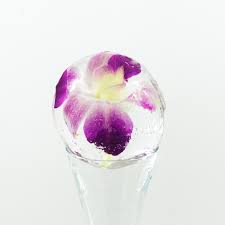
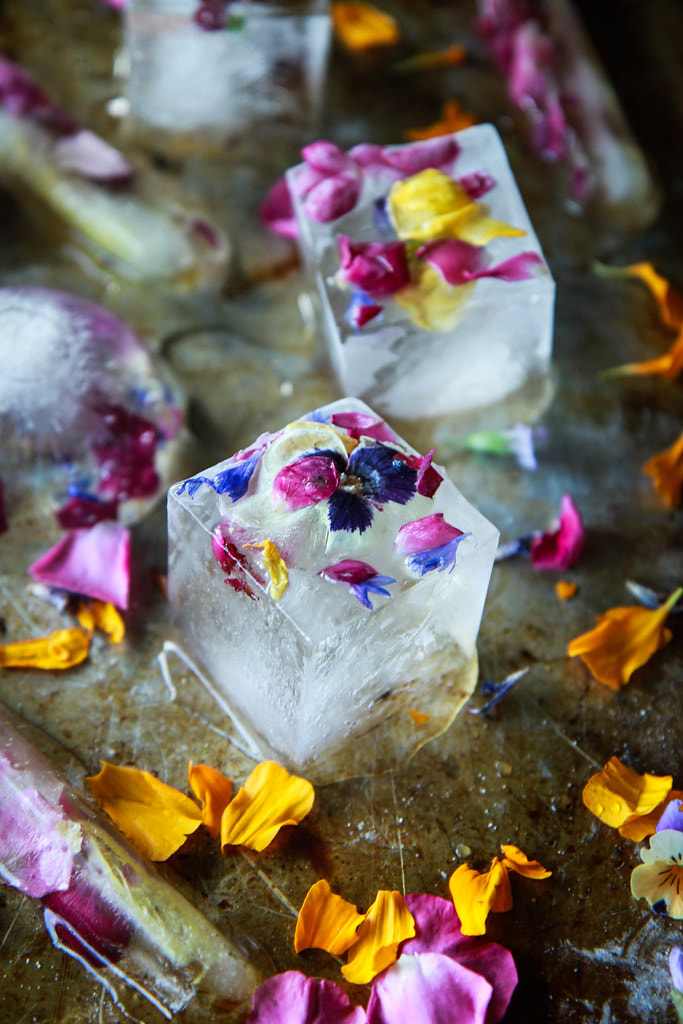
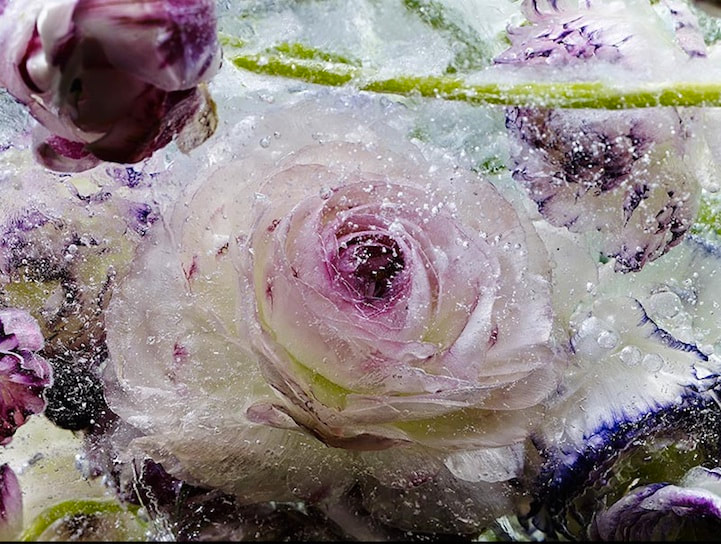
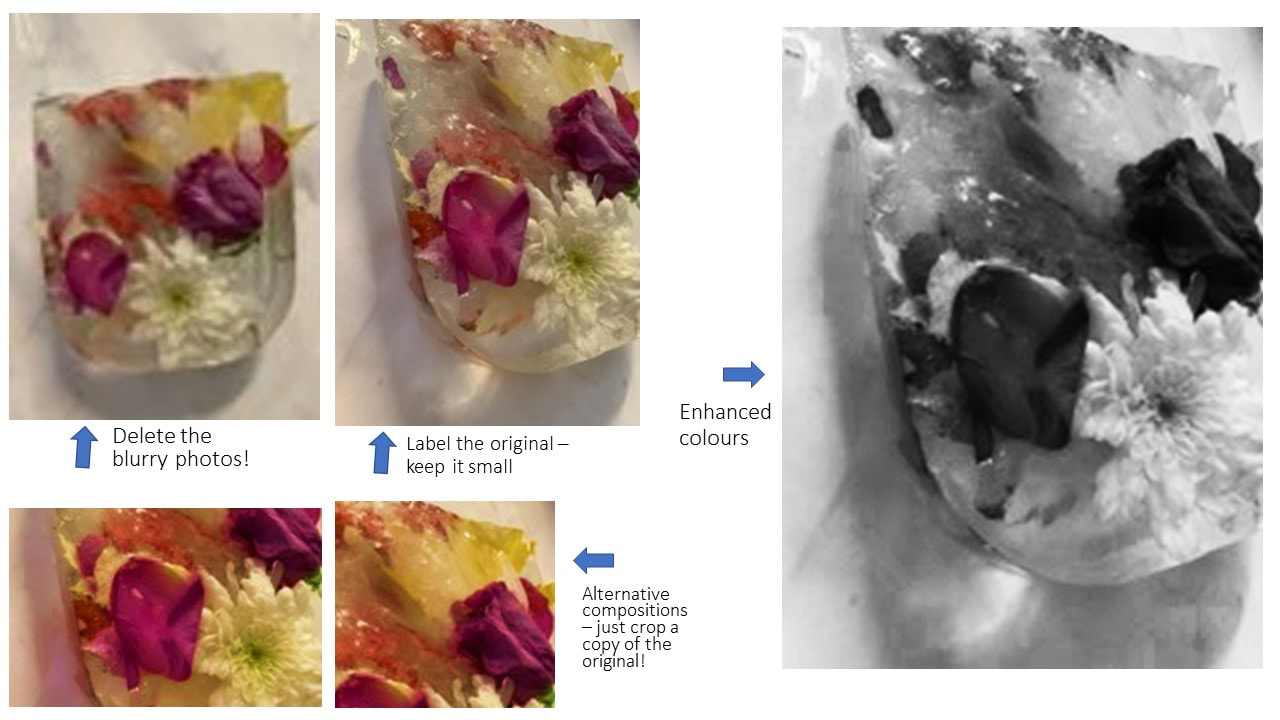
Photoshoot If you have already done this task that's brilliant. You will have an extra photoshoot which will gain you further marks. Hopefully this time you will be able to try other things too, and show other skills or ideas. Take photos of flowers in blocks of ice.
Take at least 20 photos. Edit 3 or more ICE photos Adjust the brightness and contrast and vibrance (in image, adjustments). Use the clone tool or pipette and brush tool to smooth out the background. Upload to a new slide beneath Bruce Boyd research, and your best photo full size. |
Watch this video to hear the artist talk about his work and how he creates it.
Create new ice blocks with flowers. Be creative and think about the presentation.

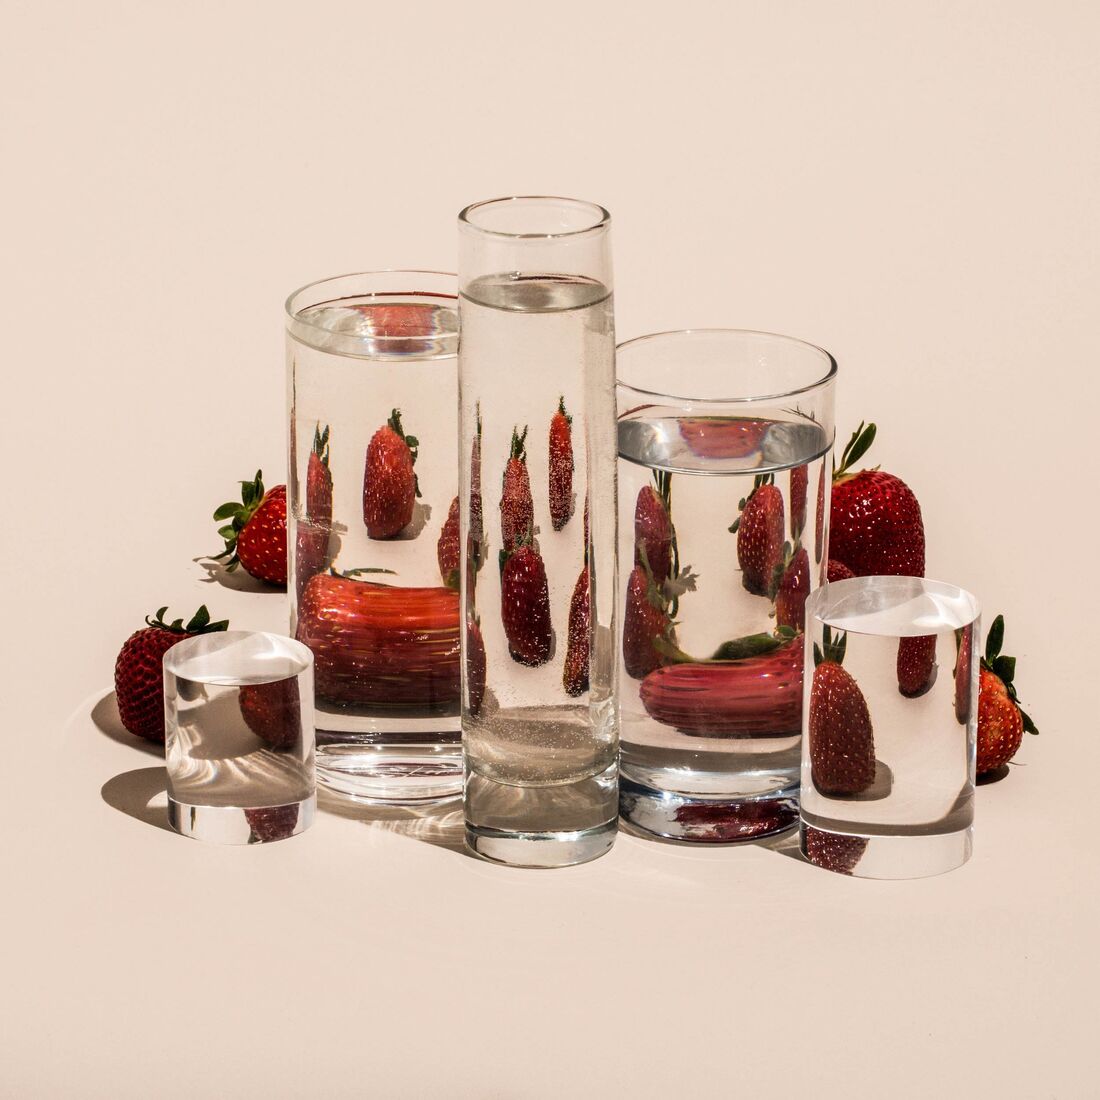
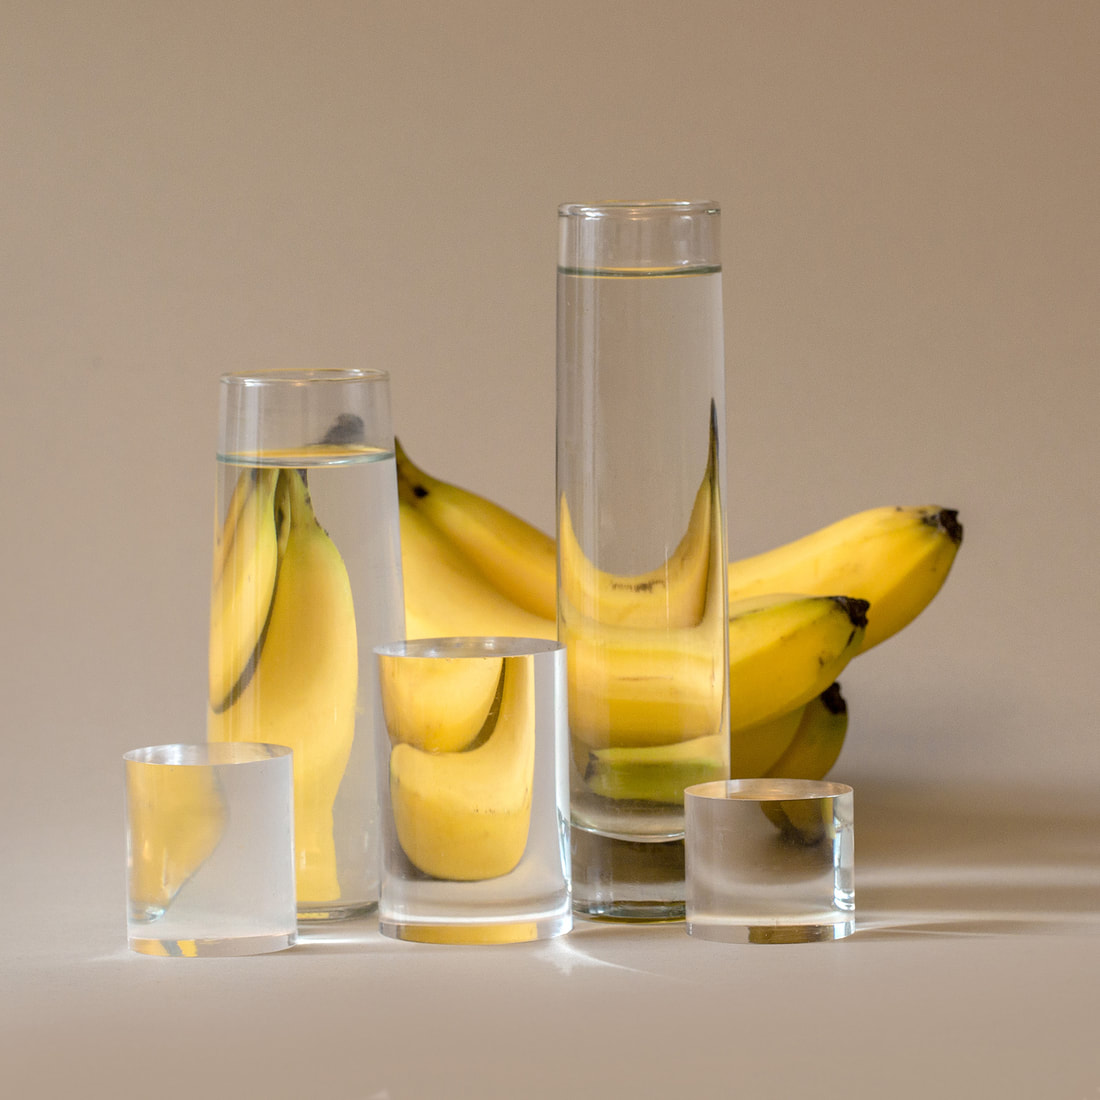
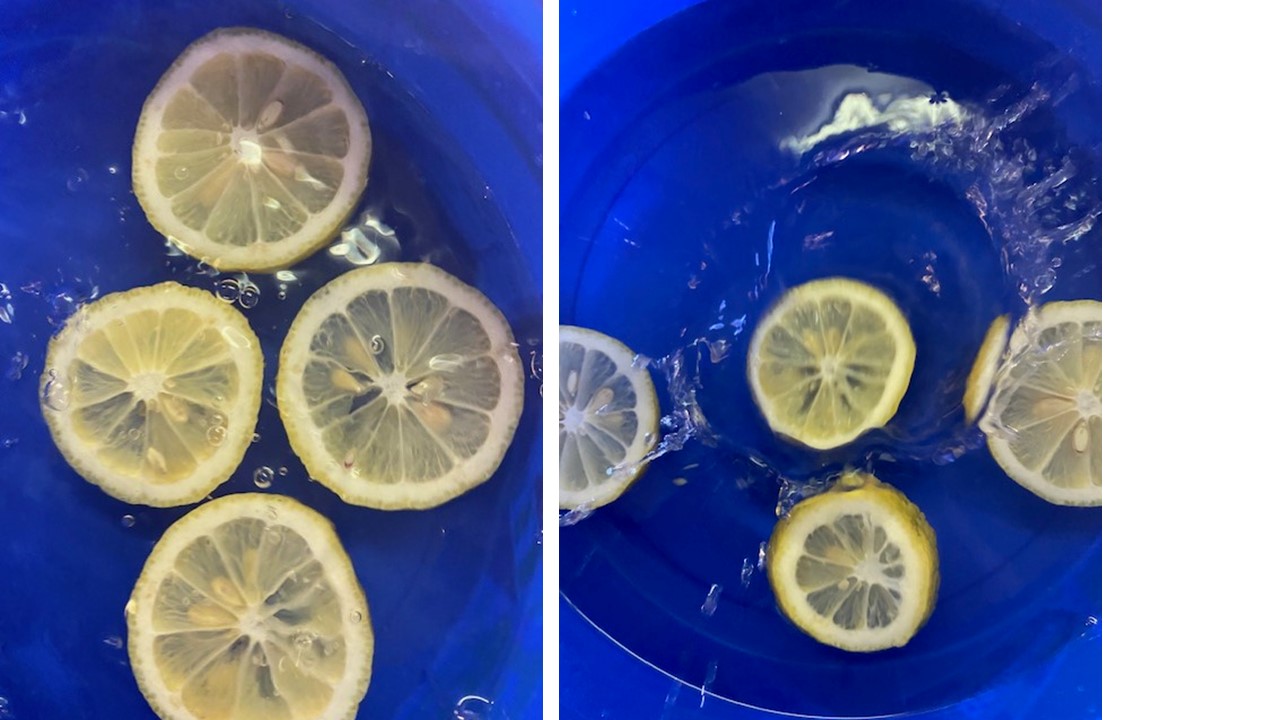
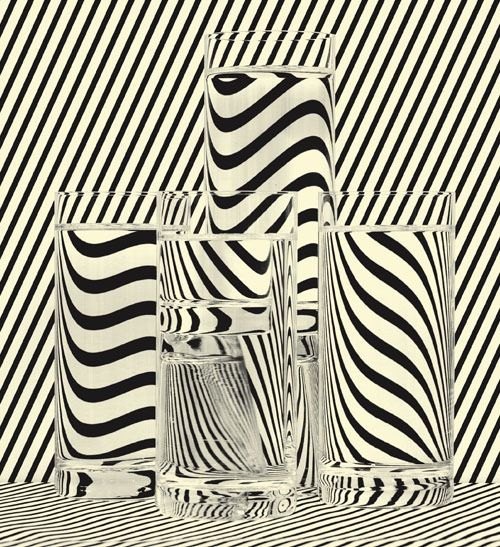
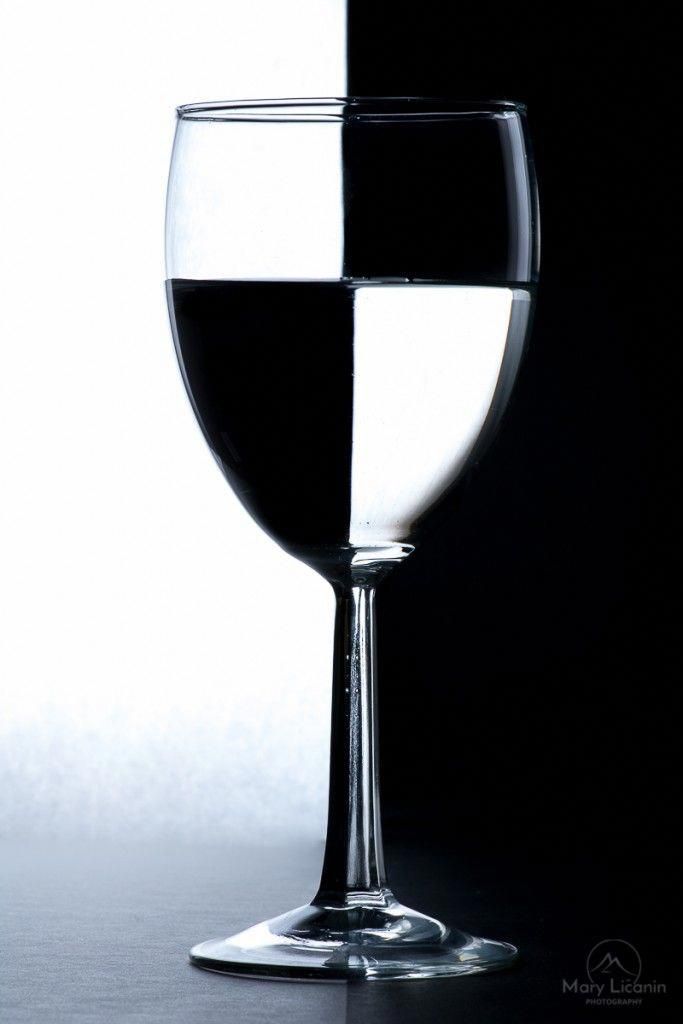
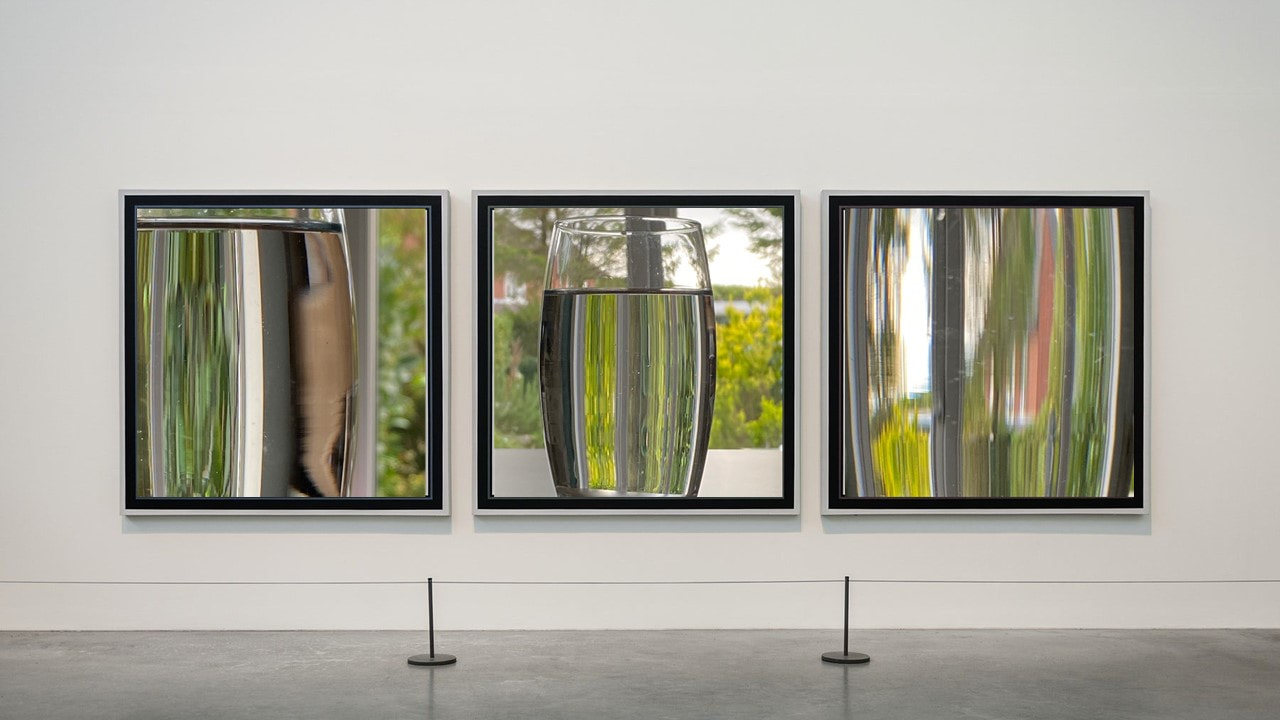
Photograph distorted food through glasses of water... research Suzanne Saroff... Edit and upload.
|
|
|
If you haven't already completed the research, copy and paste one of the images above into your Distortion page, then copy and paste these sentence starters for your research: Suzanne Saroff takes photos of... She does this by... Something interesting about her photography is... I could work in her style by... To make the work more my own rather than just copying her work, I could also try... Key words to help you: Still life, glasses, water, fruit, arrangement, bend, misshape, warp, distorted, light and shadows |
Photoshoot If you have already done this task that's brilliant. You will have an extra photoshoot which will gain you further marks. Hopefully this time you will be able to try other things too, and show other skills or ideas. Take photos of fruit through glasses of water. White background – nothing else in the photo.
Take at least 20 photos. Edit 2 or more photos Adjust the brightness and contrast and vibrance (in image, adjustments). Use the clone tool or pipette and brush tool to smooth out the background. Upload in a gallery (2 columns). |

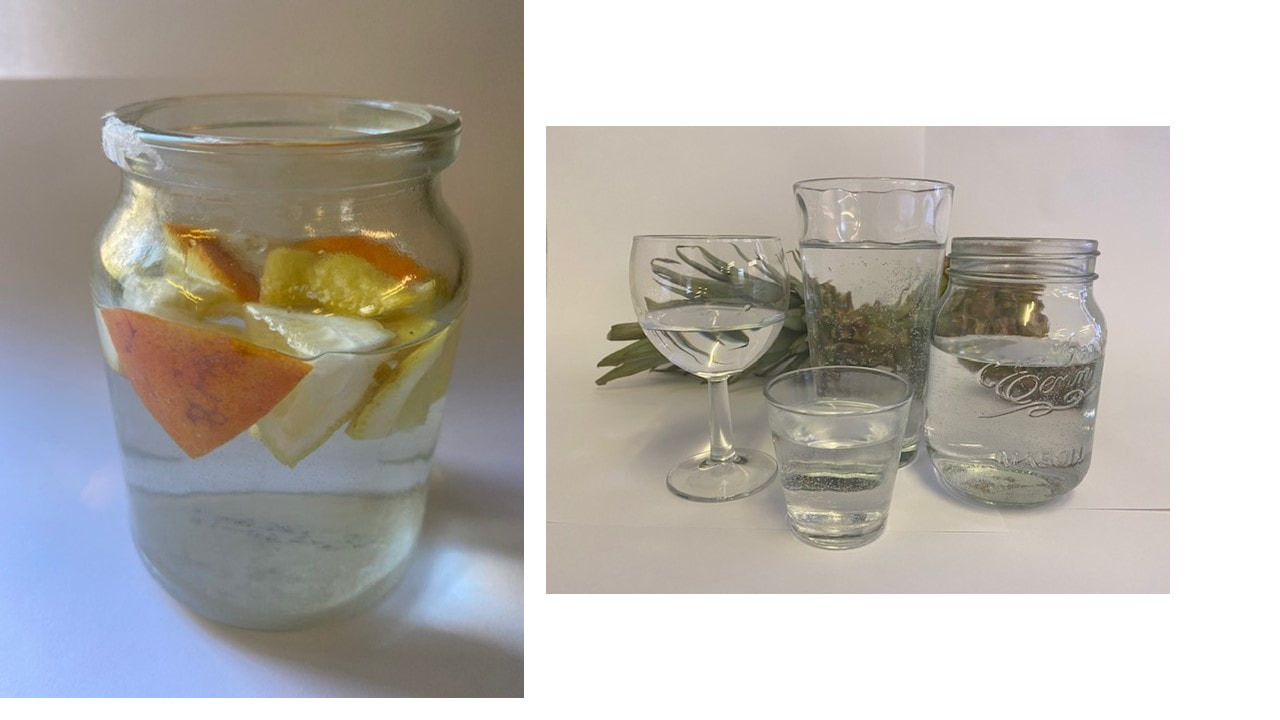

Complete the worksheet to plan a photoshoot inspired by the images above.
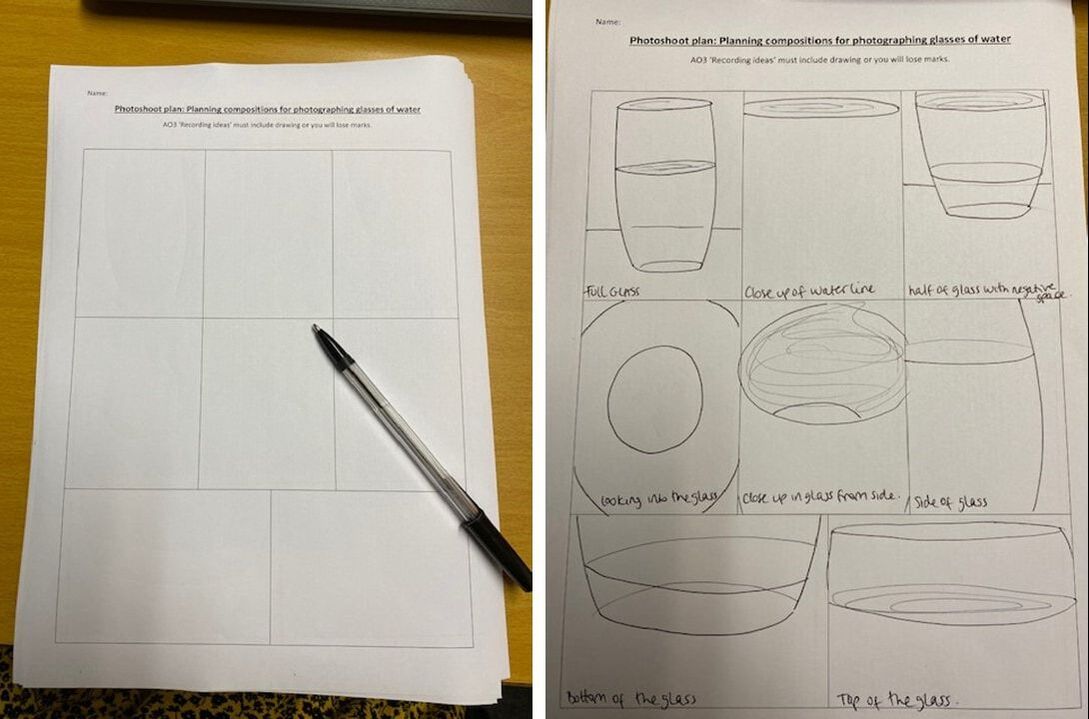
Take at least 20 photos, each one a different angle.
Upload your photos to the slide Photographing a glass of water, linking to Saroff. Upload your planning sheet on the slide before. (on the student shared area, in photography/Mrs Crawford/11G/planning sheets)
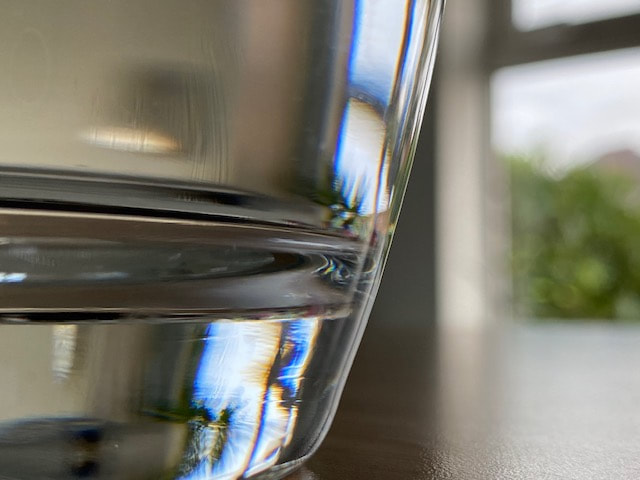
Also upload the best three photos on the next slide larger to show them off.
Hopefully these photos wont require any editing if you followed the guidance! But if you want to improve them then you may. You might need to crop them or use the clone tool to remove a reflection of your phone etc.
Also upload the best three photos on the next slide larger to show them off.
Hopefully these photos wont require any editing if you followed the guidance! But if you want to improve them then you may. You might need to crop them or use the clone tool to remove a reflection of your phone etc.
|
Annotations Write a short paragraph about this task to explain: Link to Suzanne Saroff and the way she uses glasses to distort and refract (bend) light. How you took the photos, looking for distortions in the water and interesting surrounds to be reflected in the glass. Give your opinion about why you have chosen the three large images as your best photos. I have taken these photos by... They are inspired by Suzanne Saroff because... I have chosen these as my strongest photos because... |
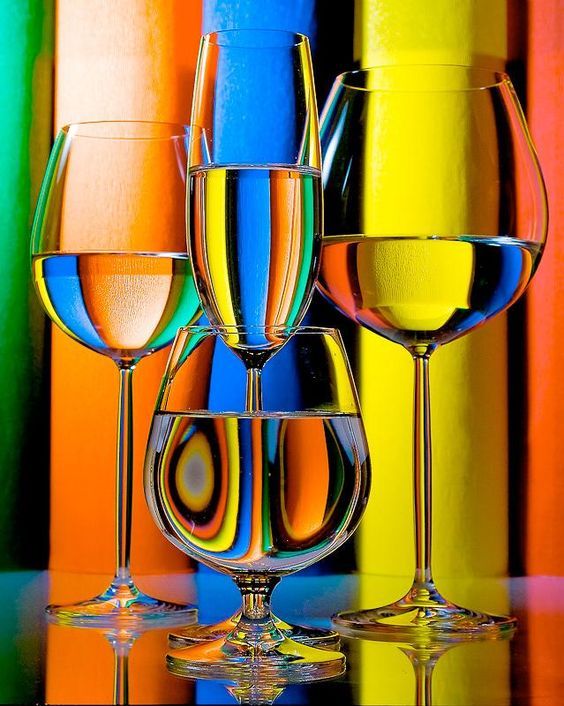
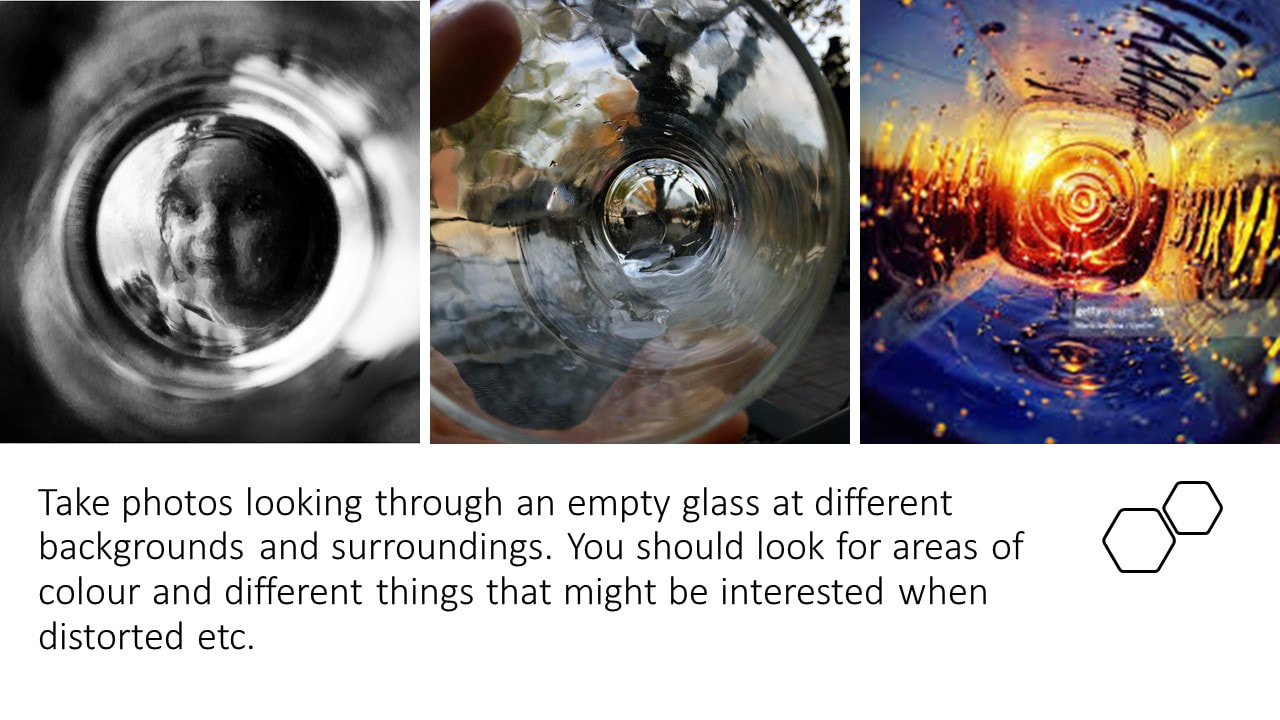
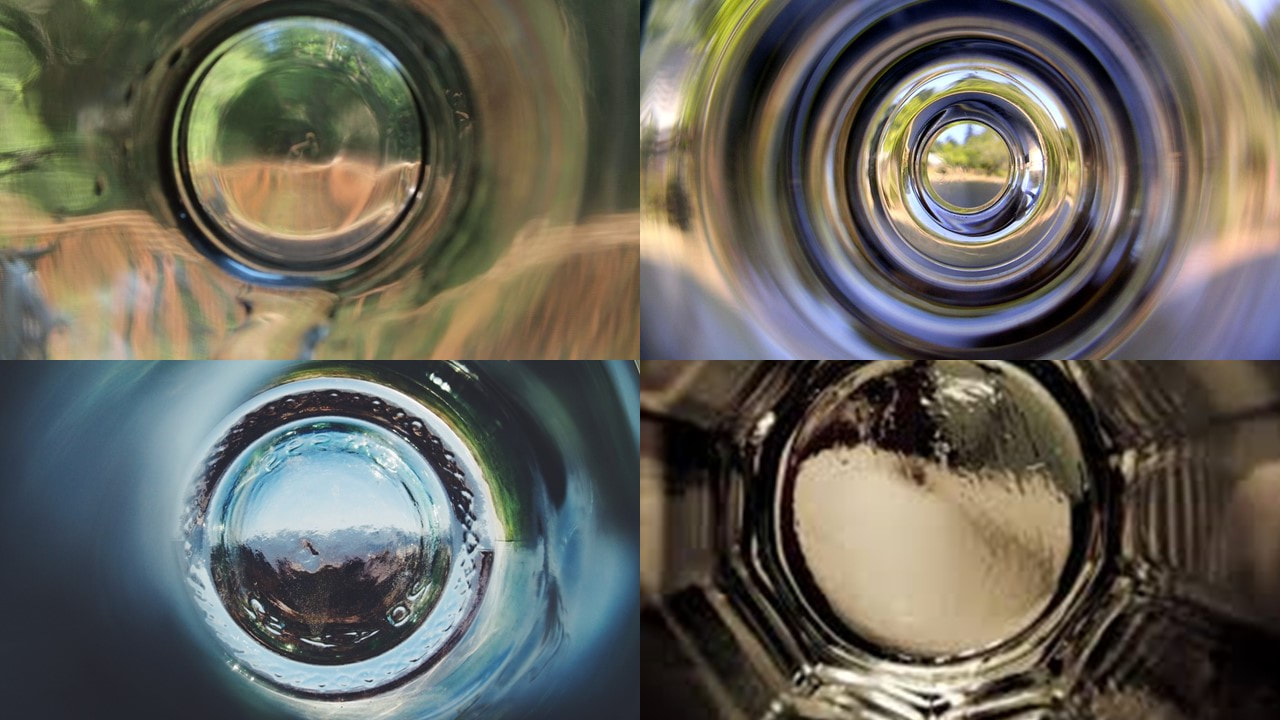
Plan for another photoshoot inspired by the video you watched for homework on Refraction.
|
|
|
1. Create a planning page with images to inspire your own photoshoot next lesson. Include notes about each image to explain how it has been created. What is being refracted?
2. Print pages of colour/pattern to use in your photoshoot. Send files to the MFD Tech printer and change the settings if you want them in colour.
*After doing this photoshoot we will re-visit Suzanne Saroff!*
2. Print pages of colour/pattern to use in your photoshoot. Send files to the MFD Tech printer and change the settings if you want them in colour.
*After doing this photoshoot we will re-visit Suzanne Saroff!*
After the photoshoot...
1. make sure you have included your planning sheet on your powerpoint. you get marks for these!
2. Upload your photos to 2/3 slides 10-15 per slide. If you have lots of photos DONT INCLUDE THE WEAK ONES!
3. On the next slide, put a title 'Best photos' and upload your best photos 2 per slide so they are nice and BIG! Use as many slides as you need to.
4. Edit your photos to enhance the COLOURS and CONTRAST. You might also want to CROP some of your photos to enhance them further.
5. Write a paragraph to review your best photos. Answer this one main question...
How have you developed your own style of distortion effectively, following initial inspiration from Suzanne Saroff?
Talk about the things you have done differently to Saroff including: using pattern, lots of colour/black and white, creative backgrounds, varying number of glasses, removing the objects, changing viewpoint or angle, including close ups.

|
Upload your photos under the title 'Through a glass' below your other work. Put them in a gallery then also upload the best three photos full size in single image blocks. Hopefully these photos wont require any editing if you followed the guidance! But if you want to improve them then you may. You might need to crop them or use the clone tool to remove a reflection of your phone etc. |
Annotations Write a short paragraph about this task to explain: Links to both artists: Bruce Boyd and the way you have distorted the surroundings by looking through glass in a similar way to how he distorts using ice. Link to Suzanne Saroff and the way she uses glasses to distort and refract (bend) light. What you looked for when taking your photos looking through a glass (colour, interesting surroundings etc). Give your opinion about why you have chosen the three large images as your best photos. I have taken these photos by... They are inspired by both of my artists. They link to Bruce Boyd by... and Suzanne Saroff because... I have chosen these as my strongest photos because... |

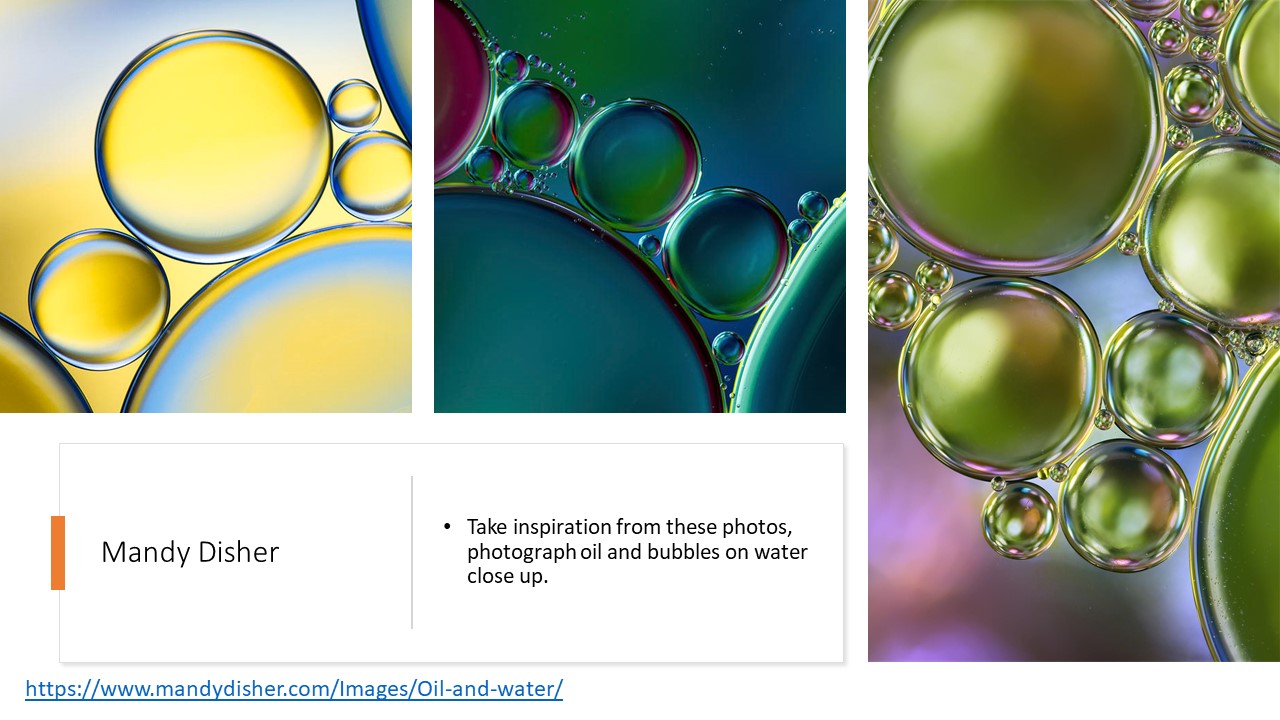
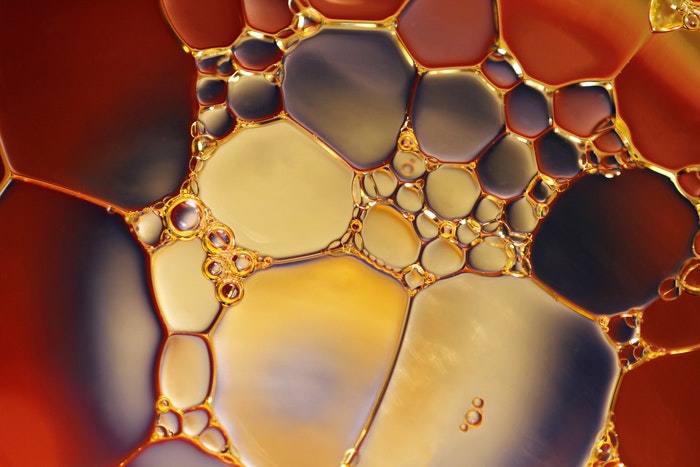
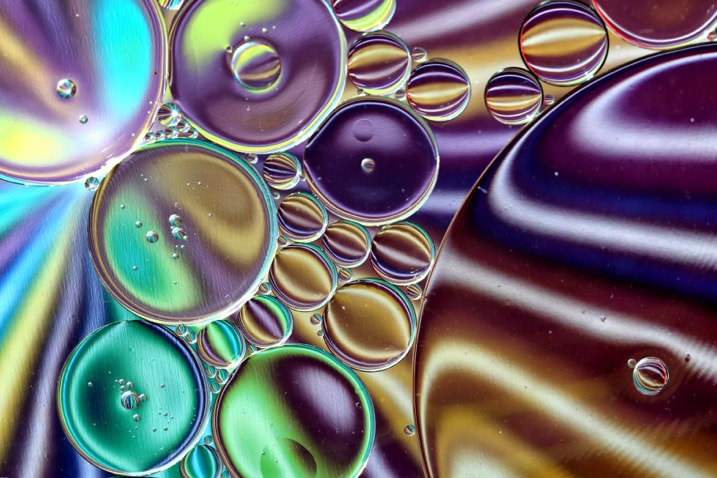
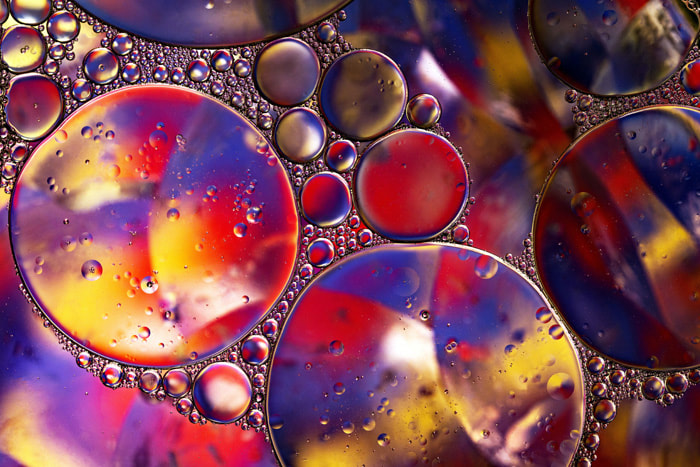
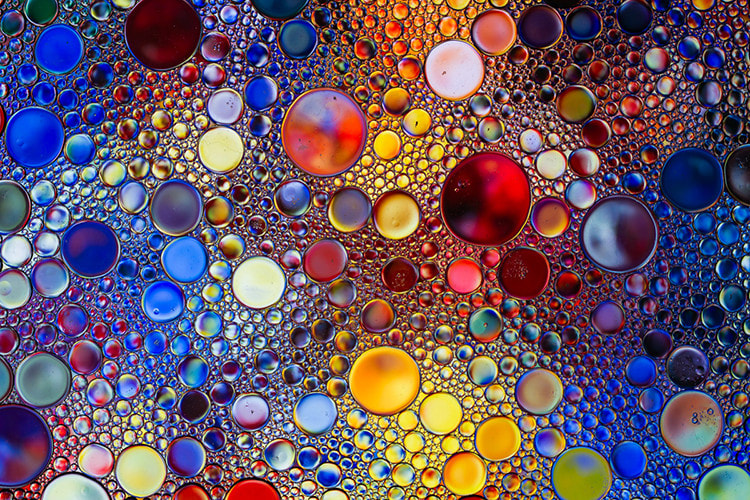
Another method of distortion with water is using oil. The two naturally separate and you get lots of tiny bubbles, perfect for macro photographs.

|
Task 1: Above your oil photos, put 2/3 photos of Mandy Disher's Oil photography on your website. Copy and paste then complete the following sentences about her work: Mandy Disher is a photographer that photographs oil on water by... Something that is effective about her photographs is... I could use this technique to show distortion by... GOLD: I could combine this technique with the styles of Saroff and Boyd by... |
Upload all of your oil photos into a gallery. Put a title above: 'Distortion with Oil on Water' Put your best 2 or 3 photos FULL SIZE below your gallery. Write a sentence below them to say why these photos are effective examples of distortion. These photos effectively distort by... |

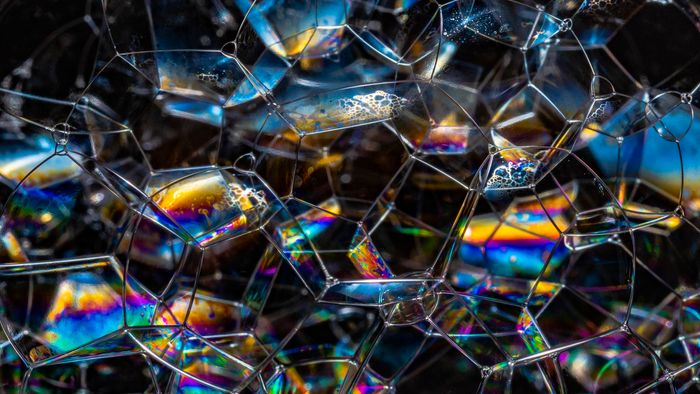

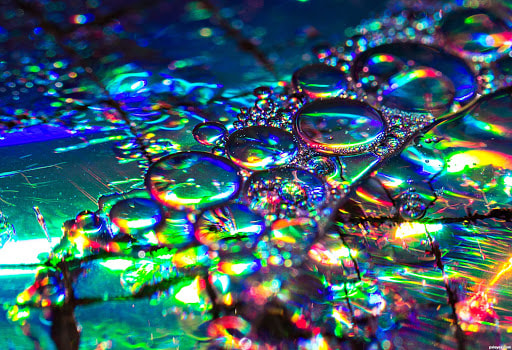
Upload all of your bubble photos into a gallery.
Put a title above: 'Distortion with Bubbles'
Put your best 2 or 3 photos FULL SIZE below your gallery.
Write a sentence below them to say why these photos are effective examples of distortion.
These photos effectively distort by...
Put a title above: 'Distortion with Bubbles'
Put your best 2 or 3 photos FULL SIZE below your gallery.
Write a sentence below them to say why these photos are effective examples of distortion.
These photos effectively distort by...


Work through the sheet to check gaps are filled.
So far i have noticed the following when marking:
1. lots of gaps in your work - check what is missing using the sheet.
2. Presentation isn't great for many - too many photos on a slide, or too much white space. make your photos bigger if you have big gaps!
3. Work not in the right order - check the sheet.
4. Missing photos - make sure all photos are uploaded. (don't just upload a few!)
5. Many of you need to work on edits for one or more of your photoshoots. See below.

Editing!
Include the original and the edit side by side.
Remove imperfections in the background, using the clone or patch tool. remember to hold ALT whilst you click with the clone tool!
Change the composition by cropping.
Enhance colour and contrast.
Remove imperfections in the background, using the clone or patch tool. remember to hold ALT whilst you click with the clone tool!
Change the composition by cropping.
Enhance colour and contrast.
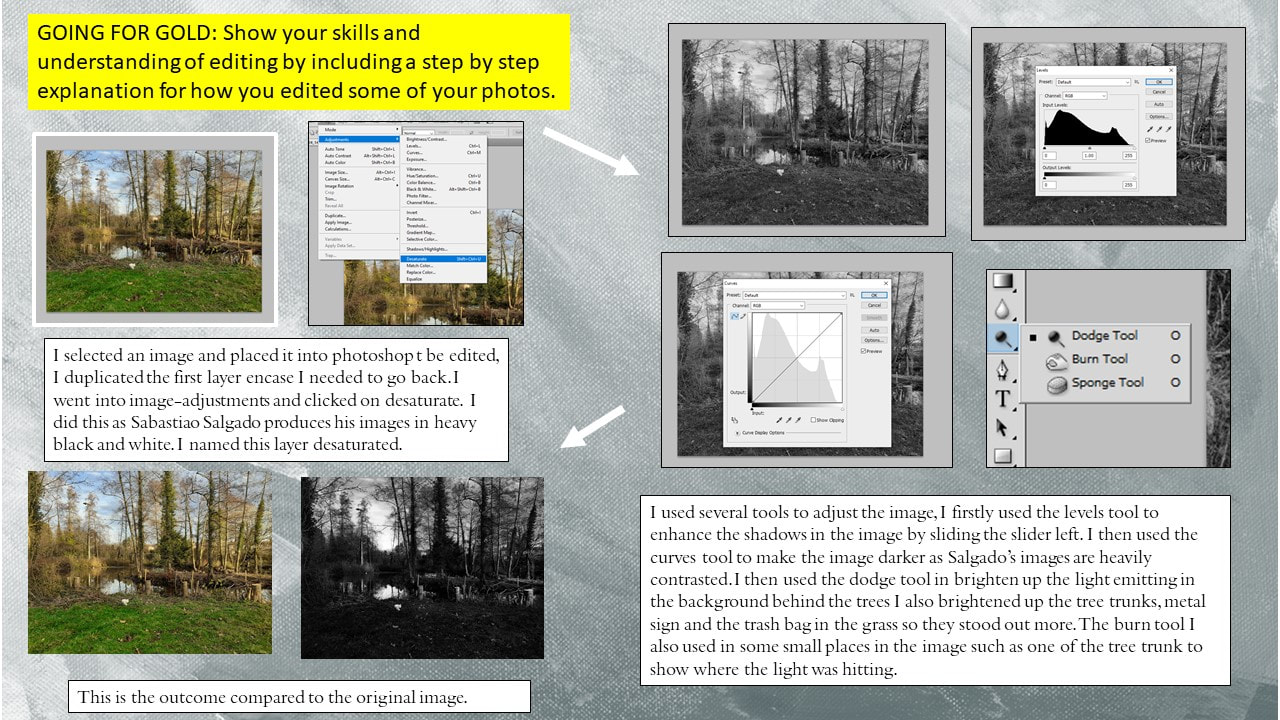
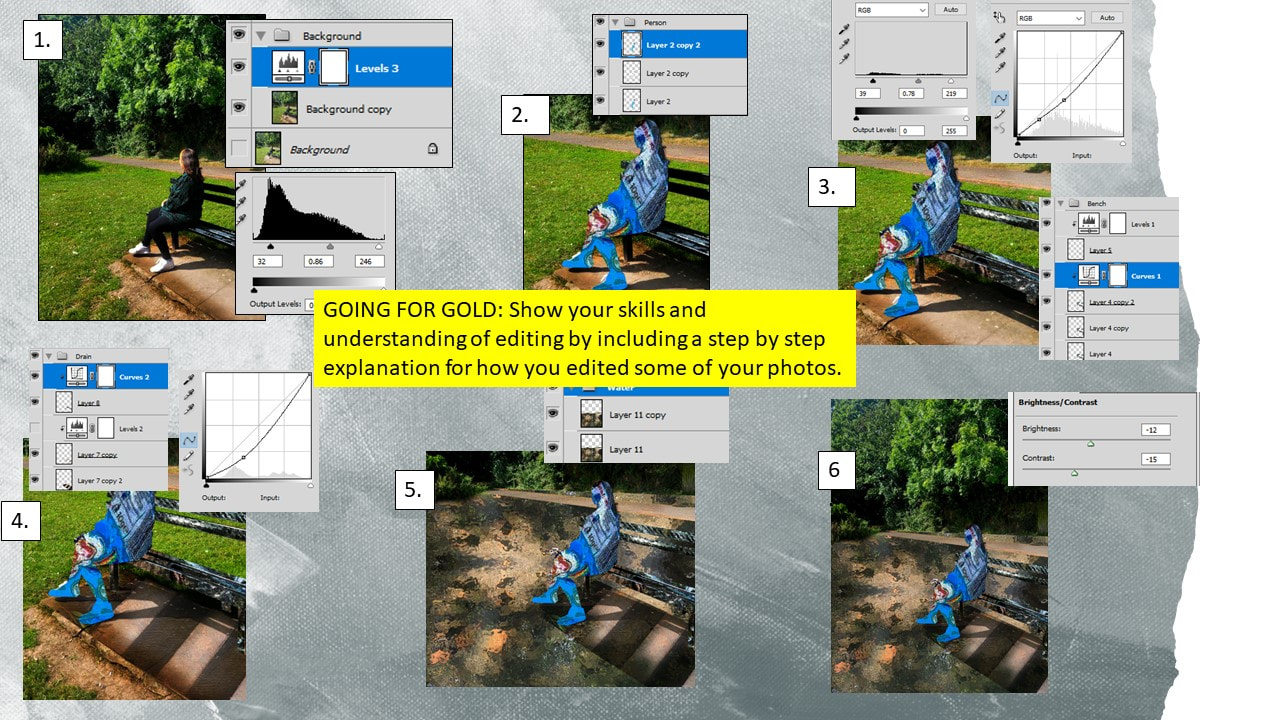
GOLD: Include SCREENSHOTS of step by step on how you edited your photo. Click the examples below to see how you could do this.


The final part of your project is to produce 3 or more outcomes as a series of work.
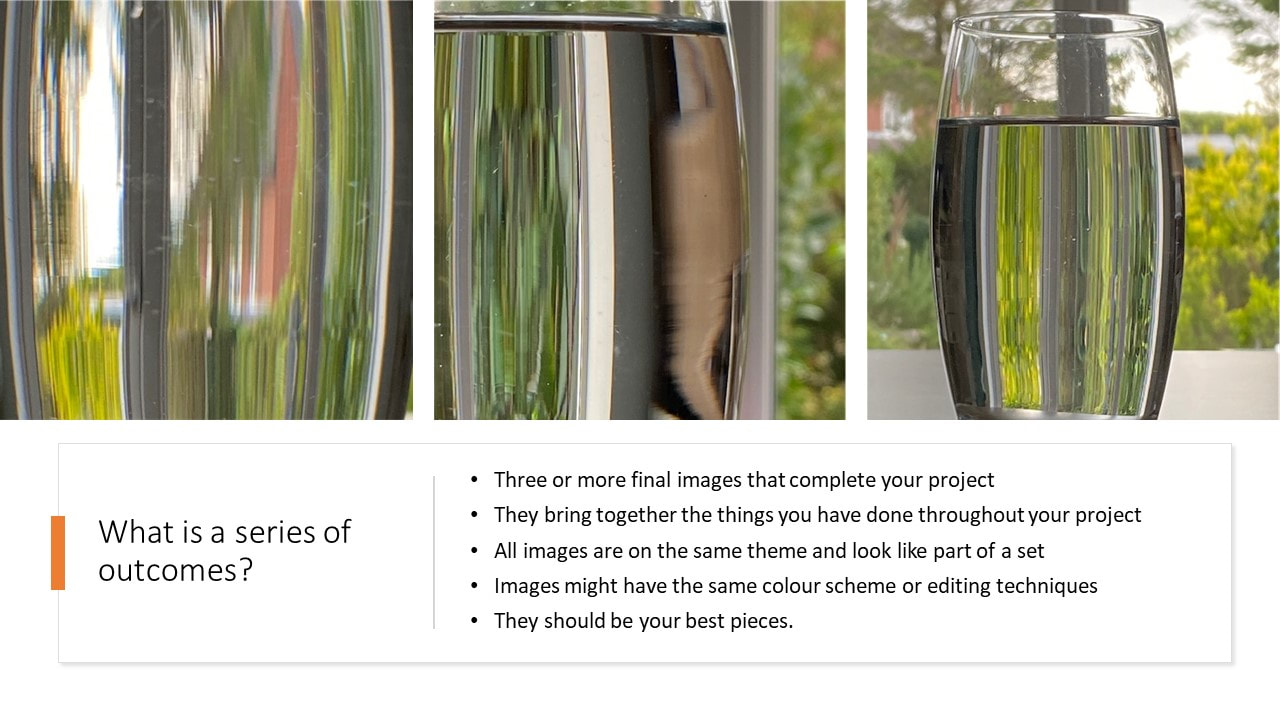
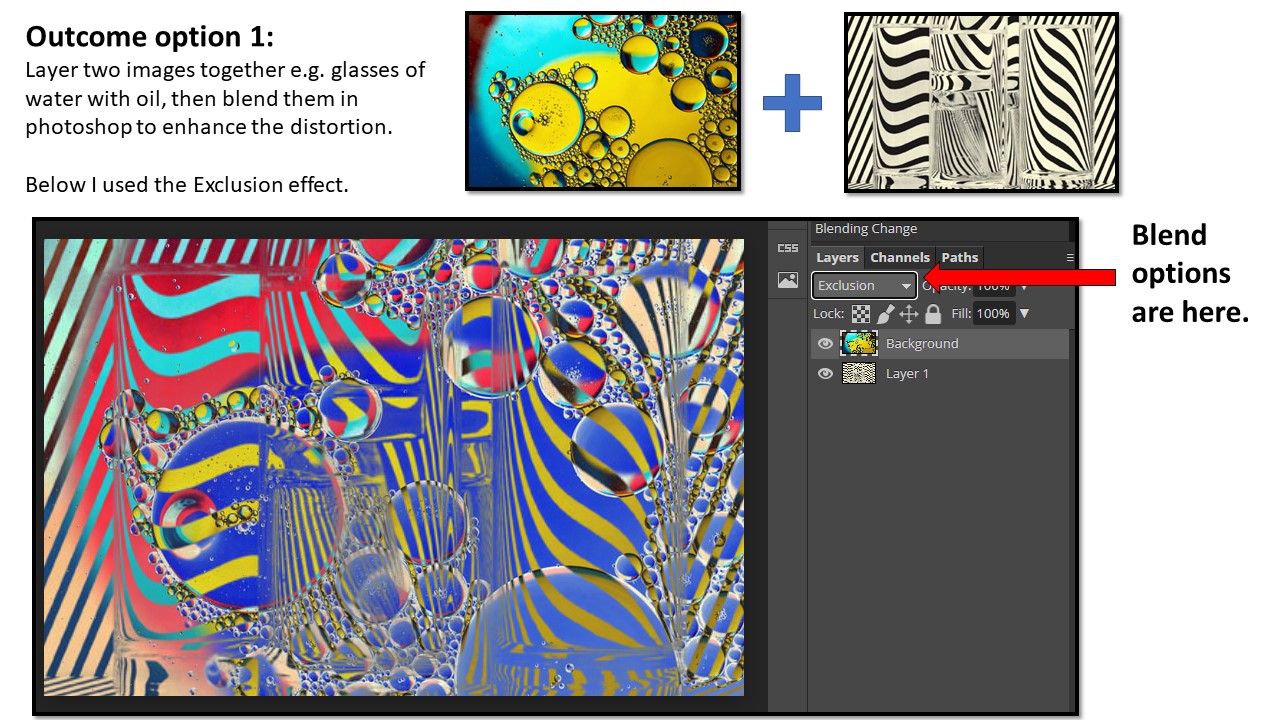
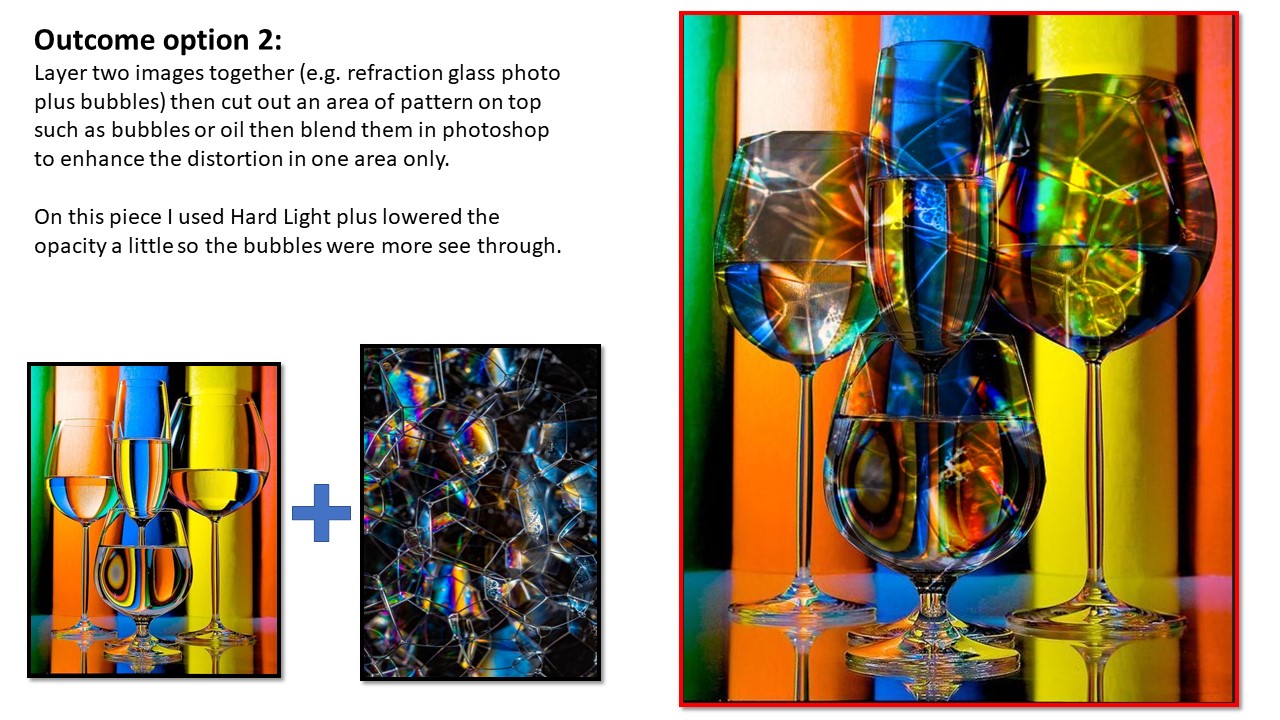
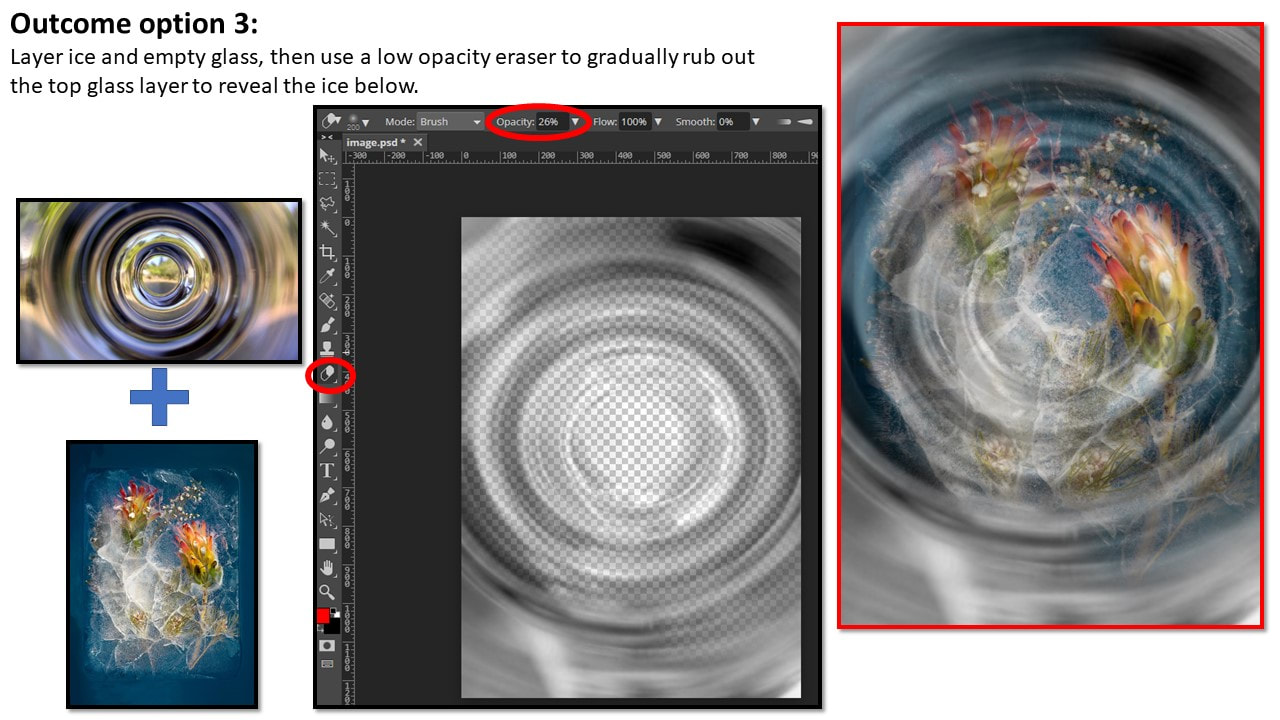
Below you will find 3 examples of ways you could edit your photos to create your outcomes. Pick one technique (or develop your own) and use 3 different combinations of images to create your 3 outcomes.
When your set of photographs is complete you will present them in a gallery like the example below:
Your task this lesson:
Edit 3 photos as your first set of outcomes (using any photos from your project )
Upload your edits FULL SIZE on three separate slides under the title of 'Final outcomes'.
Next, edit your three edits into the empty frames in one of the following art gallery pictures. Click the gallery then copy and paste it onto photoshop. Upload it underneath to show how they might look as a set of images. Paste your edits onto the picture, then use CTRL+T to re-size and rotate.
|
|

The final task when you have completed the project is to write an evaluation.
When your final pieces are finished and uploaded, you need to write an evaluation. Write it on Word so you can spell check and save, then copy it over when finished. To evaluate, use these questions to help you:
When your final pieces are finished and uploaded, you need to write an evaluation. Write it on Word so you can spell check and save, then copy it over when finished. To evaluate, use these questions to help you:
|
Prompt questions to help structure your evaluation. Answer in full sentences and write in a paragraph. How have you explored the title of Distortion through this project? Which artists have inspired your project and how? What have you experimented with to help you develop your ideas for the project? What is the idea behind your final series of images and how does it bring together the best parts of your project? How did you create your final series of images? What are the overall strengths of your project and why? What are your areas for development - what do you need to work on in future projects? |
If you need sentence starters, use them (copy and paste!), but add plenty to them. No one word answers! Explain yourself fully and expand on your answers as much as you can. The title of my project was Distortion. I have developed explored this subject through... The artists that have inspired my work most are... and... . Bruce Boyd has inspired my use of... Suzanne Saroff has inspired the way I... In order to develop my ideas for this project I experimented with... After experimenting, I have brought together the best parts of my project to create my final series of images by... To create my final series of images I... I chose to work like this because... Overall, I think the strengths of the project are... because... The areas that I will need to work on in future projects are... because... |

- Are all of your photoshoots and artist research uploaded and in the right place?
- Does each task have a clear title to explain what you did and artist links?
- Have you put your best photos from each photoshoot full size?
- Do you have any extra photos to upload? Add them to the right galleries.
- Have you reviewed your edits, explaining how you did it, which artists inspired them and strengths/areas for development?
- Have you completed at least 3 final outcomes and uploaded them full size along with presenting them in an art gallery?
- Have you written a final evaluation - full sentences and appropriate language as if talking to the examiner?
- Are there any more edits you could do for extra marks?

Whilst we have been given an extension on the coursework, we will only have 5 weeks after Christmas to finish and improve both the Pattern and Distortion projects.
Please complete any/all of the work below that you are able to over the 3 lockdown lessons this week to help lighten the load when you are back. You should have done some of this at home already as it was homework...
- upload all photos
- organise your website *Clear titles, annotate experiments, make sure things are uploaded and in order*
- annotating your work - explain how you did things, what artists each experiment links to and reflect on the strengths and weaknesses.
- check all tasks are complete (go through the page above)
- extra photoshoots for either the Distortion or Pattern project (any extra photos for any task will help get extra marks! You could re-do a photoshoot to improve it, and add a second gallery under the first to show progress)
- extra edits using any software or app that you have access to.
