 Read through the following on lighting in photography.  Through this task you are learning about the different types of lighting in photography. You need to be able to use lots of different types so that you can choose the right kind of lighting for your photoshoot. The lighting in your photo can make or break your image! 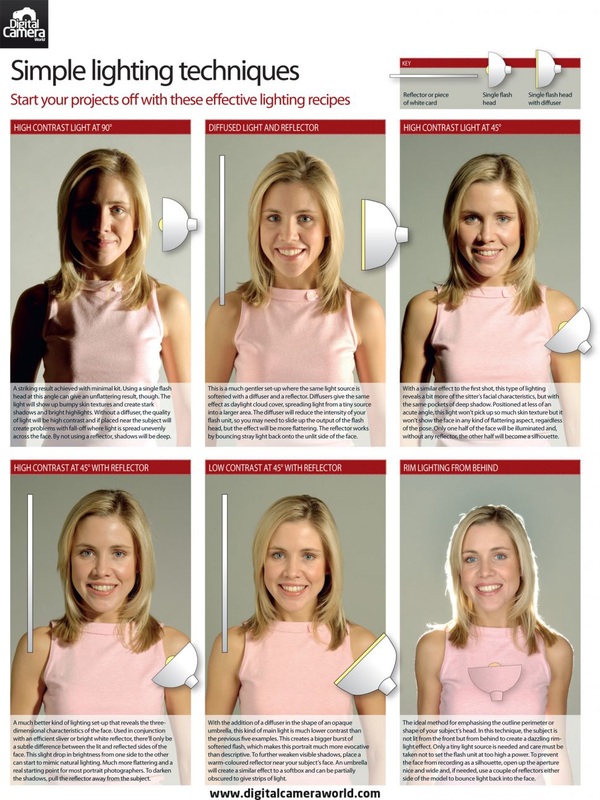  Put all of the following onto a powerpoint on different slides: TASK 1 - on the first slide: Carry out research into different types of lighting. Explore the following different types of lighting your subject in a photograph, the effect each one creates and when you might use it in your photography. Spotlight Side lighting Back Lighting Soft/diffused lighting Natural lighting Creative/unusual lighting For example: Window lighting - stand/place your subject near a window for natural lighting. This will produce highlights and some shadows, which will be softer rather harsh contrast. This will vary depending on the time of day and brightness of the room in contrast to outside. Bonus points: if you can find any 'tips for lighting' images, include these on your page to refer back to!
 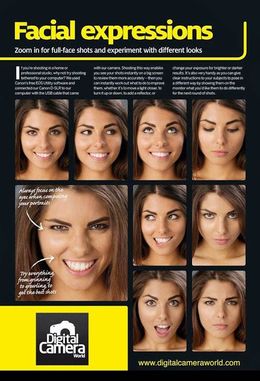 Preparing for your practical lesson When Mr Field is back in school. To apply what you have learnt through this task, you will take a range of portrait photographs using different lighting. To prepare for this, find some guides on portrait photographs eg. ideas for facial expressions, body language, poses, props etc. Copy and pastes your images under the title 'Ideas for Portait Photographs'.  For your homework, I'd like you to have a practice for the practical...
Please take 6 photographs of the same person, with each photograph using different lighting. Vary your distance from the person, their expressions, their poses etc. Save these to a new slide on your powerpoint.
0 Comments
 Add a title to your skills development called 'Artist Research'  Task 1: Reading a picture When looking at a photograph, there are certain questions that you should ask yourself in order to read into the photo fully. This table is a useful document for helping you to break down the key points you need to think about. Complete the worksheet about the photograph in the centre then save it as a JPEG by going to save as... then changing the file type to JPEG Interchange. Upload it using an image block when it is finished.
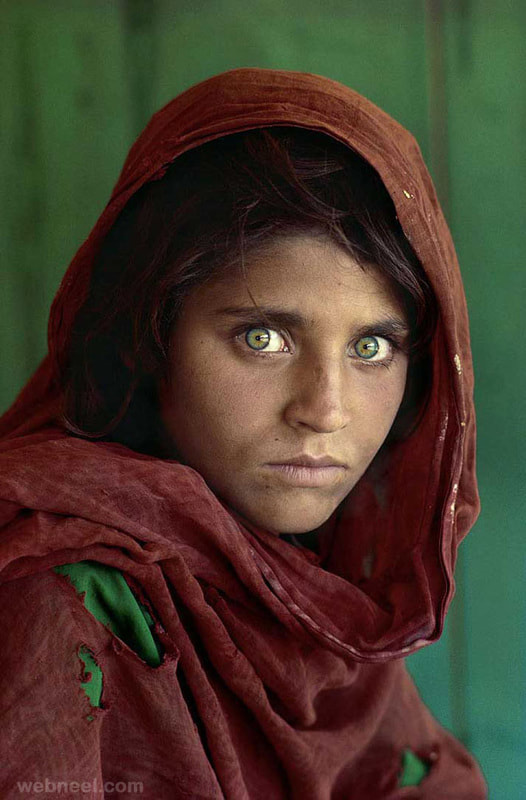
 Task 2: Analysing a photographer To analyse a photographer's work, you need to talk about: - what is in the picture? - how they have taken the photograph? - What camera or editing techniques have they used? - how have they used the formal elements? (colour, composition, lighting, viewpoint etc) - what do you like about the work and why? - how could their work inspire your own photographs? If you need help getting started, you can copy and paste these sentence starters... Artist's Name takes photographs of... He/she takes his/her photos by... This photographer considers formal elements in their work by... Something I like about Artist's Name's photography style is... I could take inspiration from this photographer in my own work by... Write a paragraph about one of these three photographers and their image that you see below. Analyse them using the questions or sentence starters above, and key words the sheet. Include a title above your paragraph which should be the artist's name, and a picture of the photograph you are talking about. Use an image widget then a text widget underneath or to the side. Steve McCurry Salvador Dali Julia Wang
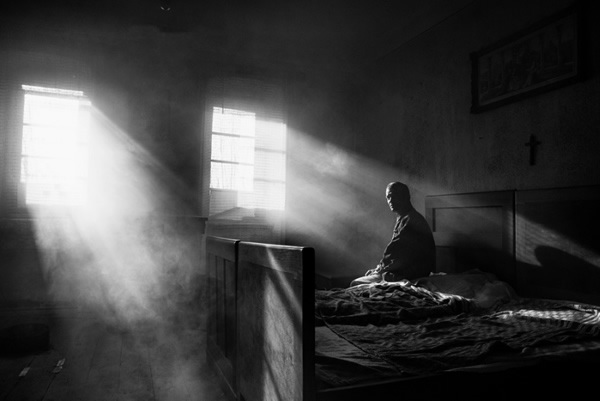
  Discuss: What makes a good photograph?  Begin by adding a new title within 'Skills Development'. 'Formal Elements'. Next, read through the PowerPoint below to help you understand what formal elements are. - Colour - Line - Tone - Texture - Pattern - Composition  Example 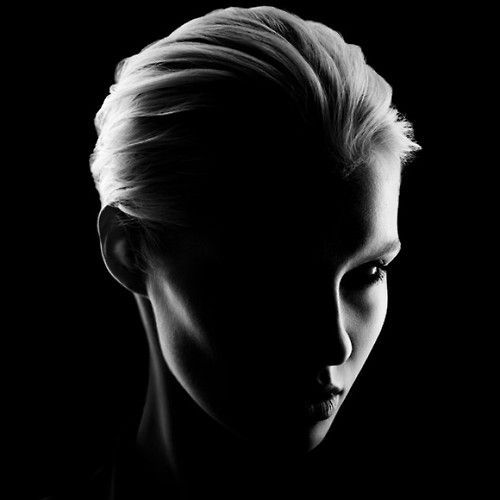 Lighting (About the formal element) Lighting is a good tool for changing the way your subject matter is viewed, and can be effective in creating a mood or atmosphere, or drawing the viewer's attention to a certain area of your photo. There are different types of lighting that you could use in photography such as using the flash on your camera, a spot light or natural lighting. Depending on the situation, you would vary the type of lighting you would use. This image for example, has been lit using a spotlight as it has strong lighting. Using a window for natural lighting would be much less striking but softer and more natural. Going for gold (Analyse your photo for higher marks) This photograph is a good example of how lighting can be used effectively to enhance the subject that you are photographing. Here, the bold contrast between the dark background and the lighting from the back of the woman's face draws attention to the features of just one side of the face. This creates a mood or atmosphere. Use the link below to see how to lay out your page and what needs to be included. You will need to arrange a title, text boxes and images in a similar way so that you can effectively write about the different formal elements. Use the internet to help you research the formal elements and find at least 2 examples of each one. Save the example photos you find to a folder on your area. To upload a photograph, click the image box when it is in place, then drag the photo from the folder into the area where it says 'drag image here'. find an example of each of the following formal elements: - Colour - Line - Tone - Texture - Pattern - Composition Year 12 should also research: Lighting, framing, and viewpoint (year 10 you will do this later). Under each photograph, write the formal element title then a short paragraph about how to use that formal element to improve your photography skills.  YEAR 10 Part one: Finish the powerpoint from today's lessons if you didn't have time to complete it, and upload it with a document block on your skills development page. Part two: Take at least 2 photographs to represent each of the formal elements that you have looked at. If you only have your phone, that's ok for now, but you must be able to get them onto the computer in Monday's lesson (or before). - Colour - Line - Tone/Lighting - Texture - Pattern - Composition Bring your memory card/usb in next lesson OR upload your photos to your area before next lesson. Don't put them on your website yet! If you don't have a card reader - get one at poundland!! If you dont have a camera... you may use your phone for this homework but not many others. You NEED a camera for this course, so please do get it sorted asap.   You should have your powerpoint complete and 12 photos ready to upload. Follow the instructions to do this.
How to upload your photos To upload your photos you will need to plug your memory card into a card reader OR plug your cable into the computer and your camera or phone. Click into the drive via the computer icon, and change the view to thumbnails so you can see previews of your photos. Select your photos by holding down CTRL and clicking each one OR hold SHIFT and draw around the photos if they are in a block. COPY the photos (CTRL+V) and paste in a folder on your area called Formal Elements.  To review the homework, copy and paste the sentence starters then complete them.
To demonstrate composition in my photography I... I thought about colour when taking my photos by... The tone/lighting in my photos is effective because... I also considered pattern and texture by... The use of line in my photos adds interest to my photos by... |
AuthorThese lessons have been written by Miss Wilson. Archives
December 2018
Categories
All
|
|||||||
 RSS Feed
