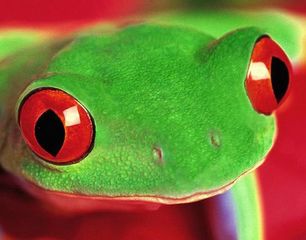
 If you used your own camera last lesson: Collect a card reader and upload your photos to your area AND to your website. If you used a school camera, your photos are in student shared/photography/year 10 In the Macro Photoshoot gallery, upload your macro photos from last lesson. We will come back to editing next week.  What is effective about the use of colour in these photographs? What difference would it make if the colours were different (brighter, bolder, darker, duller etc) in each photo?
 Through this task you will learn a range of colour techniques. By learning about colour theory, you will make more conscious decisions about the colours you put together in your photoshoots, resulting in more effective photographs, and higher marks if used thoughtfully. 
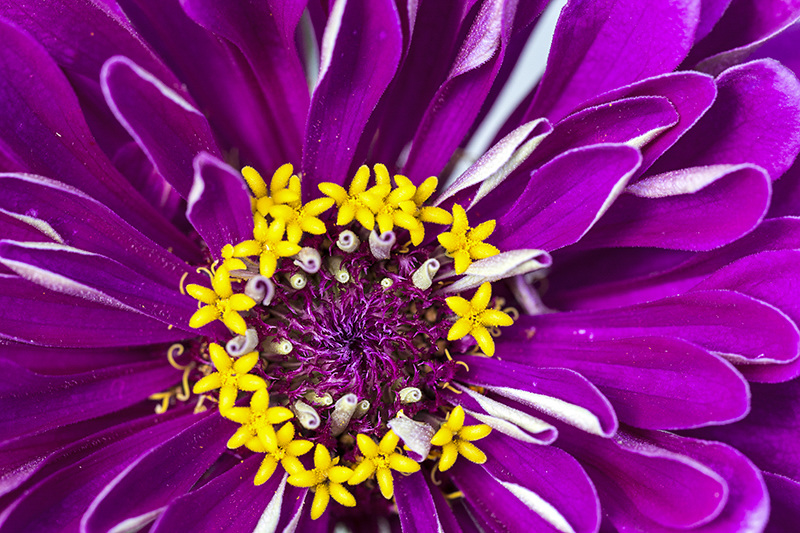
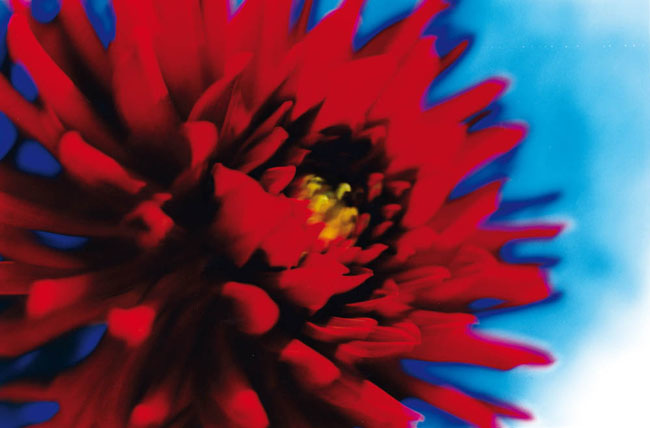
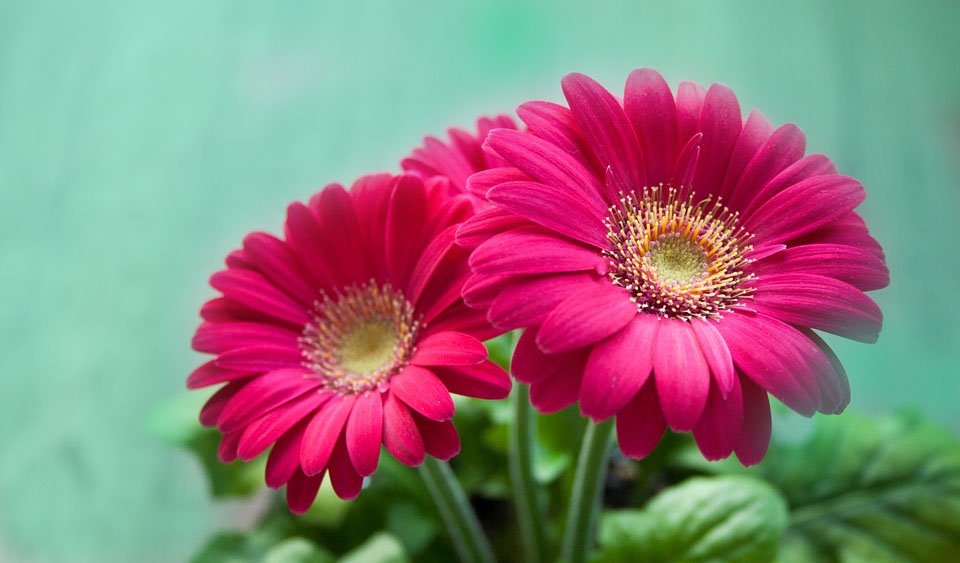
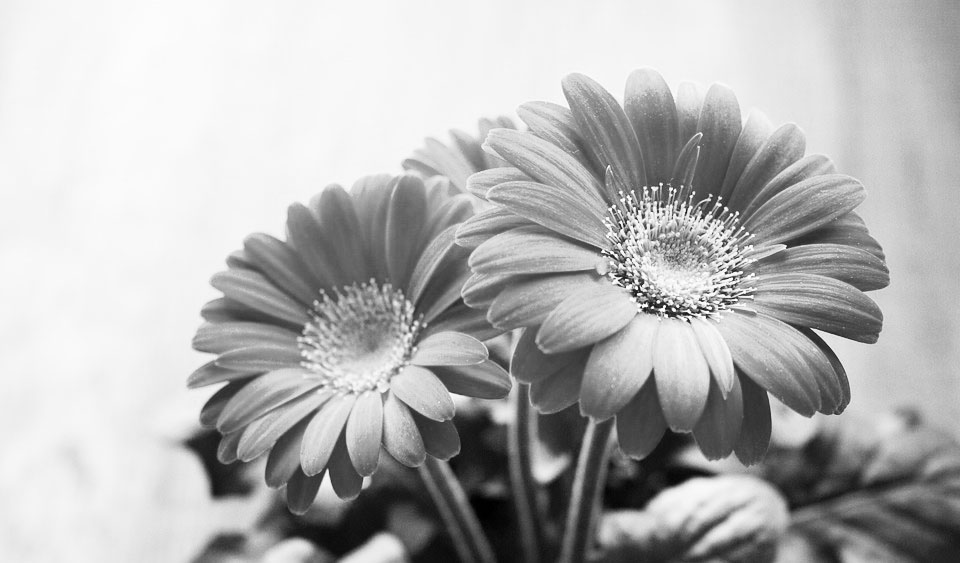
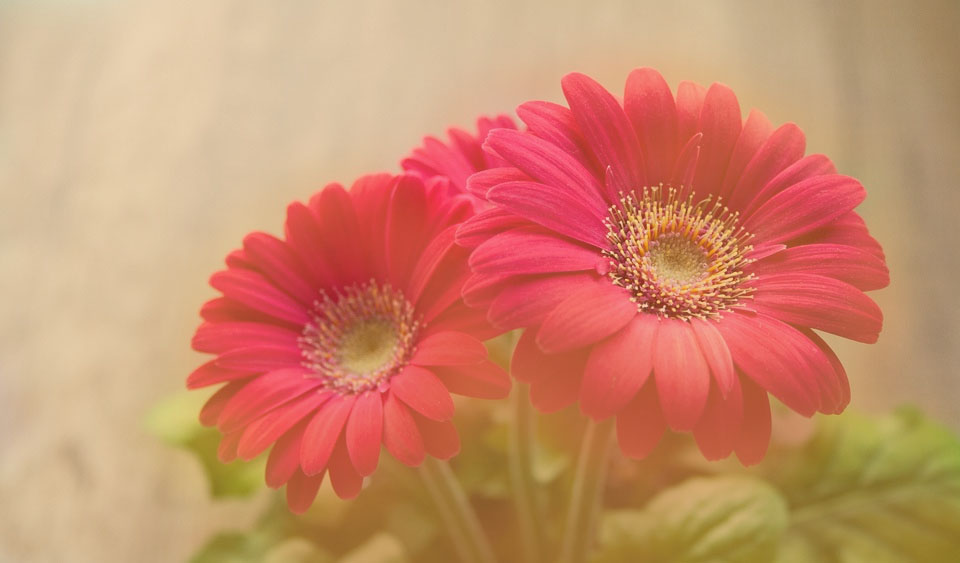
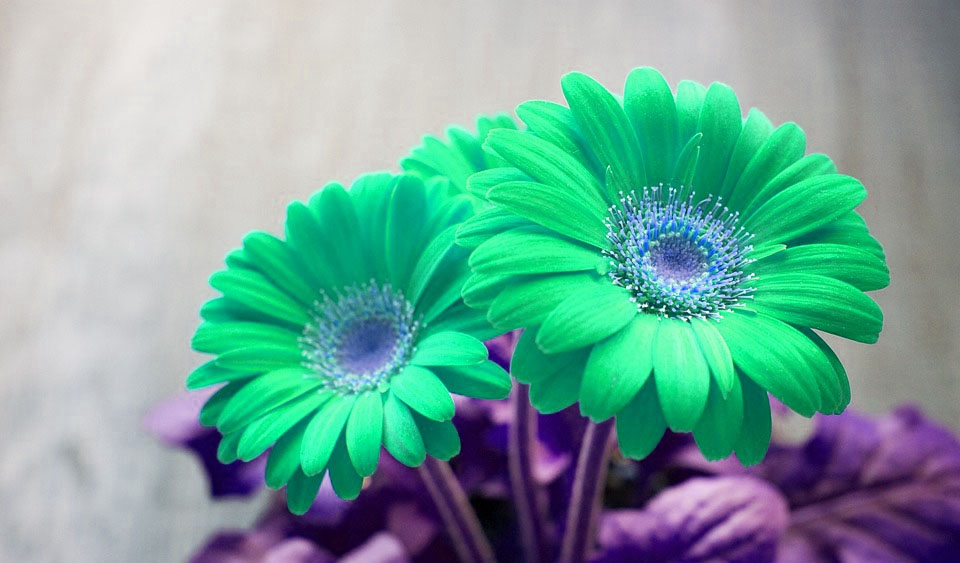
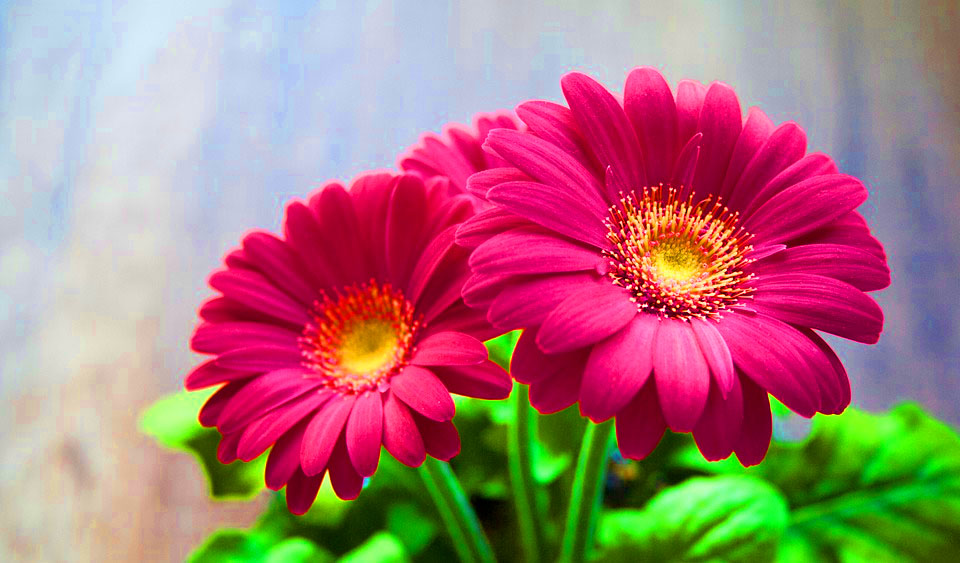
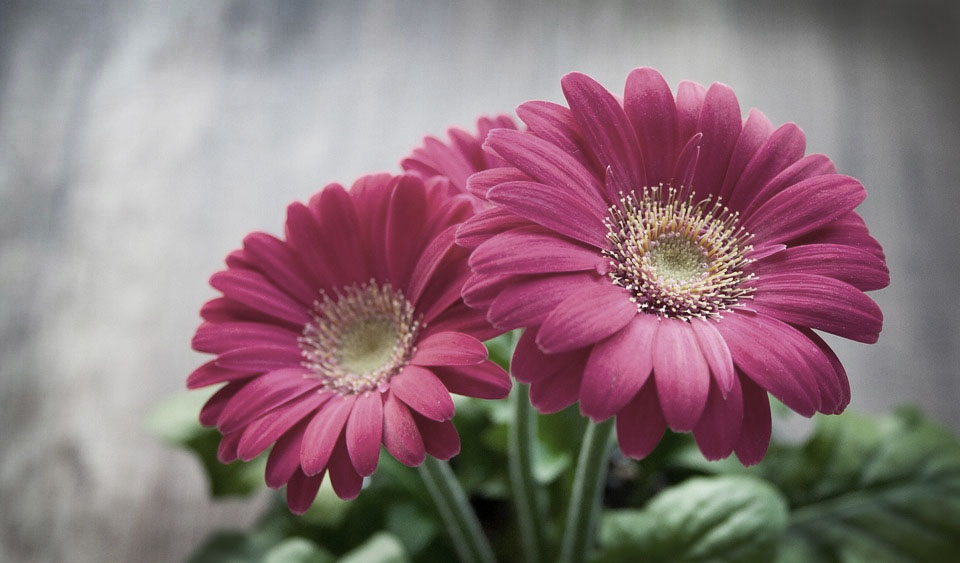
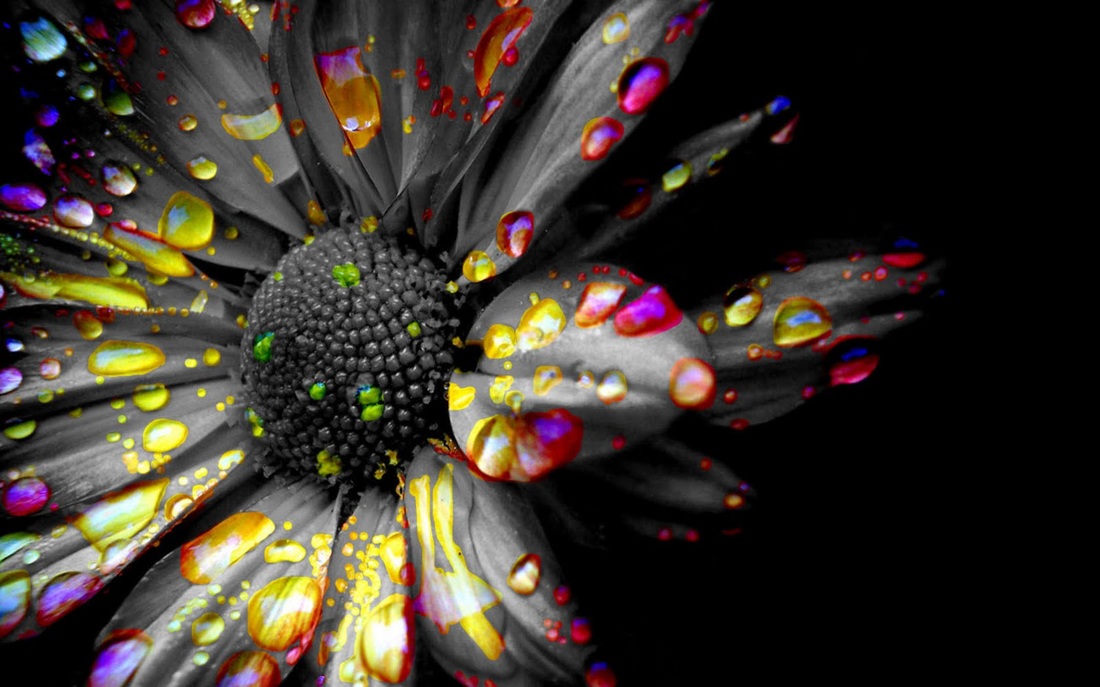
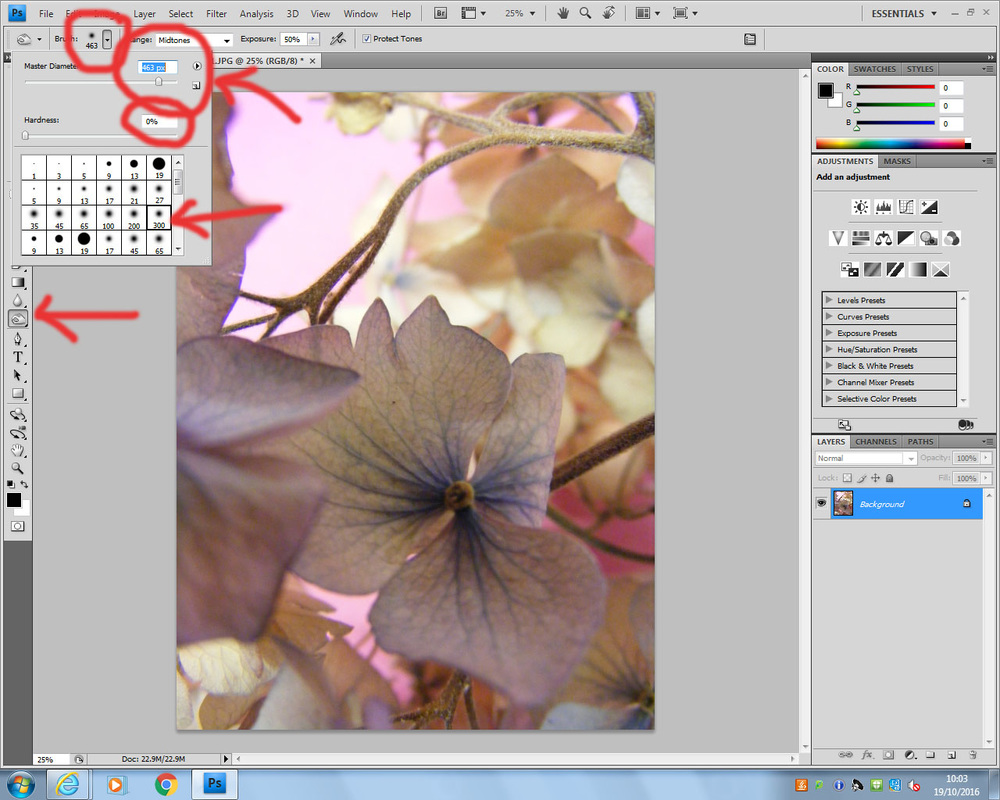
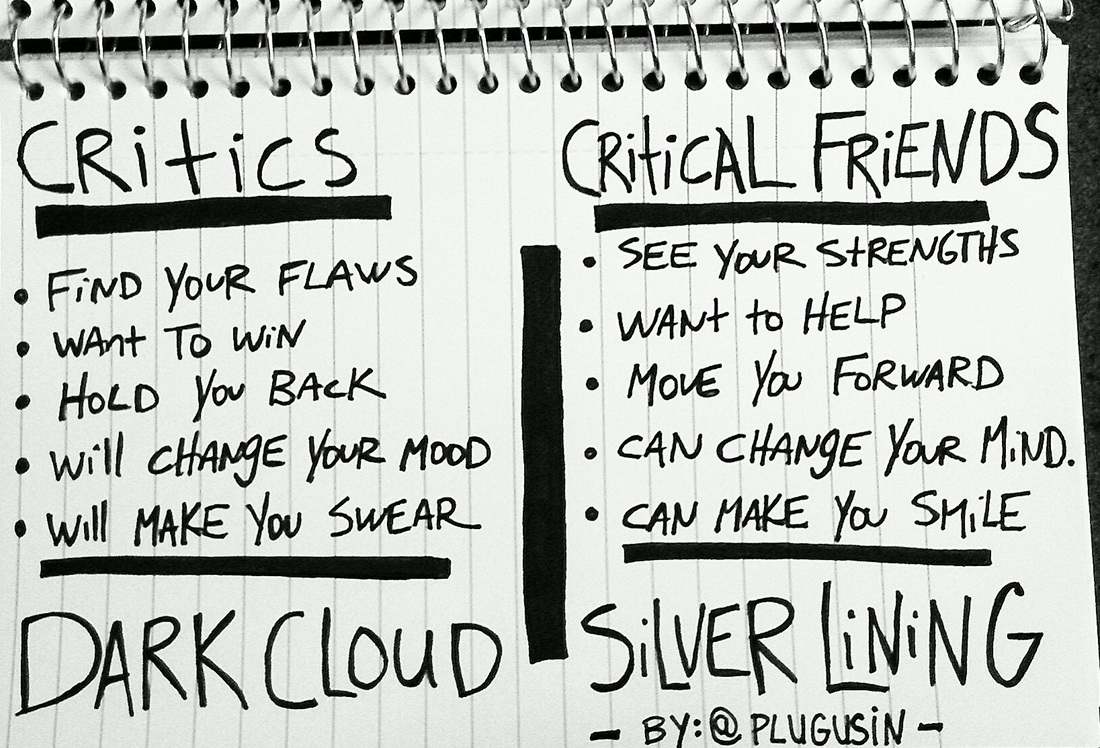
The above photos are by the artist Mika Ninagawa. The artist has photographed colourful items, then the bold colours of these simple objects have been exaggerated on Photoshop, altering brightness, contrast, hue and saturation.  Task 1: Edit one of your previous photographs multiple times to represent all of the different types of colours, and to show the different things you can do with a single photo. After each edit, save it as a JPEG (new title) then go back to the original photo using CTRL+ALT+Z to undo your editing. To change colours you have multiple options: 1. go to image, adjustments, hue and saturation. Here you can change the colours completely with the hue or make it brighter or duller with saturation. 2. go to image, adjustments, desaturate. This will take all colour out of the picture. 3. Use the brush tool on a large setting with 0% hardness and on a low opacity (around 30%) to paint colour onto sections of your picture (change the colour on the tool bar). For example Add a new title to your Close Up page - Colour theory Upload all of your photos into a GALLERY, with a caption on each photo of the correct titles: - Complementary colours - Monochrome (colour) - Monochrome (black and white) - Warm colours - Cool colours - Increased saturation - Decreased saturation  Title: COLOUR THEORY Write a paragraph to explain the task and the way you can change an image completely as a result of changing colours. Desribe the changes that occur in the way your photo could be viewed, and give your opinion on the photos - is there a colour type that you prefer more than others? Why? etc. If you need help getting started use these sentence starters: To alter the colours in photoshop I... By working on the same photograph, I can demonstrate that by changing the colours... I prefer the.... because... Going for gold Add an extra sentence or two to reflect on when you might use some of the colour types. Perhaps some are more suited to creating a certain atmosphere etc. 

0 Comments
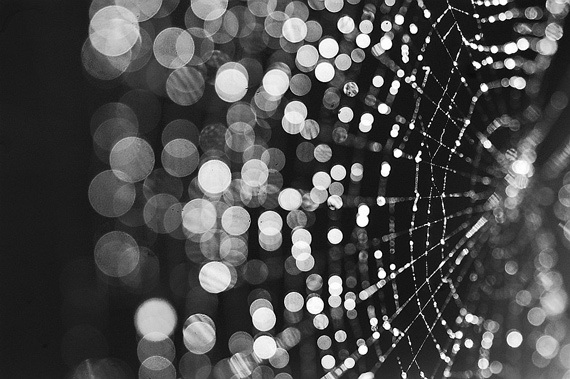
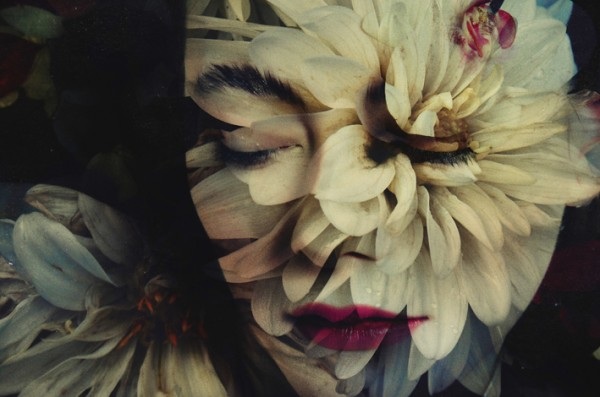
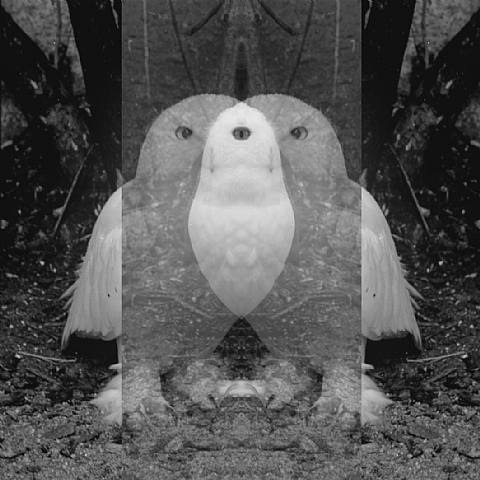
 Discuss these pictures in pairs. How do you think they have been created on photoshop? Click the pictures to enlarge them.
 This lesson you are learning how to use layers on Photoshop. This is one of the key features that you will need to be using on a regular basis in order to get the higher marks.   Upload your homework photos. Whilst they are uploading, continue with the work below...Work your way through the PowerPoint above (ALSO EMAILED TO YOU as it wasn't uploading properly!) to develop your skills with layering, and experiment with different ways of layering your photos to create more artistic outcomes. Edit your BEST homework photos! Create at least one image for each of the following: - Reduced opacity - 2 images layered - Altered size - 2 or more images layered - Colour splash After completing each photo, save it as a JPEG unless you need to work back on the layers in which case you need to save it as a PSD file. You have 3 lessons to complete this if needed. If you finish early, try another edit using layers with a different photo! Experiment and see what you can do... Next week you will continue from here: Add a title of 'Layers on Photoshop' to your close up page under all of your other work. Upload all of your edited layers photos so far with a subtitle for each photo of the technique used. - Reduced opacity - 2 images layered - Altered size - 2 or more images layered - Colour splash 
 Learn the following photoshop shortcuts for a test next lesson. You must get at least 9 out of 12 to avoid having to repeat the test after school next week. 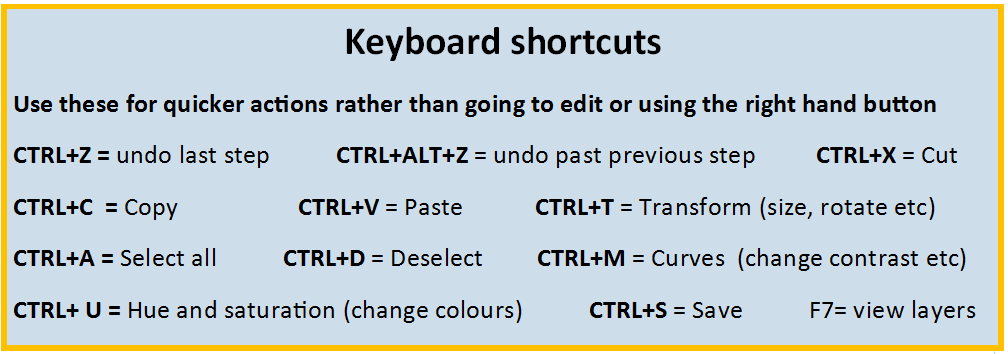 

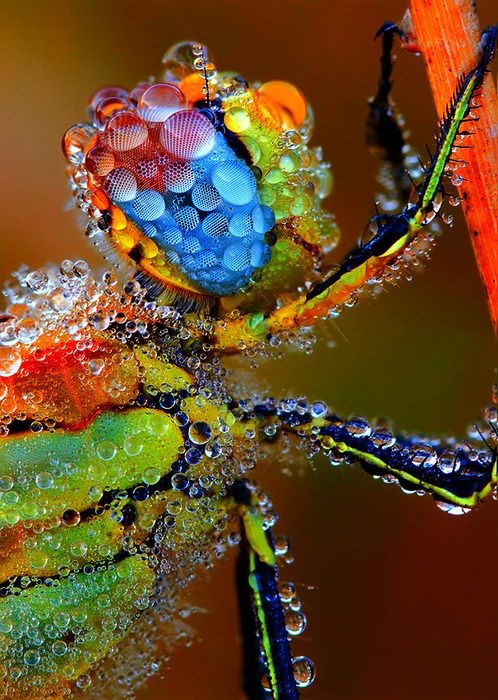
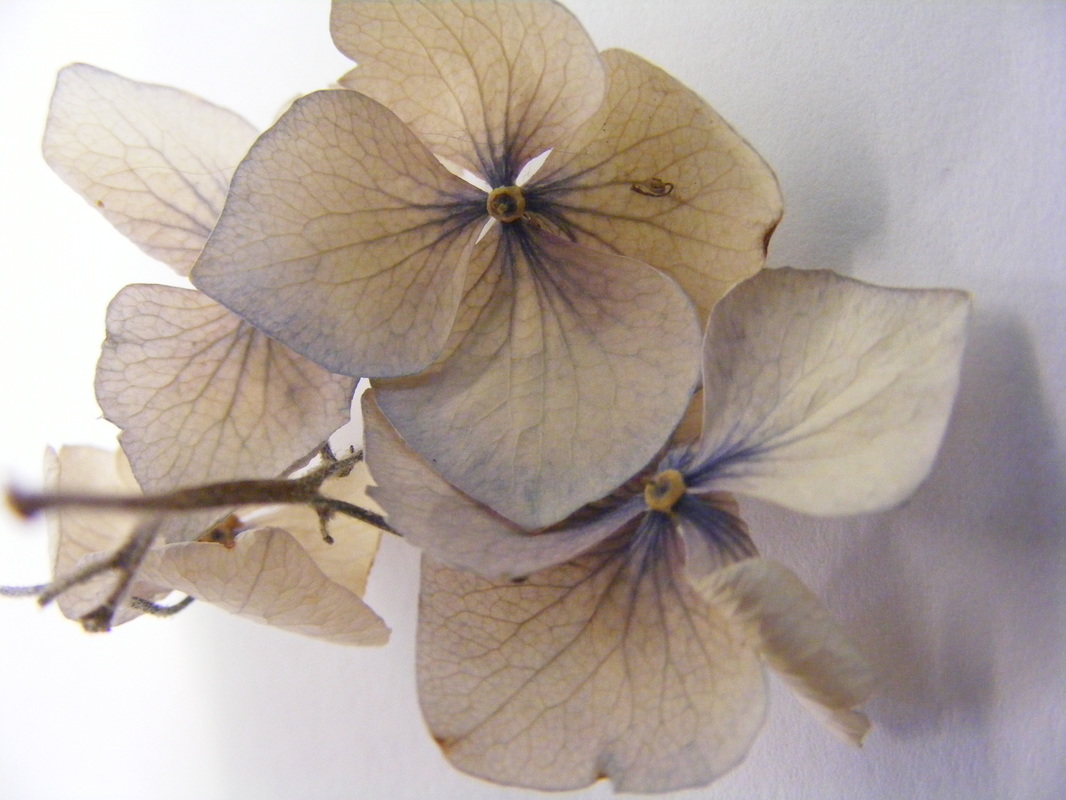
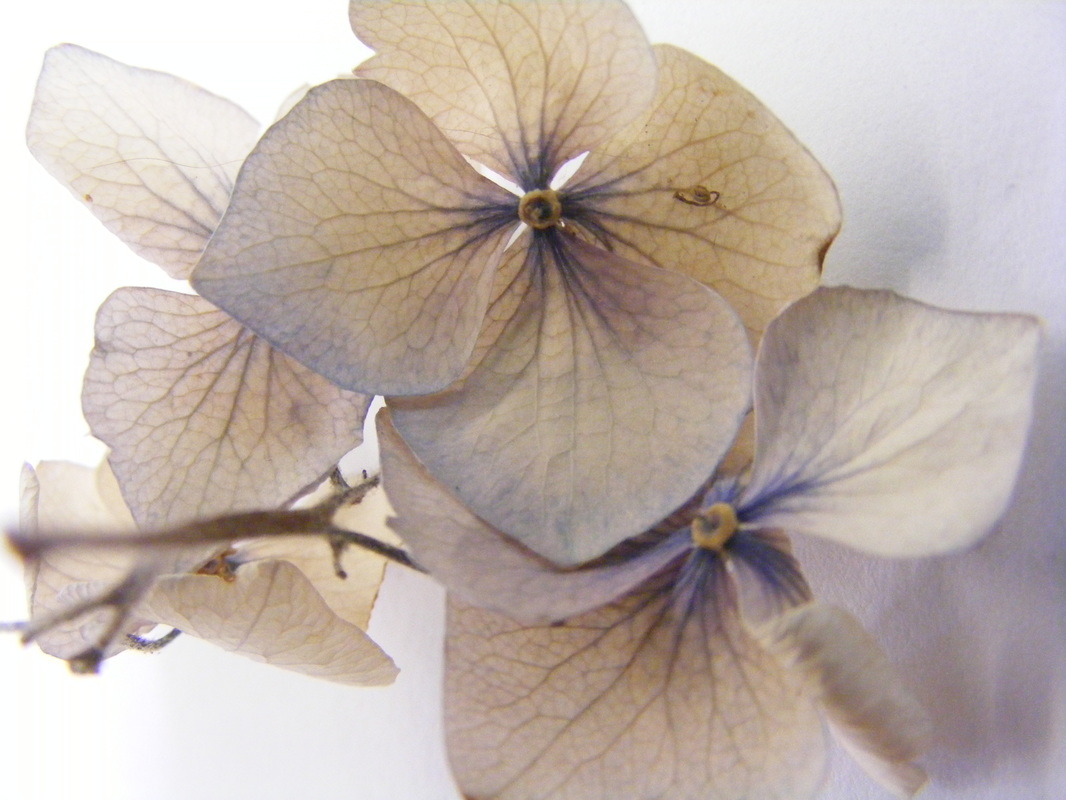
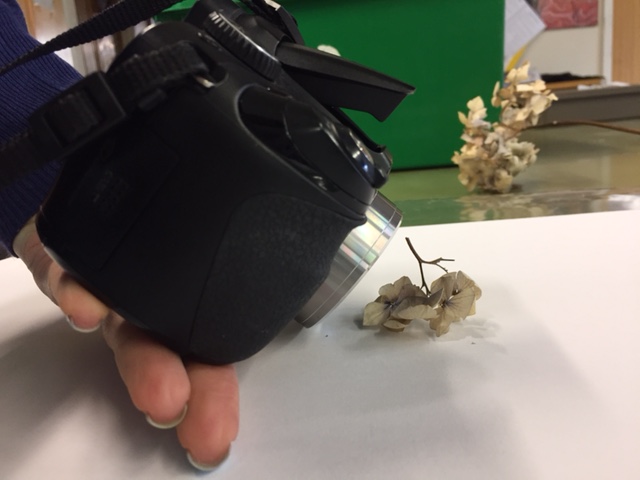
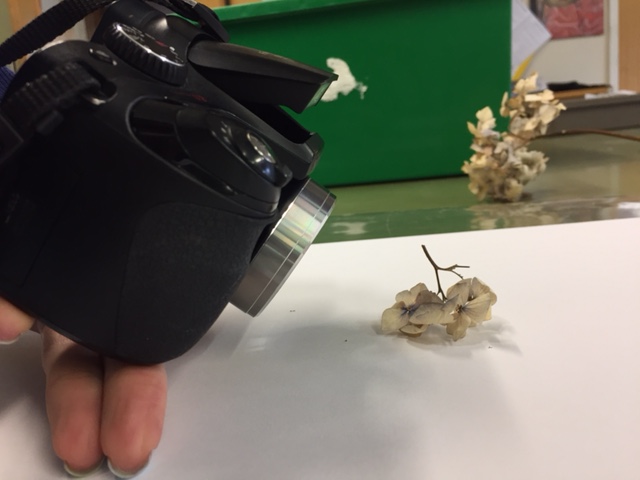
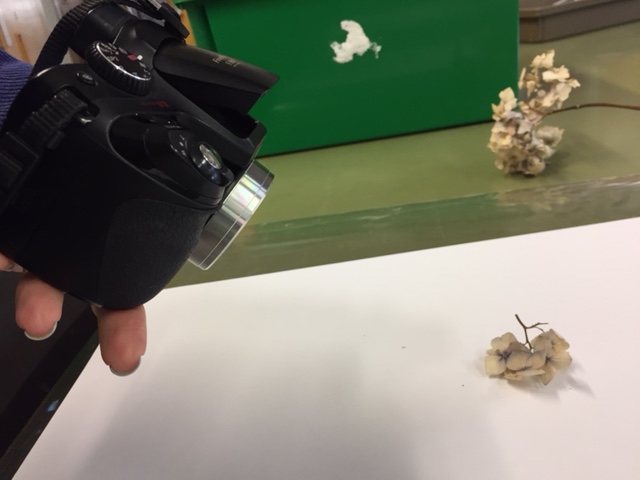
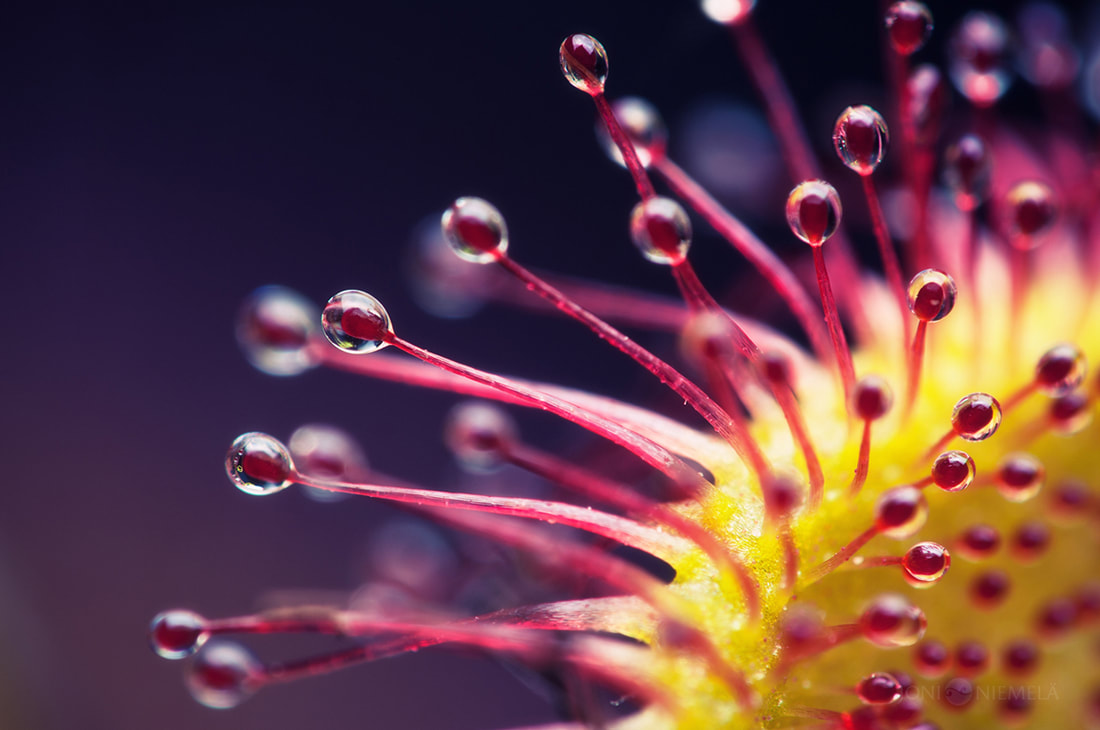
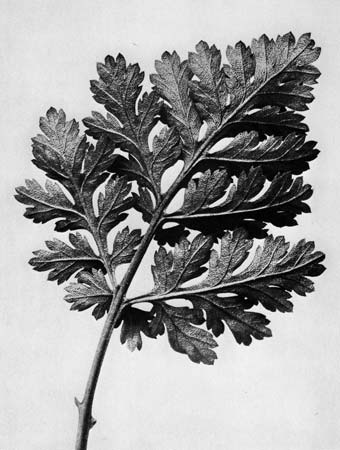
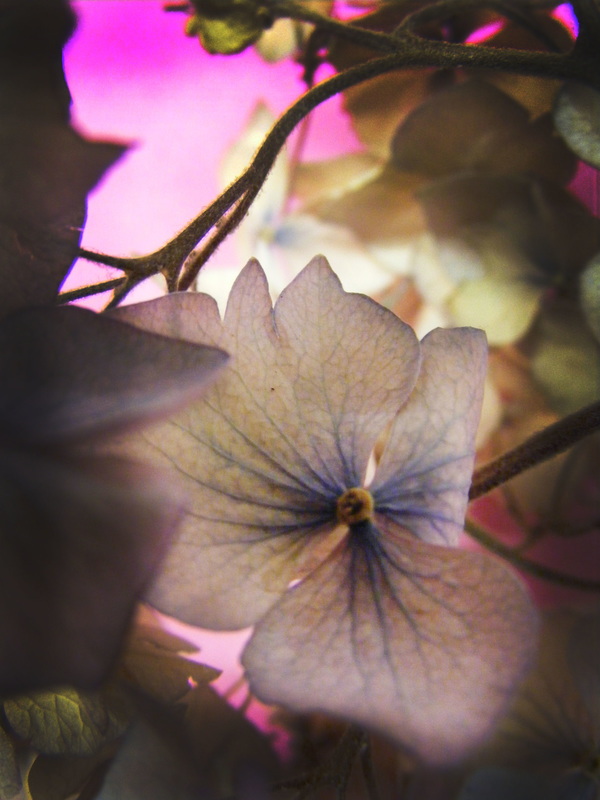
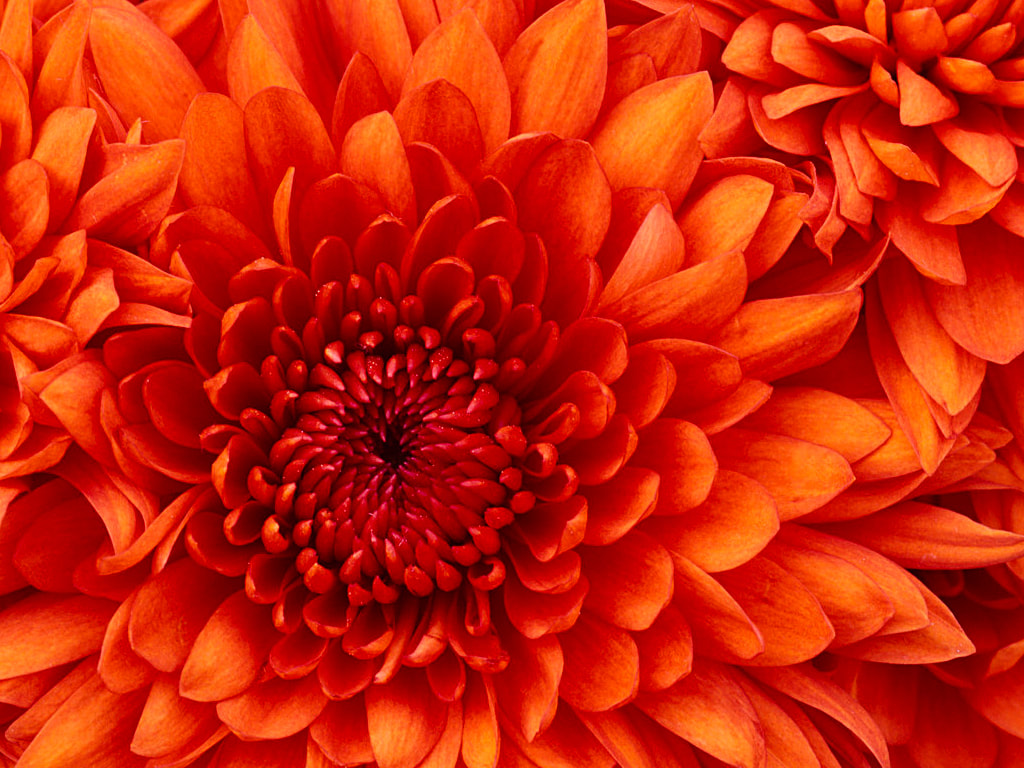
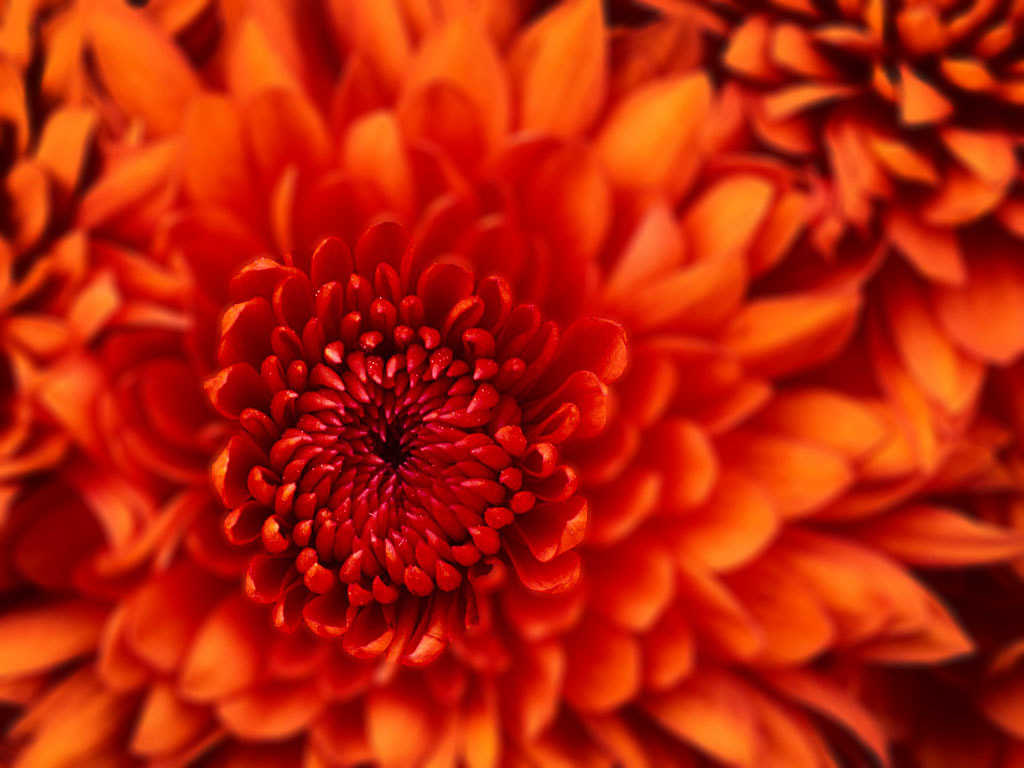
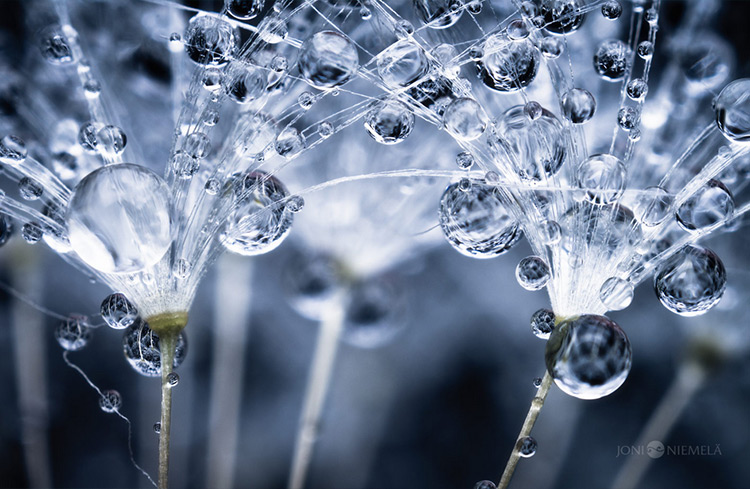
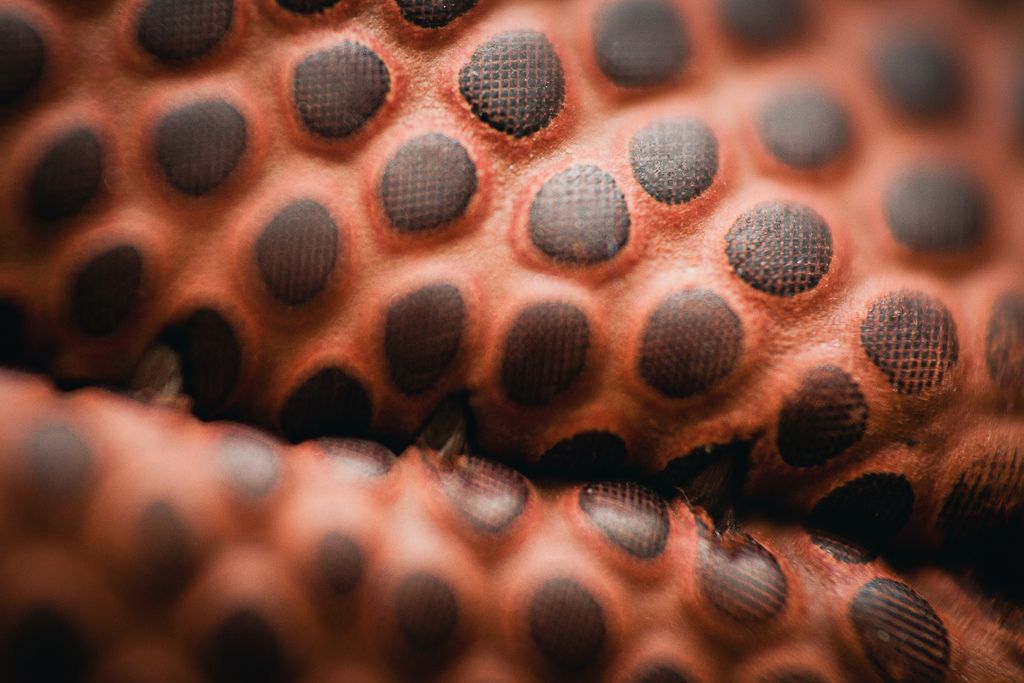
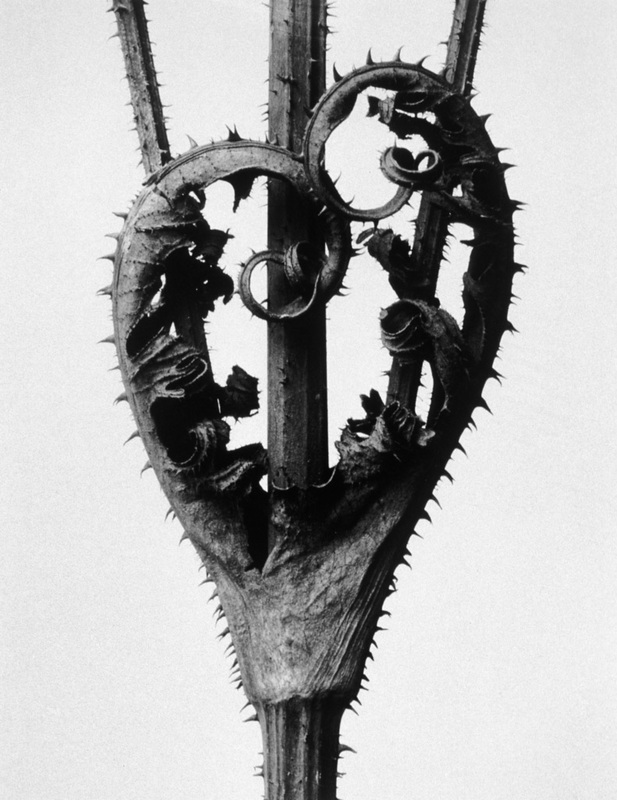
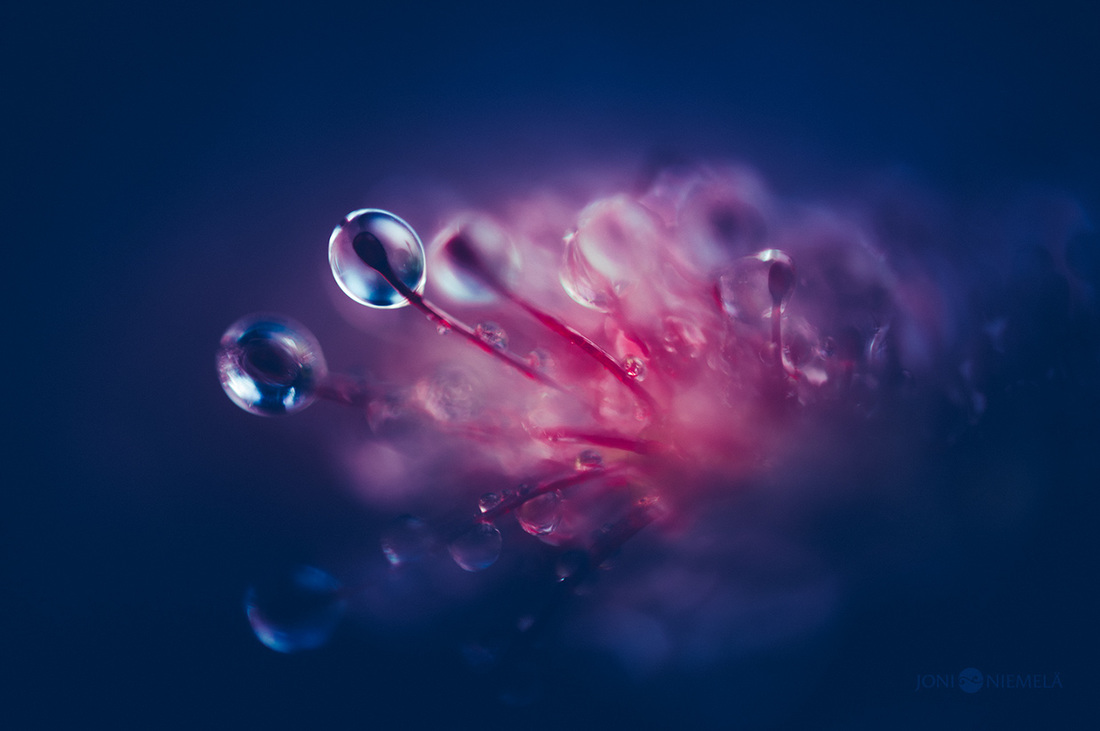
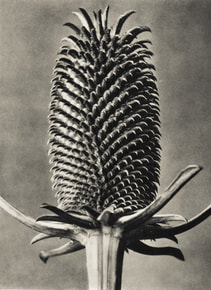
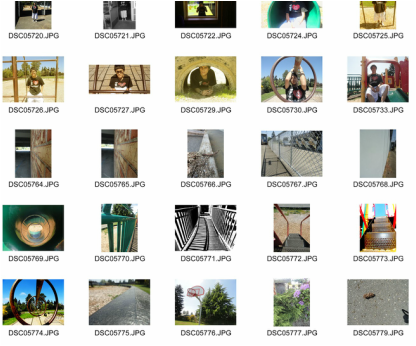
 What is the difference between macro on and off? How should you hold your camera? Roughly: 1CM = SUPERMACRO 2-4 CM = MACRO 10CM OR MORE = MACRO OFF  If you have a card reader and your memory card...Go to your Close up page. Add a title underneath your artist research, followed by a gallery element. Plug in your memory stick or cable so you can access your photos. Click your gallery icon then upload ALL of your photos (except selfies!). This will take a few minutes. Do the opposite task on a word document whilst you are waiting - you will copy and paste it when your photos have uploaded. When finished, pass your card reader/memory card to the next person. Click the gallery at the edges so the settings come up. Change the number of columns to 5 or 6 depending on the number of photos you have so they fit more neatly onto the page. Put a title above your gallery called 'Macro Contact Sheet'. If you are waiting for the card reader or memory card do this whilst you wait... On your Close up page, add a title 'Macro Photoshoot' under the work from last lesson, then a text box below. Write a paragraph to explain the task using the following questions. When writing, always imagine you are talking to the examiner as that is who will read your work! What did you have to do? For this task we had to... What was the purpose of this task? The purpose of the task was to... Explain how you used the macro setting, what you took photographs of, and what you found to be most effective. I used the macro setting to photograph... The objects I found most effective were.... because... Did you try anything that didn't work? Explain why this was. Something I tried that didn't was... because... How did the work of Joni Niemela and Karl Blossfeldt inspire you? Make links between your work and theirs. I took inspiration from the work of Niemela and Blossfeldt by....  How will you have to edit your photos so they are in the style of the two photographers?
 AO2: Experimenting (25% of your marks) with links to artists (for marks in AO1 too!) This lesson, you are learning how to enhance your photos so they still look real but slightly abstract, enhancing what a macro setting does to your photographs. You will alter hue, saturation, brightness and contrast, as well as explore blur tools.  This lesson you are asked to do a minimum of 2 edited photographs. One in the style of each of your photographers. If you finish these, your challenge is then to combine the two styles independently - think how you might do this whilst you are working. Blossfeldt editOpen your favourite photo from last lesson that links most to Blossfeldt in photoshop. Start by making your picture black and white (go to image, adjustments, desaturate), then change the brightness and contrast (go to image, adjustments, brightness and contrast) of your picture so it is similar to the style of Blossfeldt. Next, crop your picture if you need to so there isn't too much negative space around your object (crop tool is in the tool bar). Finally, you might need to clean up your white background there are two ways that you could do this: 1. use the clone tool (on the tool bar) to copy sections from a clear area of background to replace areas of shadow/marks etc. (press alt on the good area then let go, then right click and colour in the area you want to replace. You will need to do this a few times). 2. use the dodge tool to lighten areas of the background (this is on the tool bar- but you might need to right click on the burn/sponge tool if you cant see it) draw over the areas that need lightening. Niemela editOpen a different photo in photoshop. Start by enhancing your colours so they are a little less realistic (go to image, adjustments, hue and saturation), then change the brightness and contrast (go to image, adjustments, brightness and contrast) of your picture so it is similar to the style of Niemela. Next, crop your picture if you need to so there isn't too much negative space around your object (crop tool is in the tool bar). Next, darken the edges of your picture 1. use the burn tool with a brush size 200+ (see pictures below) to darken around the edge of your picture to make it look like it is fading into the border (this is on the tool bar- but you might need to right click on the dodge/sponge tool if you cant see it) draw over the areas that need darkening. If you then feel your main focus needs to be , do the same as above but with the dodge tool.
ADVANCED editing - either add this to your edit, OR create a second edit with a different photo using some of those techniques along with this one: Use the Quick selection tool to draw around the section of the image that you want to keep in focus. CTRL C to copy, then CTRL V to paste on a new layer. click the first layer (not the new one) so it goes blue - this means you are editing this layer but not the other. Add a LENS BLUR - go to filter, blur, lens blur, then alter the adjustments until you are happy. This will result in the selected section staying in focus, but the rest of the image being blurred and out of focus. Use burn etc to enhance further!
Two additional layers, middle layer blurred slightly, and bottom layer blurred more. Soft burn in corners.   Photography homework MACRO PHOTOSHOOT
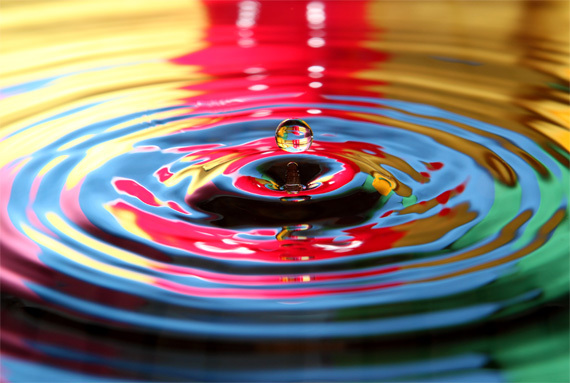
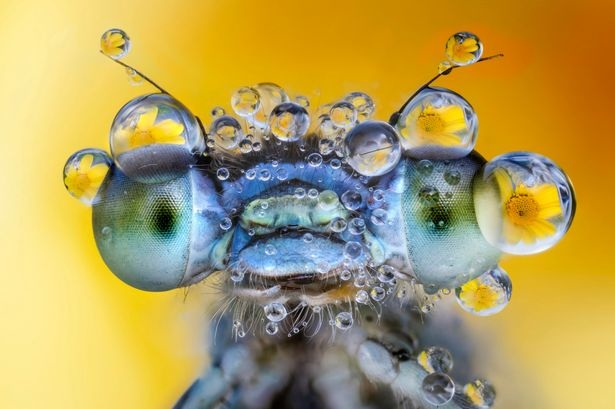
– due Tuesday 6th after half term. Take 5 (OR MORE!) photos for each of the following headings: Flowers Plants Other nature Textures Outside of food item Inside of food (eg. Half an orange) Machinery/tools/related objects Car/bike (inside or outside) Other – your choice! Going for gold: Think about composition, contrasting colours, choice of background, lighting, links to current artists (Blossfeldt and Niemela). For Bonus points: Look at your next artist (Peter Keetman) and take some photos in his style.  Can you guess what these objects are?? Click the pictures to enlarge them. They are all taken with the macro setting - you should know what this is after completing the homework.
 For AO1 (25% of your marks) You need to show that you can take inspiration from an artist. Today you will look at two photographers that look up close at objects. 
 Underneath your homework on your Close up page, add a new title of 'Artist Analysis'. Write a paragraph about each artist, to analyse their work. Include a picture of their work next to your paragraph, and a title above your analysis of the photographers name. You might want to do this in two columns to separate their work clearly. To analyse a photographer's work, you need to talk about what is in the picture, how they have taken the photograph, camera or editing techniques they have used, how they have used the formal elements (colour, composition, lighting, viewpoint etc), what you like about the work, and how their work could inspire your own photographs. Try to use key words. If you need help getting started, use these sentence starters but write as a paragraph... Artist's Name takes photographs of... He/she takes his/her photos by... This photographer considers formal elements in their work by... Something I like about Artist's Name's photography style is... I could take inspiration from this photographer in my own work by...
 1. Bring in your camera for the practical on Thursday. Remember to charge your batteries and make sure you have a memory card in your camera!
2. Bring in any objects that you think would be interesting to photograph up close.  If you haven't already done so, start the lesson by uploading your photoshoot to a contact sheet on your Journeys page, under the title 'Initial Photoshoot'. Write a brief explanation of the photoshoot, including: - What were you aiming to capture through your photos? - What did you photograph and how? - Where did you take the photos and why? - Review the strengths / weaknesses of your images, any challenges you faced and how you overcame them.  How to develop ideas through early experiments on Photoshop.  This lesson, you should link back to all of the skills development tasks that you have completed, and consider them as you attempt some initial experiments to enhance your photos.  Work independently to enhance your photos on photoshop. Save each edit as a JPEG, then upload them as a gallery (2 columns). Add captions to each image, with brief notes on how you edited them. Add a title of 'Initial Photoshop Experiments' above your gallery.  Next, you need to find two main artists to inspire your project. I would suggest that one clearly links to your subject choice, and the other links more specifically to editing techniques/photography style etc. Include photographs of their work on your website, with an analysis of their photography style, technique and representation of the subject, along with your opinion and how they could inspire your work.  As a blog post, write a reflection on your ideas so far for this project. What are you planning to do next? What other photoshoots have you thought about doing? etc.
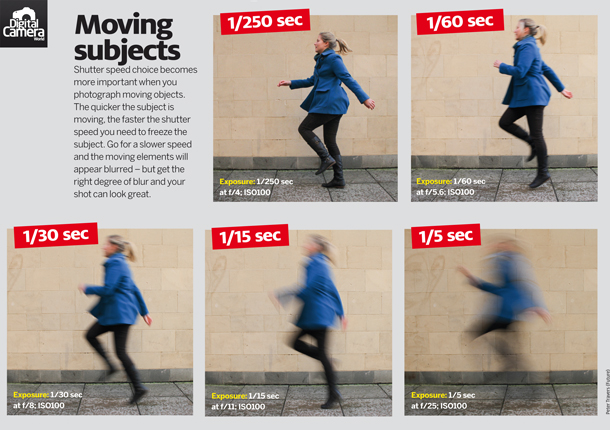
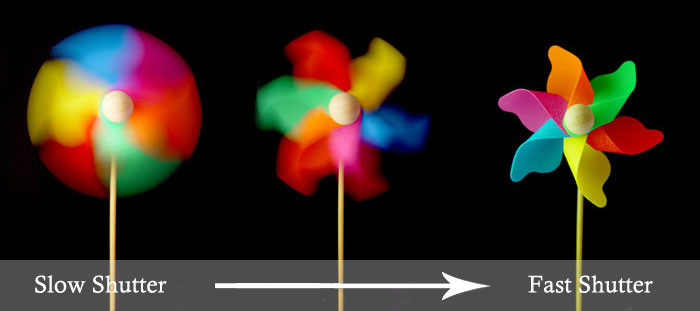
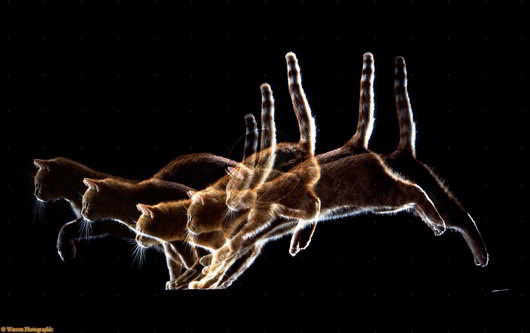
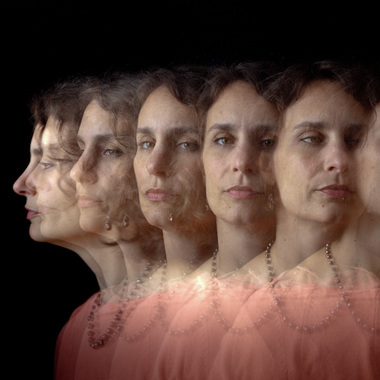
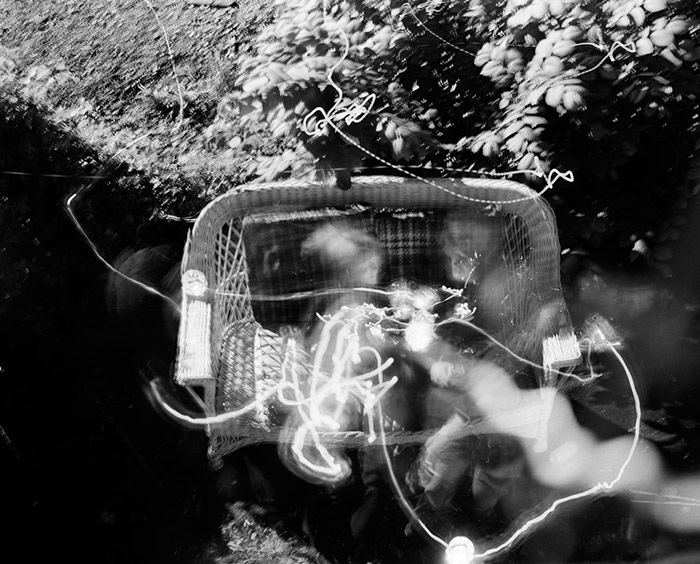
 Read through the following two articles on shutter speed to prepare for the next task. http://www.cambridgeincolour.com/tutorials/camera-shutter-speed.htm http://digital-photography-school.com/6-ways-to-use-shutter-speed-creatively/  You are learning how to use shutter speed and aperture creatively through this task. This will be essential in order for you to reach the higher marks, and you need to be confident with using technical language in order to communicate at the higher level in your written work.
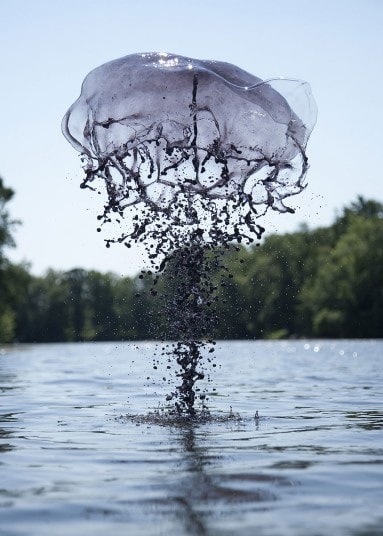
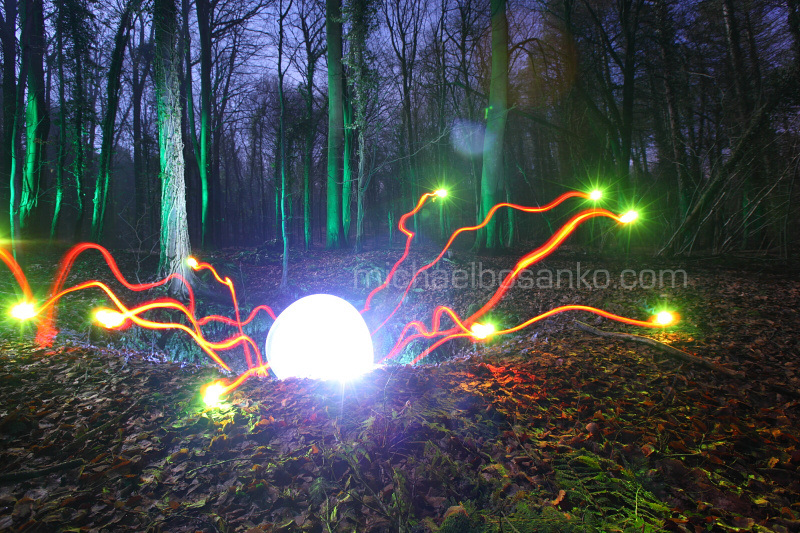
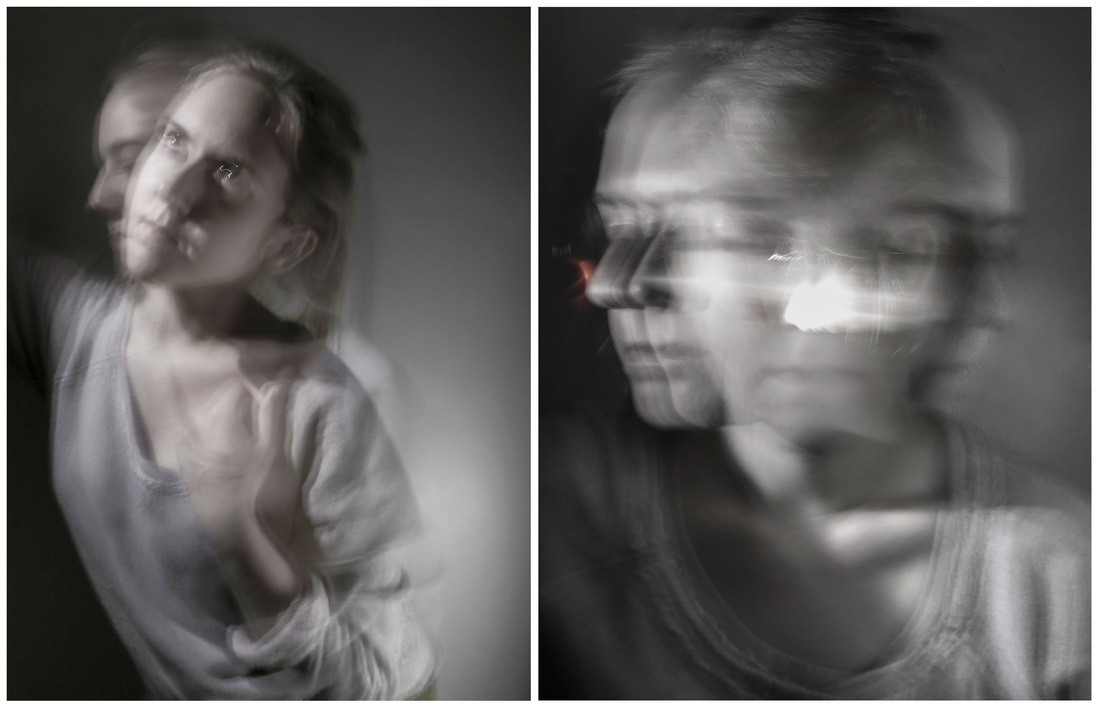
 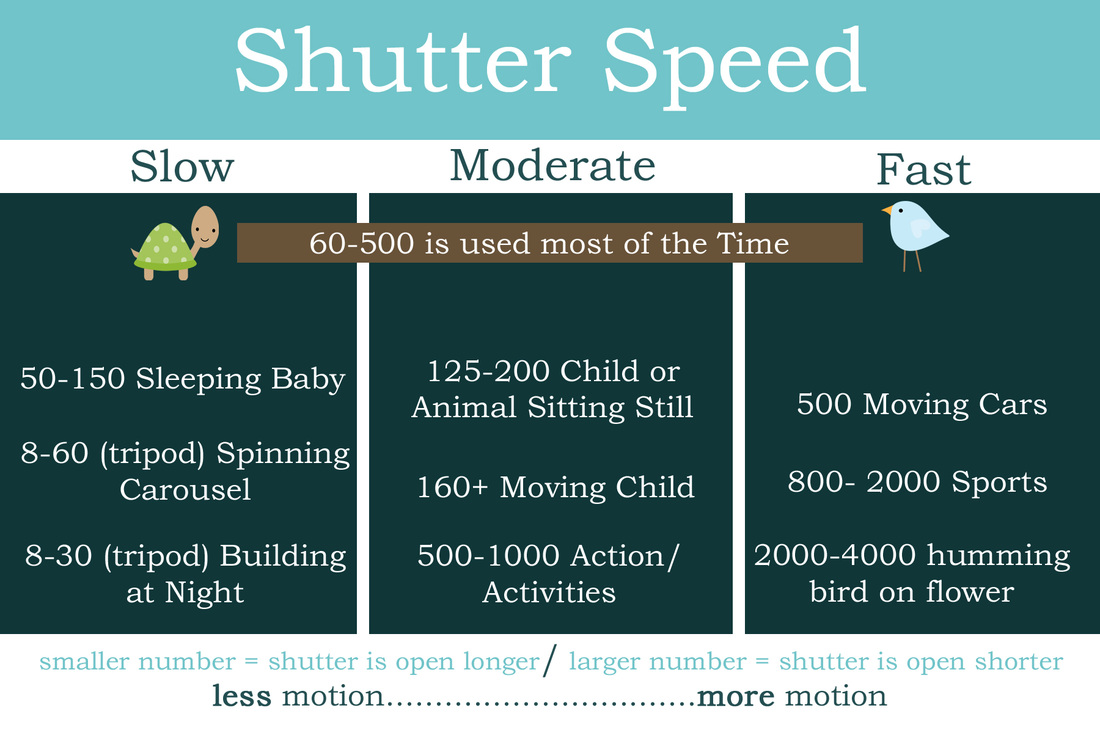 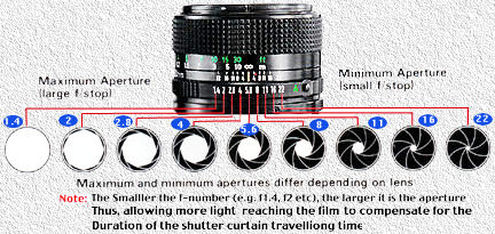  Add a heading below your last photoshoot of 'Movement'. you might want to change the size and colour of the main task headings so it is clear to see where your work changes. Carry out some research into aperture and shutter speed. Add a clear definition of both terms in your own words so that you have a good understanding of both. You can also add some examples or images like those above if it helps your understanding - they might be useful for later reference. Next, explore the following artists work. Include an example of their fast or slow shutter speed work then write a brief analysis of both photos. For higher marks, add an extra text box below and make comparisons between the two photographers approaches, focusing on their technique and creativity. Jack Long  On Thursday's lesson you will experiment with different shutter speed techniques and learn how to use them effectively in combination with aperture. Bring your own camera if you would like support with using the settings. After this lesson, upload all photos into a gallery with a title above it called 'experimenting with shutter speed'. Write a short review of the task and what you learnt from it, along with reminders of how to get successful images the next time you use these techniques.  Your homework is to take 15 (minimum) photographs using slow shutter speed and 15 (minimum) photos using fast shutter speed. You are aiming to represent movement creatively. Please upload your photos at home if possible into two separate galleries - with fast/slow shutter speed titles.  Upload your shutter speed photos to your movement page under the title 'Experimental shutter speed photos' in a gallery as a contact sheet (5/6 columns). Write a brief reflection above your contact sheet on the photoshoot. Comment on the following: - Trial and error - Strengths and weaknesses - How you could enhance the way the photos show movement.  This lesson, you are asked to plan a second photoshoot which uses fast and/or slow shutter speed, with a focus on showing movement as a journey. Consider what you will photograph, where, how, lighting, composition etc. On top of this, I'd like you to think about how you will edit your photos before you do the photoshoot. Find one or two photographers to inspire your work before you begin planning. Start by analyzing their work and the way they edit their photos, include the main photos that interest you on your movement page, then begin to plan your next photoshoot. You have today and tomorrow's lessons to do your artist research and plan your photoshoot in some depth. Ideally, this photoshoot will take place during lessons on Thursday OR it will need to be done on Wednesday after school.
 Upload your photos from your half term photo-shoot to your Journeys page using a Gallery element to create a contact sheet. Save your best photographs to your area so that you can edit them later in high resolution. Also ensure that your PowerPoint with your planning is added to your website (above your contact sheet)  You now have today and tomorrow's lessons to edit your photographs inspired by your photographers and your planning. Refer back to skills development for the possibilities of Photoshop, plus go a step further and do independent research into other editing techniques. Youtube tutorials can be really useful for step by step guidance on how to do something on photoshop. You are aiming to edit at least 2 photographs inspired by each photographer. To take this a step further, you could edit an additional photo that combines the styles of both photographers. When you have finished editing, upload your photos using single image elements, and keep your photos fairly large as they are the outcomes for this task. Write a brief evaluation to explain: - Considerations during the photoshoot - limitations, issues, surprises, trial and error etc. - Links to photographers and how they inspired your photos - How you edited, using technical terms - Strengths and weaknesses of your photos - Areas for development 
 Quick discussion: List everything you can think of that would look interesting if you looked up close at it. Think about different types of nature and man made objects to get you started. 
 You are learning how to explore a topic through initial research. To be successful, keep your ideas really wide and varied - explore everything you can think of! When choosing images, focus on photographs that inspire you and that might give you ideas later in the project.  Create a PowerPoint for researching your first project. Include the following slides: Slide 1. A mind map or list of everything you can think of that links to your title. Present this as you wish, but break down everything you think of. For example: Close up -> Nature -> Insects -> Nests -> Insects carrying things Slides 2 and 3. Pages of photographs of all different types of close up things that inspire you. Add a sentence next to each image that explains briefly what it is that you like about the image - for higher marks try to refer to the formal elements and other things you have learnt so far in photography. Save your PowerPoint Change the name of your 'first photoshoot' page to Project 1: Close Up Save your PowerPoint as a JPEG then upload to the top of your close up page using a Slideshow element. 
 Main homework
Research what a macro setting is for on your camera and how it is used. Under your powerpoint, add a title 'Homework research' then write a paragraph underneath to explain what you have learnt from your research. You might want to include photo examples or diagrams to support your explanation. Due next lesson. Optional homework - Going for gold- for extra marks/people who want to push themselves Take a range of extra photos of close ups. Try to be creative - don't just take photos of flowers - that's what everyone else will do - be different. Do some research for ideas! If you have a macro setting on your camera - use it. Upload these photos under your macro explantion in a gallery before the lesson please - add a title above it of 'Going for Gold Homework' - this is also due this time next week if you choose to do it.  Upload your photos to a gallery on your Journeys page - change the size of your photos to 5/6 columns to it becomes a contact sheet. Add a title above it called 'Pathways'. In between your title and contact sheet, write a brief explanation of the task, how you approached it, where you went etc. Comment on your use of formal elements, composition, lighting etc.  Select your best 4 photographs to edit and load them in Photoshop. Experiment with: Brightness and contrast, curves, levels, hue and saturation, desaturation (if you want to try black and white), filters etc. Aim to demonstrate different Photoshop skills on each photograph.  When you have finished editing, add a title below your contact sheet of 'edited photos' then upload your photos using a 2x2 gallery. Add comments to each photograph, and explain the editing techniques you used in each photo, making sure to use key terminology. Comment on the strengths of each image and potential for further development.  Go to your blog page - start a new blog called 'Pathways'.
Upload your favourite edited photograph and write a brief summary of the strengths, areas for development, what you learnt through this task and what you will aim to improve/do differently in your next photoshoot.. Once this is done, you will each comment on each other's photos on the blog page - what do you like about their work? And can you see any areas for improvement? Aim to comment on one or two of the formal elements so that your feedback is specific.  Make sure your PowerPoint's are uploaded from earlier. Add a title above each one eg. Mind mapping the theme.... Breaking down the title.... Exploring Pathways. Read through the information below. 
 Create a powerpoint to plan for your Pathways photoshoot (detailed in homework below) Include all of the following information, and aim to include at least 2 'drawings' of some kind. I would suggest that you start with composition sketches either by hand or on the computer. - Where you will go to take your photoshoot and why (include pictures of that place if you can!) - What kind of photos are you aiming to take? (include drawings here) How will you creatively photograph pathways? Is there a mood/atmosphere? What lighting will you have? Day or night? What/who is in your photoshoot? What are they doing? Is there a narrative? What might the meaning behind the photos be? How do you want the viewer to read them? How will you ensure variety across your photos? Are there any camera techniques that you have considered using yet? why? How will you consider composition and formal elements? - What is your back up for if these photos don't work?  Photoshoot due Tuesday.
Take 30 photographs of pathways. Ensure a creative approach with consideration of the formal elements and lighting, with reference to your planning. Review each photograph after taking it so that hopefully you will show progress and improve. Either upload the photos to a gallery on your journeys page under your planning before the lesson, or bring in your memory card.  If you have a card reader and your memory card...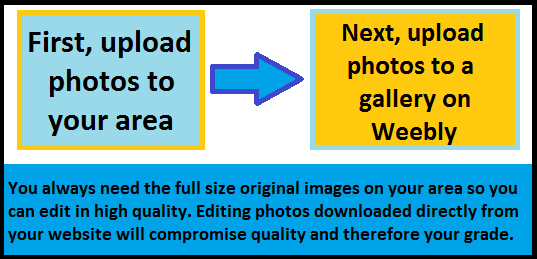 Add a title to your skills development page, followed by a gallery element. Plug in your memory stick or cable so you can access your photos. Save your photos to your area in a folder 'lighting photos'. When finished, pass your card reader/memory card to the next person. Click your gallery icon then upload ALL of your photos (except selfies or silly photos!). This will take a few minutes. Do the opposite task on a word document whilst you are waiting - you will copy and paste it when your photos have uploaded. Click the gallery at the edges so the settings come up. Change the number of columns to 5 or 6 depending on the number of photos you have so they fit more neatly onto the page. Put a title above your gallery called ' Lighting Contact Sheet'. If you are waiting for the card reader or memory card do this whilst you wait...On your skills development page, add a title 'Photoshoot' under the work from last lesson, then a text box below. Write a paragraph to explain the task using the following questions. When writing, always imagine you are talking to the examiner as that is who will read your work! What did you have to do? For this task we had to... What was the purpose of this task? The purpose of the task was to... Explain the different types of lighting that you tried and which ones you found most effective. Give reasons why they were effective. I experimented with different lighting techniques such as... The techniques I found most effective were.... because... Were there any lighting techniques that you found difficult or less effective? Explain your answer. Something I found difficult was... because... Did you have any issues with team work? If so, what were they and how did you overcome them? As a team we.... You will repeat this task for homework - what will you do differently in order to produce better photos? Explain your answer in detail. In order to do better next time, I will...  This lesson you are learning how to create a contact sheet and how to edit the brightness and contrast of your photograph.
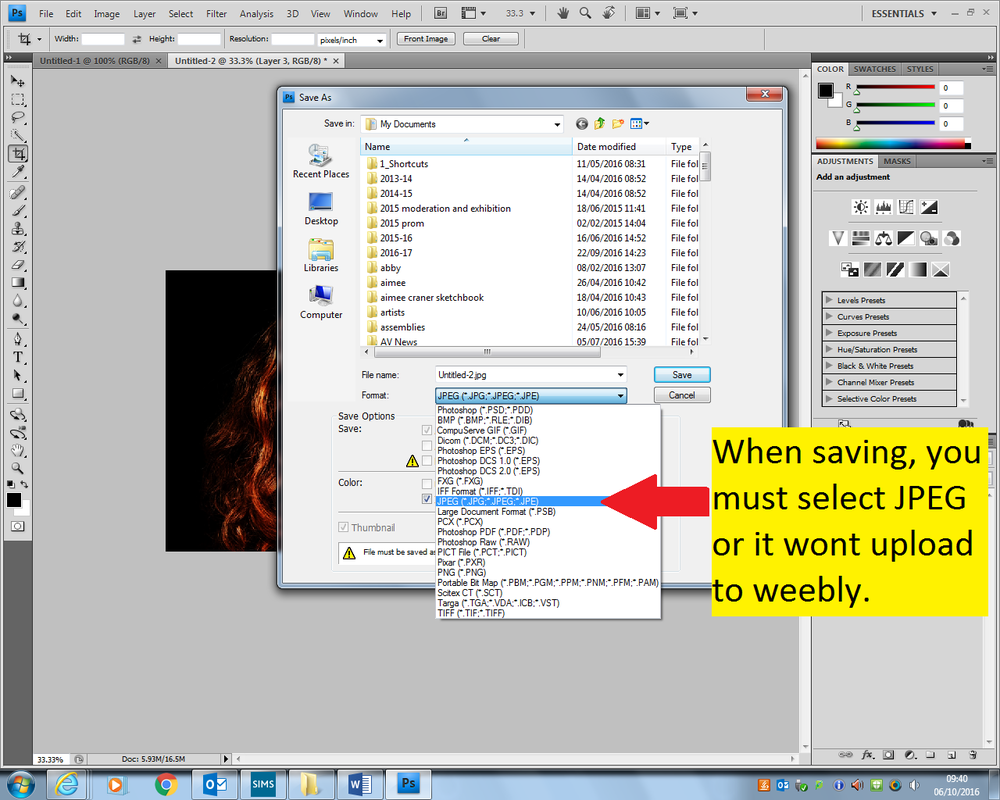
 Open Photoshop then go to Open... then select one of your lighting photos... Basic Edit the brightness and contrast of your image to enhance the lighting and/or shadows. To do this, go to image, adjustments, brightness and contrast Advanced As well as this, experiment with what happens when you alter Levels and Curves. To do this you also need to go to image, adjustments then Levels or Curves. When you are happy with your adjustments, please save your work to your area. Make sure you select the file type JPEG otherwise weebly wont understand the file type. Next, go back to your portfolio, and under the gallery, add a title 'Edited photo' then upload your picture into a large image element underneath. You might want to add the 'before' picture too so that the examiner can see the changes you have made clearly. How to save as a JPEG on photoshop. |


| ADVANCED EDITING Next, select another photo to edit and open it in photoshop. Go to the layers box, then right click and duplicate the later. Desaturate the top layer ( go to image, adjustments, desaturate) then alter the brightness and contrast of this layer only. click the eye icon on the left of this layer to hide it, then click the background layer so it is selected. Alter the hue and saturation, and the brightness and contrast so you have a colourful/bold portrait on the background layer. un-hide the top layer by clicking the eye again, then select this layer so it goes blue. Using the eraser tool on the tool bar, rub out sections of the black and white portrait to reveal the colour underneath! Save as a Jpeg then upload under a title on your skills page 'Going for gold: Colour Splash editing' | 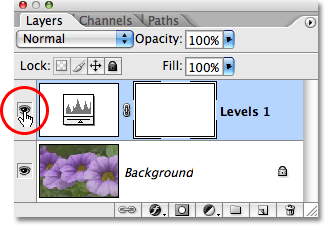 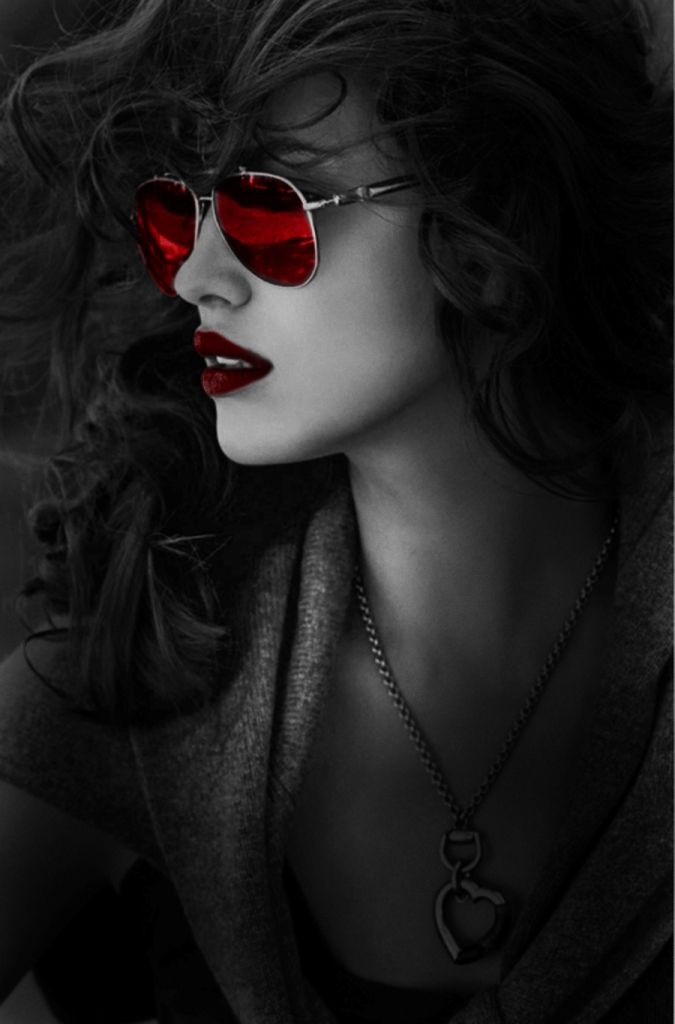 |
Any time you do a going for gold task, put the writing/titles in GOLD!

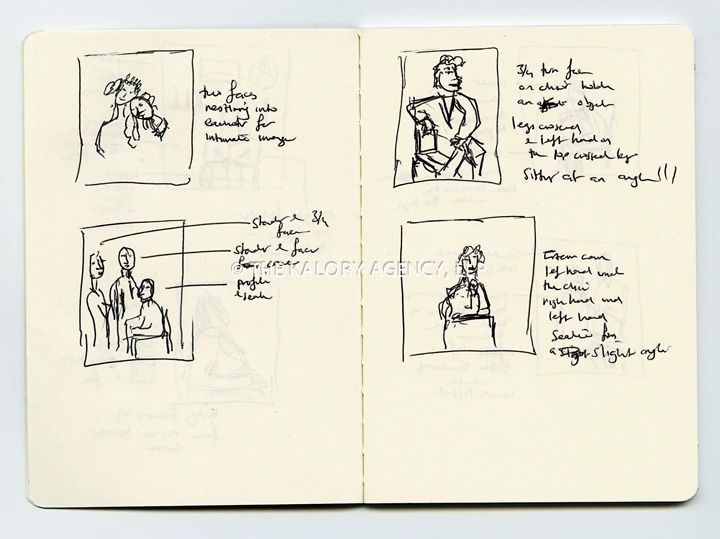
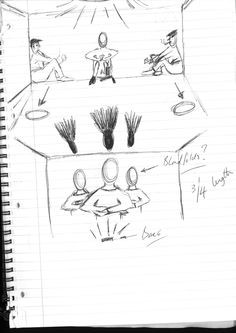
Your homework this weekend is to take at least 15 photos of the same person using different types of lighting. This is due Tuesday.
The purpose of this is to build on what you have learnt today and practice ways of lighting a portrait photograph.
Remember to think about:
- different types of lighting
- composition
- facial expressions
- body position
- close up/full body/unusual angles etc.
- Background and location - indoor/outdoor plain (eg a wall) /patterned background (eg a curtain)
Author
These lessons have been written by Miss Wilson.
Archives
December 2018
November 2018
October 2018
September 2018
June 2018
May 2018
March 2018
February 2018
January 2018
December 2017
November 2017
October 2017
September 2017
July 2017
June 2017
May 2017
April 2017
March 2017
February 2017
January 2017
December 2016
November 2016
October 2016
September 2016
Categories
All
Component 1
Coursework
Skills Development
Year 10
Year 11
Year 12
Year 13
 RSS Feed
