The final 40% of your grade...You have less than three months to develop your final project. Use the information below to help you to work in lessons and independently.
The most important thing that you need to do is organise your time effectively so that you keep on top of your work as this project is going to go very quickly! Examiners are looking for quality but also quantity to some extent in order for you to show enough progression of ideas within your work. |
|
Exam Dates 2020
Mock Exam: 12th March
Final Exam: 5, 6, 7th May
Mock Exam: 12th March
Final Exam: 5, 6, 7th May
How are you marked?
All work will be handed in on the first day of the exam. You are not allowed access to your exam project outside of the exam time after it has started, so your website will be locked.
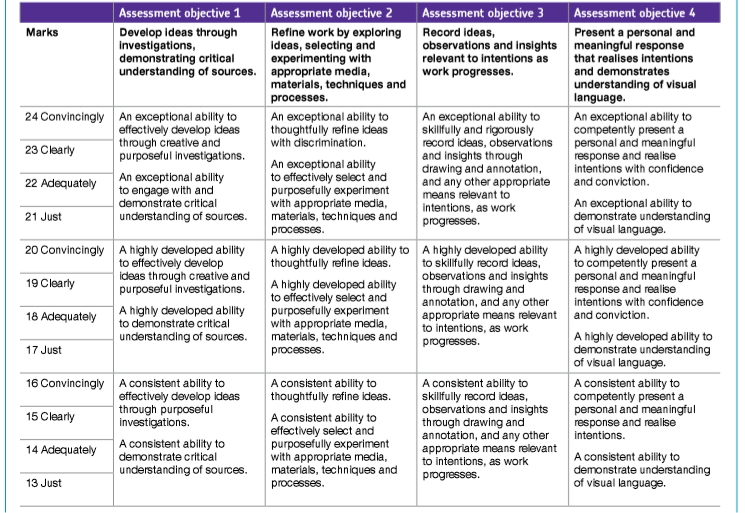
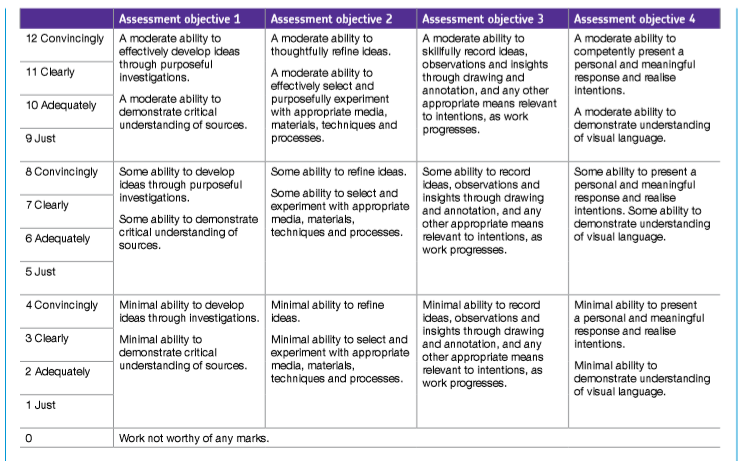
All work will be moderated my your teachers and marks submitted the week after your exam has taken place, using the criteria below which you should be familiar with. An external moderator will then check our marks.
All work will be moderated my your teachers and marks submitted the week after your exam has taken place, using the criteria below which you should be familiar with. An external moderator will then check our marks.
|

|
Timeline
Support for the exam questions
Read the titles carefully.
Carry out research before making a decision.
When choosing, think about all of the possibilities... choose something that captivates you!
What will you photograph, how and where? If the answer is something you don't have easy access to it might be the wrong title for you...
Carry out research before making a decision.
When choosing, think about all of the possibilities... choose something that captivates you!
What will you photograph, how and where? If the answer is something you don't have easy access to it might be the wrong title for you...


Read your exam paper. This is yours to keep - you can highlight and make notes on it.

Independent research
Carry out general research into each exam question that interests you. Make notes on your exam paper of anything that interests you, and start copying any images that you might want to come back to later onto a powerpoint, making a note of the artists names etc.
Consider:
- Things you could photograph
- Concepts/meanings that could be explored
- Places you could go to take photos
- Photography techniques
- Editing techniques
Choose your title carefully - you cant change it once making a decision - there isn't enough time!

Continue to research if you need to in order to make a fully informed decision by next lesson.
Continue to finish working on your essays so your coursework can be moderated asap.
Continue to finish working on your essays so your coursework can be moderated asap.


Decide on a title then complete the following:
Create a collage of initial ideas, full of inspiring images that link to what you might do for this project. What are you planning to do? Make notes on the collage that link to your specific ideas.
Create a new page called Component 2: Question Title
Upload your collage.
Create a collage of initial ideas, full of inspiring images that link to what you might do for this project. What are you planning to do? Make notes on the collage that link to your specific ideas.
Create a new page called Component 2: Question Title
Upload your collage.

Write an initial 'statement of intent' below your collage and mindmap.
Write a paragraph to explain your ideas for the project. What will you explore? What do you plan to focus on? What will you photograph? You can update this later in the project – it still has to be relevant at the end of all of your experiments etc. If things change, you just need to remember to update your paragraph.
Write a paragraph to explain your ideas for the project. What will you explore? What do you plan to focus on? What will you photograph? You can update this later in the project – it still has to be relevant at the end of all of your experiments etc. If things change, you just need to remember to update your paragraph.


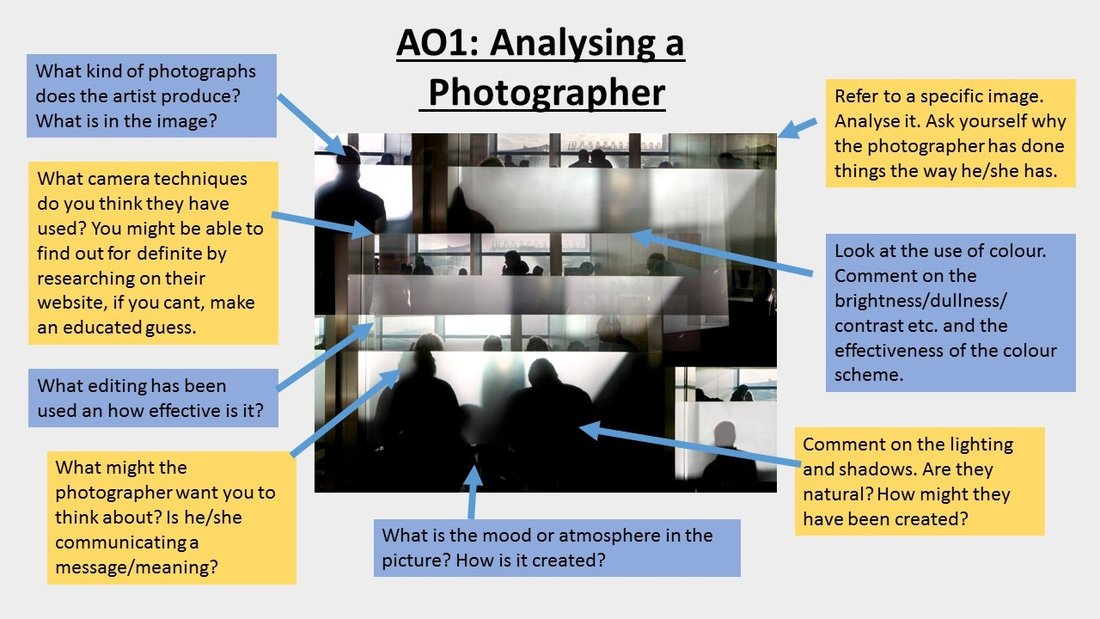
RECAP: How do you analyse a photographer? And what is important when choosing a photographer to inspire your ideas?

You now need to find THREE artists to inspire your ideas.
As you know, 25% of your marks come from artist research and using artists to inspire your ideas. Choose your artists carefully as you will spend the next few weeks working in their style. You should also consider how you will combine their styles, as you will need to do a lot of this!
Things to consider when choosing your artists in order to be successful:
- Do you really like their work? If not - don't choose them!
- Do you have lots of ideas for your own work inspired by their style?
- Are the artist's style and techniques a suitable level of challenge for you? Not too easy/too hard.
- Are they a professional photographer? The photographer you choose should have their own website and multiple images. Be careful not to choose a students work as you cant reference them in your project.
- Do the artists work well together? Are they different enough to each other to make sure that you can show a range of skills? Eg. not both black and white. Can you think of different ways to combine their styles? This is important!

Your task is to write an analysis about the work of your chosen photographers and the way they photograph your chosen subject. You should include:
- photographs of the work that inspires you
- key information about their work from the things you have read about (not the photographer but the work itself)
- Your own observations and analysis of the photography techniques and formal elements that you see - eg. how does the photographer use composition, lighting, line, shape, tone etc? What does the photographer want you to think about? What might the meaning behind the work be?
- Your own justified opinion and explanation of how you will take inspiration from their work.
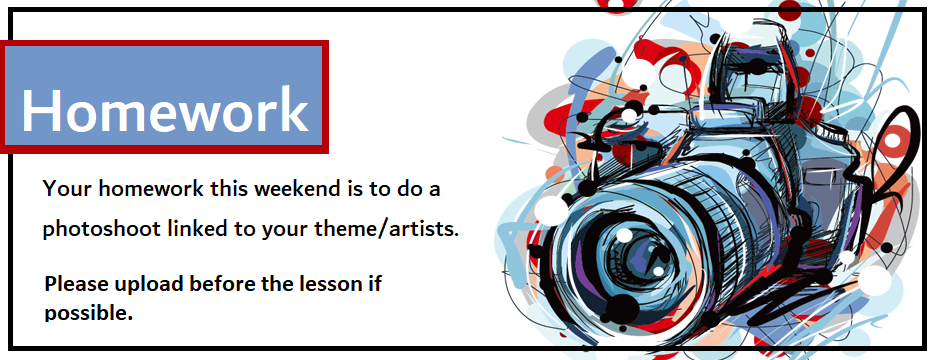


Upload your HW photos - split them into the three artists - don't upload them all in one gallery.
2 minute discussion: How did your photos turn out? How will you edit in the styles of your photographers?
2 minute discussion: How did your photos turn out? How will you edit in the styles of your photographers?

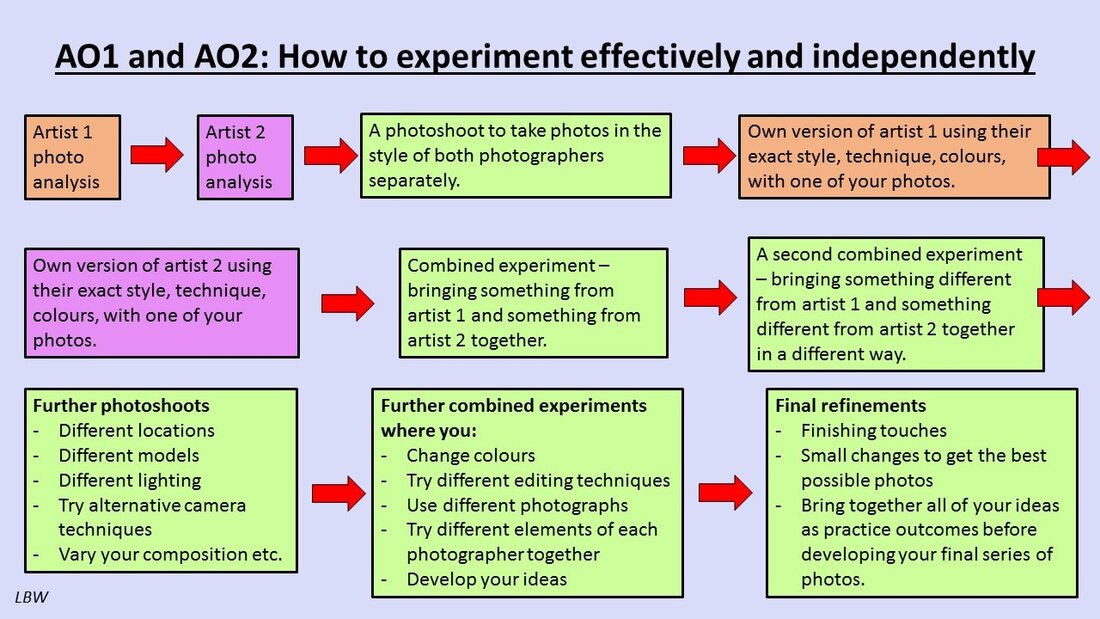
AO1/AO2 : Editing and experimenting in the style of your photographers.

Create an initial edit or two in the style of each photographer.
Upload and evaluate as you go along. Refer to the image below to remind you how to develop effectively within AO1 and AO2.
Upload and evaluate as you go along. Refer to the image below to remind you how to develop effectively within AO1 and AO2.
What to do next?
Plan out your next photoshoot... ready for this week's homework.
Plan using sketches, story boards, notes, mind maps etc. to produce new photographs to work with in the experiments. Make sure you document that you have considered a range of:
- Locations
- Focal points
- Viewpoints and angles
- Camera techniques such as shutter speed, macro etc.
- Formal elements
- Composition
- Lighting
- Photo editing
- Hand manipulation


1. Upload your planning pages
2. Upload your new photoshoot
2. Upload your new photoshoot

AO1/2 begin to combine the styles of your photographers creatively.

Produce a range of experimental edits, combining the styles of each photographer in different ways.
Try to vary:
- the image you edit
- editing techniques
- combine different elements of each photographer with each edit
- skills that you are demonstrating - composition, viewpoint, lighting etc.
Upload your edits as you go along.
Try to vary:
- the image you edit
- editing techniques
- combine different elements of each photographer with each edit
- skills that you are demonstrating - composition, viewpoint, lighting etc.
Upload your edits as you go along.

Evaluate your edits using technical language.
Focus on strengths, weaknesses, HOW your image has been inspired by photographers and HOW your ideas have developed as a result of each edit. Where will you go next and why etc?
Focus on strengths, weaknesses, HOW your image has been inspired by photographers and HOW your ideas have developed as a result of each edit. Where will you go next and why etc?


If you had to produce a series of outcomes based on your work so far, what would they look like??

For your mock exam on the 12th of March you will be required to produce a series of 3 images to bring together your ideas so far.
To be successful:
- Combine the ideas/techniques of both photographers
- Do this creatively and purposefully
- Demonstrate the best of your ability
- Consider how the images will work together as a series.
Be purposeful and methodical in your editing, refining each time in order to show progress
Review using technical terms to explain what you did

Upload each edited photograph - full size if successful, half size if you don't think it is that effective.
Below each photo, review:
How did you edit in the style of your two photographers? What are the strengths? How will you develop in the next edit?
To edit this image in the style of my two photographers I...
Something that works well is...
On my next experiment, I will develop my ideas further by...
Going for gold: Use technical language and be reflective on your skills and areas for improvement - but don't be too critical!


Planning for your photography mock
Your mock exam will be on Thursday the 8th of March.
Mock overview:
P 1,2,3,4 - you will be asked to create two or more mini outcomes that bring together your ideas so far. You will work independently and in silence during this section of the mock exam. You will upload and review at the end of p4.
Whilst you are working, Miss Wilson will talk to each of you and do A-level style one to one tutorials, to help you plan for the time you have remaining before the real exam (30th April - 34 school days after the mock exam!).
P5+6 - you will have this time to go back over previous work to ensure that everything is finished off and to start on the next section of your project, following your tutorials.

Create a powerpoint to plan for your mock exam. Include the following:
- A photoshoot plan - what images do you need to take before the exam, how and where will you take them etc. Use specific photography terms and camera techniques (eg. composition, lighting, shutter speed...)
- An editing plan - how many edits will you do (2 or more), how will you edit, how will they combine your artists styles etc. Use specific photoshop terms.

Before you upload your powerpoint, show it to the person next to you and get feedback on areas you could improve. Make note of these in your red book on the sheet.
Make improvements, upload your completed powerpoint then complete the response to mission section of the peer assessment sheet in your red book.
Make improvements, upload your completed powerpoint then complete the response to mission section of the peer assessment sheet in your red book.

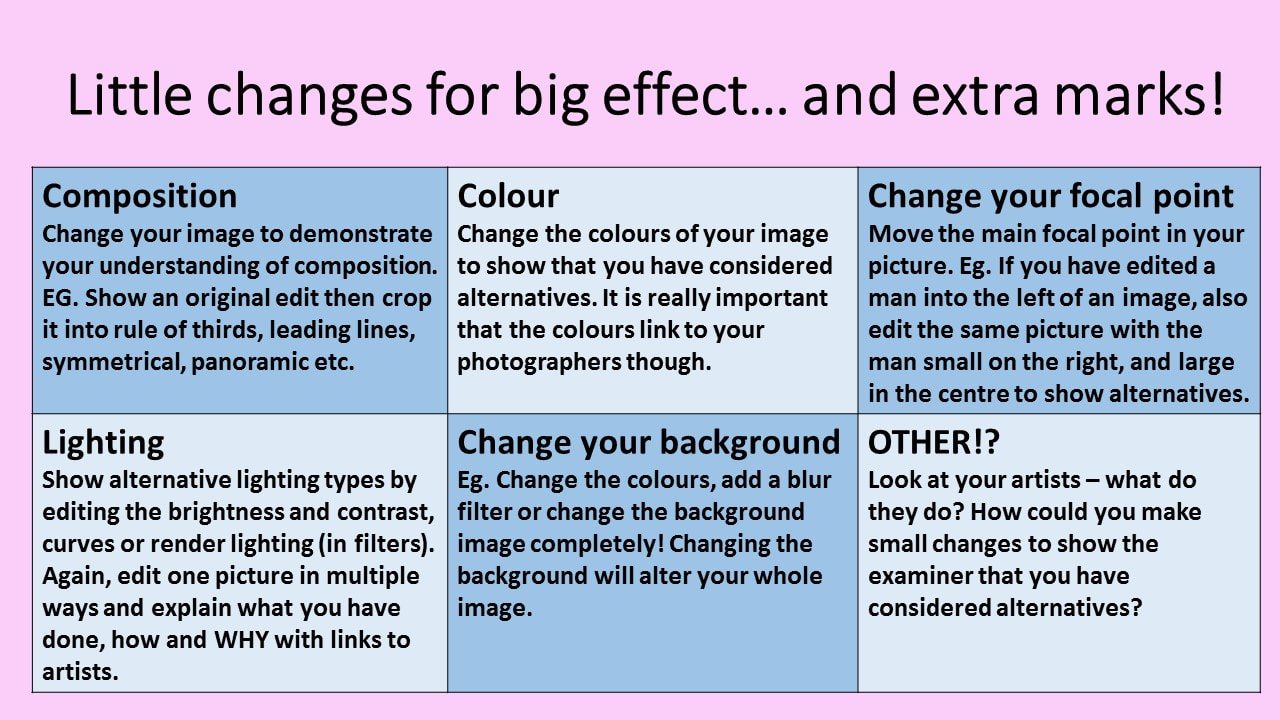
You might also want to consider showing alternatives to the edits you have done so far for extra marks - see the example below...


A lot of you only have 6 lessons left until the Photography exam:
First set of exams: 30th April, 3rd and 4th of May
Second set of exams: 8th, 10th, 11th May
Hopefully we will have a stop day on Thursday the 26th but this is not definite yet.
Key info:
1. People doing the exam on the 30th/3rd/4th – you will have to complete your exam AND Coursework projects by the end of the third day of the exam. There may be the chance for one or two extra lessons on coursework, but don’t rely on this – a lot of you will miss lessons the following week for the art exam.
2. You must have all photos that you need ready for the first day of the exam.
3. All writing must be black for your two projects, then anything completed in the exam must be red, including titles on exam edits.
4. Your accounts will be disabled on the final day of your exam so you cannot work on them at home. You will be able to add one or two more bits if needed up until the final deadline of 3pm 11th May.
5. All work will be marked on the 14th to 16th of May.
6. In OCTOBER – you may request your account to be transferred into your own email address by emailing me, or if you are continuing with Photography at A-level your account will be unlocked in September.

Your task for today, and Homework due Thursday – is to plan your exam series. Please do this
Whether you are finished with other things or not – you can come back to anything incomplete later. After completing your planning, you will finish things off, then experiment and practice ready for your final exam pieces.
- What will your final 3-5 images be?
- How will you edit them?
- How will they link as a series?
- What skills will you be demonstrating?
- How will the best of your ideas be brought together at the end of your project?
- How will you link to your 2 or 3 photographers?
You may plan in your choice of the following options:
- Hand drawn plans with notes, then scan
- Powerpoint – combination of photos and notes

Refer to the checklist below for the remaining lessons!

Exam overview
1. Produce your final images - upload with titles above in BLUE 'Final Outcomes'
2. Write an evaluation of the project (in BLUE)
3. Go back and finish off anything incomplete on the exam project. You cannot work on it again after the 10 hours.
4. Totally finished? Go back to coursework!
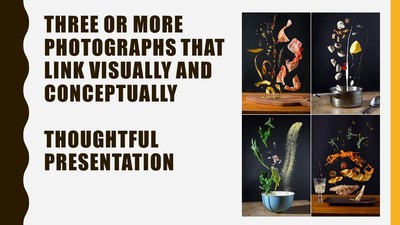
To be successful in AO4 you need to:
- produce a series of images (3 or more) for your project
- your series must bring together all of the best parts of your experiments
- You must include elements of all of the artists you have looked at (most have 2 artists, some of you have 3)
- your series of images must look like they go together - similar techniques, colours etc.
- They might tell a narrative across your images - eg. 3 parts of a story
- Think about how they will be presented - these images will be printed and presented alongside being displayed on your website.
Above anything else, your work must demonstrate the best of your ability.
For a 5 or above, you are aiming to show a consistent ability to competently present a personal and meaningful response and realize intentions, as well as a consistent ability to demonstrate understanding of visual language.
If you are going for gold and aiming higher, the language refers to the level of skill which changes to 'highly developed ability' or an 'exceptional ability'...
2. Evaluation
When your final pieces are finished and uploaded, you need to write an evaluation. This MUST be completed in the exam, so leave time for it. Write it on Word so you can spell check and save, then copy it over when finished. To evaluate, use these questions to help you:
What was the title of your project and how have you developed your project inspired by it? What approach have you taken?
Which artists have inspired your project and how?
What have you experimented with to help you develop your ideas for the project?
What is the idea behind your final series of images and how does it bring together the best parts of your project?
How did you create your final series of images?
What are the overall strengths of your project and why?
What are your areas for development - what do you need to work on in future projects?
If you need sentence starters, use them (copy and paste!), but add plenty to them. No one word answers! Explain yourself fully and expand on your answers as much as you can.
The title of my project was...
I have developed my own individual approach to this title by...
The artists that have inspired my work most are... and... .
Artist 1 has inspired my use of... Artist 2 has inspired the way I...
In order to develop my ideas for this project I experimented with...
After experimenting, I have brought together the best parts of my project to create my final series of images by...
To create my final series of images I...
I chose to work like this because...
Overall, I think the strengths of the project are... because...
The areas that I will need to work on in future projects are... because...
1. Produce your final images - upload with titles above in BLUE 'Final Outcomes'
2. Write an evaluation of the project (in BLUE)
3. Go back and finish off anything incomplete on the exam project. You cannot work on it again after the 10 hours.
4. Totally finished? Go back to coursework!
To be successful in AO4 you need to:
- produce a series of images (3 or more) for your project
- your series must bring together all of the best parts of your experiments
- You must include elements of all of the artists you have looked at (most have 2 artists, some of you have 3)
- your series of images must look like they go together - similar techniques, colours etc.
- They might tell a narrative across your images - eg. 3 parts of a story
- Think about how they will be presented - these images will be printed and presented alongside being displayed on your website.
Above anything else, your work must demonstrate the best of your ability.
For a 5 or above, you are aiming to show a consistent ability to competently present a personal and meaningful response and realize intentions, as well as a consistent ability to demonstrate understanding of visual language.
If you are going for gold and aiming higher, the language refers to the level of skill which changes to 'highly developed ability' or an 'exceptional ability'...
2. Evaluation
When your final pieces are finished and uploaded, you need to write an evaluation. This MUST be completed in the exam, so leave time for it. Write it on Word so you can spell check and save, then copy it over when finished. To evaluate, use these questions to help you:
What was the title of your project and how have you developed your project inspired by it? What approach have you taken?
Which artists have inspired your project and how?
What have you experimented with to help you develop your ideas for the project?
What is the idea behind your final series of images and how does it bring together the best parts of your project?
How did you create your final series of images?
What are the overall strengths of your project and why?
What are your areas for development - what do you need to work on in future projects?
If you need sentence starters, use them (copy and paste!), but add plenty to them. No one word answers! Explain yourself fully and expand on your answers as much as you can.
The title of my project was...
I have developed my own individual approach to this title by...
The artists that have inspired my work most are... and... .
Artist 1 has inspired my use of... Artist 2 has inspired the way I...
In order to develop my ideas for this project I experimented with...
After experimenting, I have brought together the best parts of my project to create my final series of images by...
To create my final series of images I...
I chose to work like this because...
Overall, I think the strengths of the project are... because...
The areas that I will need to work on in future projects are... because...

*Is your website examiner ready? Click the link then check your homepage.
*Is everything that you completed in the exam put in red? Red text and titles above edits.
*Have you saved all of your outcomes (for all projects!) in the student submission folder on the shared area (in photography)? Save all final photos for all 3 projects as your full name eg. Miss Wilson 1, Miss Wilson 2.
*Is your coursework finished?
*Is the overall presentation effective? Could anything look better for the examiner?
*Have you checked your spellings, capital letters, punctuation etc? Double check it – ask a friend to check too!
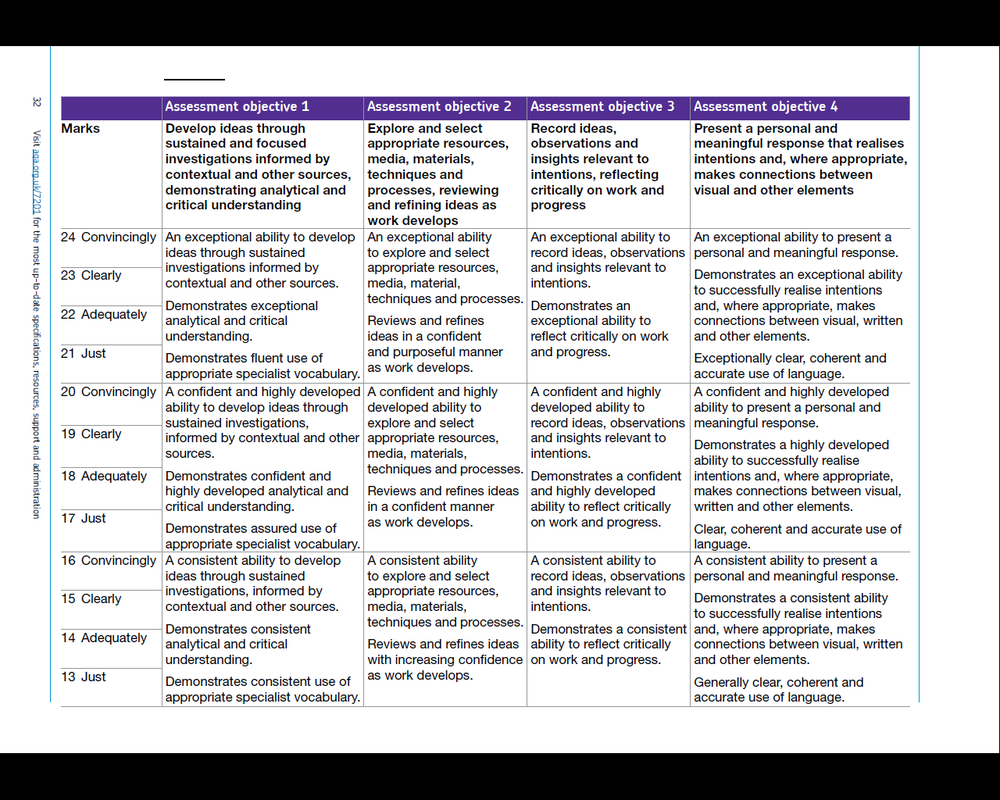
Marking Criteria
Grade boundaries
Due to this being a new specification, we do not have any previous grade boundaries for comparison. Any predicted grades are approximate based on previous specifications and should only be used as a guide.
All students work is marked by at least two teachers, including Miss Wilson, and your marks are debated and discussed at length before being submitted to the exam board. After receiving the marks, the exam board will send a moderator to moderate the work and check that they agree with our marking. Because of this, we obviously take a lot of time to ensure that your marks are accurate!!
All students work is marked by at least two teachers, including Miss Wilson, and your marks are debated and discussed at length before being submitted to the exam board. After receiving the marks, the exam board will send a moderator to moderate the work and check that they agree with our marking. Because of this, we obviously take a lot of time to ensure that your marks are accurate!!
