 Open your website, and show your Close Up page to the person next to you. Explain your plans for your final piece to them. Can they see the links to your previous work? Can they see links to both photographers? Do they have any ideas to help you get higher marks? Discuss each others work before moving on to the main task.  Read your feedback about your final artist. Make improvements where suggested. Make sure you respond in your feedback book.  Edit your final outcomes as planned on your powerpoint. If you havent finished your powerpoint, click here for last lesson. Remember, you should have 3 to 5 edited photos. When you finish, add a title of 'Final Outcomes' to the bottom of your Close Up page. Use a single image element to upload each photo separately, full size. Use a spacer element under each photo to give a little gap in between each picture.  The final part of all art and photography projects is an evaluation of the finished project. Use the questions and/or sentence starters to help you with this, and refer to the example of an A* evaluation to see a high standard example. Write this on Word so that you can use the spell check and save as you go along, then copy and paste it onto the bottom of your Close Up page under the title under 'Project Evaluation'.
A* Example I used a Nikon DLSR to take the bulk of my images. Through the use of an interchangeable lens (18-55mm & 70-300mm), I achieved a diverse range of shots, from wide angle, to close up and zoomed in. After I had taken a number of starting points, I used Adobe Photoshop 7.0 to develop the photographs in the style of my main artist. Through the use of layers and filters, I built up photo-realistic images that have both a sense of both surrealism and believability. Once one final outcome was completed, I felt compelled to create more: six in total. Each one was a slow process, averaging about 5-7 hours each. Patience and an eye for detail made my work successful, taking the time to cut and paste every part of the image to build up something that was visually interesting to the viewer. The photographers that influenced me include Jim Kazanjian who creates impossible landscape images that could never exist in the real world. Through the use of Photoshop, he uses stock images to build up surreal architectural forms. These are comprised from his imagination and demonstrate no reference to architectural forms throughout history – and this I find is what is so appealing. I also chose Jerry Uelsmann because I enjoy how complicated his work appears to be. I was drawn to his work because his photographs are not the kind that one would typically see. He is great within the darkroom and with composite photographs. He creates incredible surreal landscapes. Through the use of traditional techniques, he has shown what is possible within the darkroom. And finally, although M.C Escher is a graphical artist (and I had used him in my previous project) I still felt he was relevant to this particular exam question. Through a combination of tessellation and manipulation of angles, Escher builds up surreal forms that could never exist in the real world. His pieces are wildly complex, and form a geometric puzzle for the viewer. This complexity was translated into my own work, through the use of photography and Photoshop. Black and white was important to achieve the desired effect. I found with colour there was too much going on and it didn’t seem as convincing. However, I experimented and de-saturated the images, making them more believable, bringing every individual image together as one. The black and white adds a certain atmosphere to every image – there is a sense of mystery and wonder in the images. Many structures within my images were built from scratch. I do not live near the sea, so I had to come up with new and creative solutions. I took pictures of scaffolding and lampposts to build up piers and other structures. I went to old ruins, such as Croxden Abbey, which provided me with crumbling stone and the arches. Many of the seascape images were taken while on holiday in the summer, in and around Whitby, North Yorkshire. I didn’t know what to do with this bank of images, however when I thought of this project, these were the perfect resources for a starting point.  At the end of the project, we need a paper copy of all of your work from this project (this will probably be 15-20 pages!). The easiest way to do this is: - press update then open the link to your website - open your Close Up page - right click then Print Preview - Follow instructions in the images below: 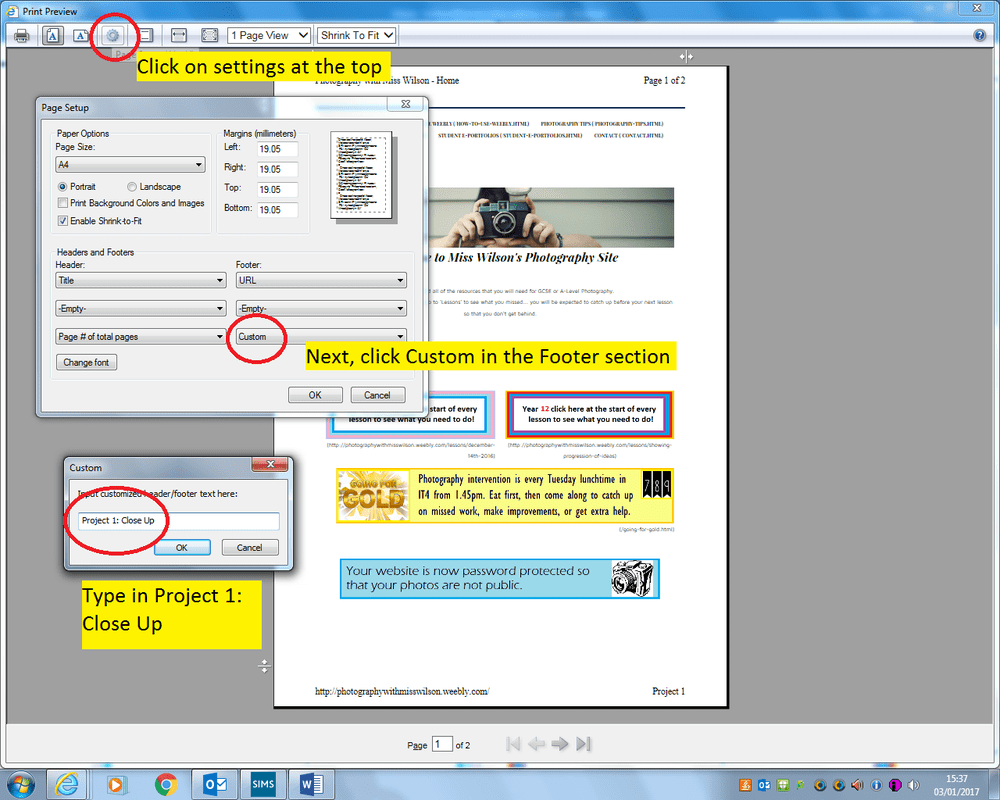 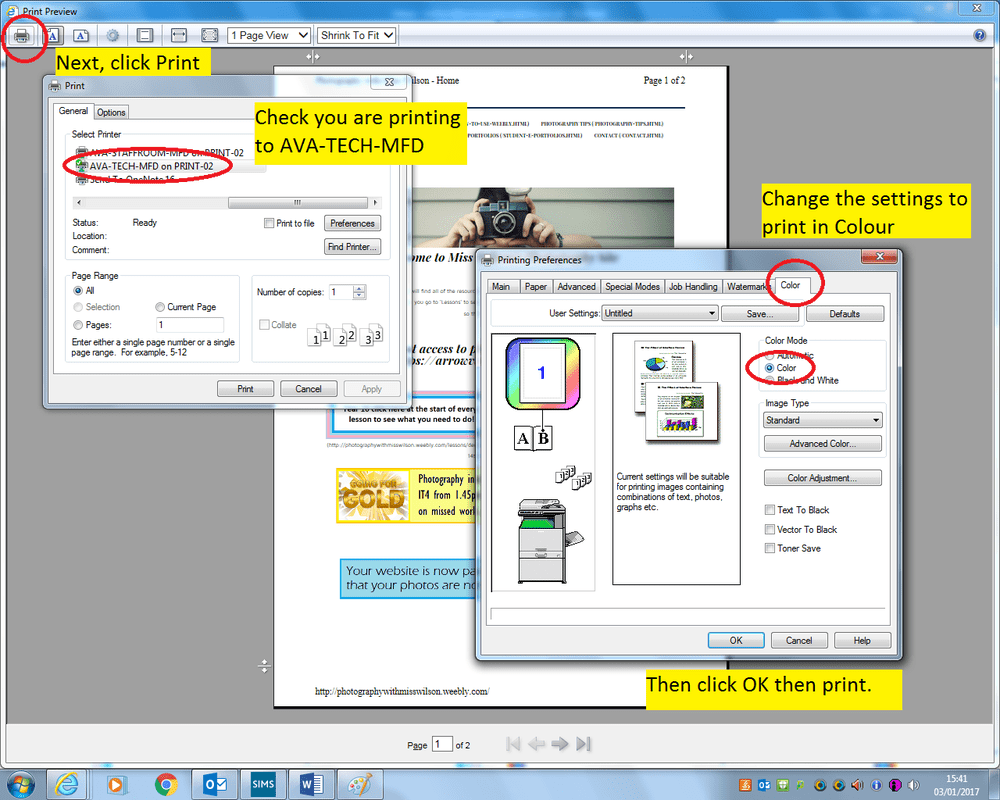 Next, you need to print all of your PowerPoints for the Close Up project. Print to MFD Tech again and select colour if you'd like them to be in colour. Full page slides - double sided is fine. Finally, you need to print your final images - each one full page (A4). To do this: - open the folder with the JPEGs saved - Hold down shift then click all of your final images - click print at the top of the window - check it is the AVA TECH MFD Printer - go to printer properties and change to colour and one sided - press print  To prepare to start the next project, write a review of what you have learnt through the Close Up project. Write a new blog post - title: Tips for success Write a list of things that you need to do on the next project in order to produce the best possible project. Try to include a tip for each of the different stages of a project (copy and paste the list then add to each section if you need help getting started!) - Research - Developing ideas - Taking photos - Editing photos - Using artists - Experimenting independently - Creating outcomes - Evaluating your work  This task will get you ahead on the next project which is based on the human figure. Start researching photography linked to this and keep a record of your research on a powerpoint. You might like to research: - portrait photographers - tips for taking portrait photographs - portrait lighting techniques - ways of showing emotion, mood or an atmosphere in portrait photographs - surreal or creative portrait photography examples Collect as much information as possible as it will help you on the next project.  Anything that is incomplete needs to be finished by Thursday's lesson please, so that your work can be printed and marked.
0 Comments
Leave a Reply. |
AuthorThese lessons have been written by Miss Wilson. Archives
December 2018
Categories
All
|
 RSS Feed
